Transferring (Dubbing) | DVD VHS |
|
|
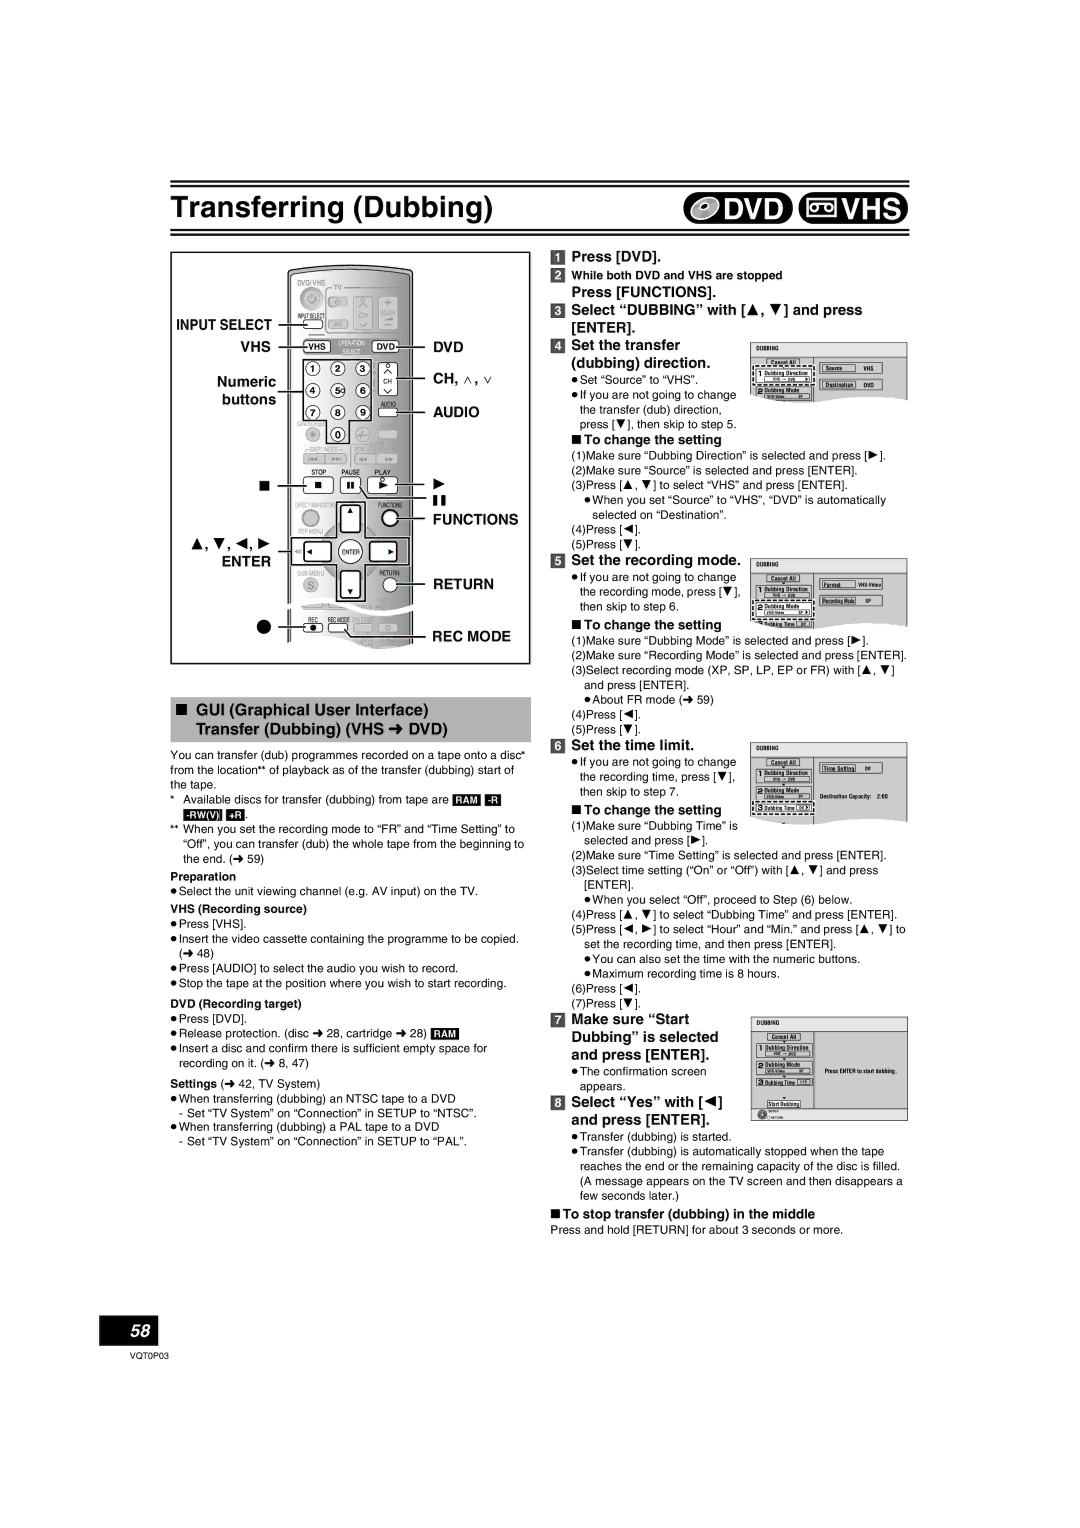
INPUT SELECT
VHS
Numeric buttons
∫
3, 4, 2, 1
ENTER
µ
DVD/ VHS | TV |
| |
INPUT SELECT | CH | VOLUME | |
| |||
| AV |
| |
VHS | OPERATION | DVD | |
SELECT | |||
|
| ||
|
|
| AUDIO |
CANCEL/RESET | |
SKIP/ INDEX | SLOW/ |
REW SEARCH FF | |
| PLAY |
DIRECT NAVIGATOR |
| FUNCTIONS | |
TOP MENU |
|
|
|
SUB MENU |
|
| RETURN |
S | DISPLAY | STATUS | TIME SLIP |
PROG/CHECK | JET REW | ||
PROG/CHECK |
|
| TIME SLIP |
DISPLAY | STATUS | JET REW | |
REC | REC MODE DVD ERASE | TIMER | |
DUBBING | CREATE | F Rec | |
CHAPTER | |||
VHS | DVD |
|
|
A | B | C |
|
DVD
CH, W, X
AUDIO
1
;
FUNCTIONS
RETURN
REC MODE
[1]Press [DVD].
[2]While both DVD and VHS are stopped
Press [FUNCTIONS].
[3]Select “DUBBING” with [3, 4] and press [ENTER].
[4] | Set the transfer | DUBBING |
|
|
| (dubbing) direction. | Cancel All |
| |
|
| Source | VHS | |
| ≥Set “Source” to “VHS”. | Dubbing Direction |
| |
| VHS | DVD |
| |
|
| Destination | DVD | |
| ≥If you are not going to change | Dubbing Mode |
| |
| SP |
| ||
|
|
|
| |
| the transfer (dub) direction, |
|
|
|
| press [4], then skip to step 5. |
|
|
|
∫To change the setting
(1)Make sure “Dubbing Direction” is selected and press [1]. (2)Make sure “Source” is selected and press [ENTER]. (3)Press [3, 4] to select “VHS” and press [ENTER].
≥When you set “Source” to “VHS”, “DVD” is automatically selected on “Destination”.
(4)Press [2]. (5)Press [4].
[5] Set the recording mode. DUBBING |
|
| |
≥If you are not going to change | Cancel All | Format | |
the recording mode, press [4], |
| ||
Dubbing Direction |
| ||
VHS DVD | Recording Mode | SP | |
then skip to step 6. |
| ||
Dubbing Mode |
| ||
∫To change the setting | SP |
| |
Dubbing Time | Off |
| |
(1)Make sure “Dubbing Mode” is selected and press [1]. (2)Make sure “Recording Mode” is selected and press [ENTER]. (3)Select recording mode (XP, SP, LP, EP or FR) with [3, 4]
and press [ENTER].
∫GUI (Graphical User Interface) Transfer (Dubbing) (VHS l DVD)
You can transfer (dub) programmes recorded on a tape onto a disc° from the location°° of playback as of the transfer (dubbing) start of the tape.
°Available discs for transfer (dubbing) from tape are [RAM]
°°When you set the recording mode to “FR” and “Time Setting” to “Off”, you can transfer (dub) the whole tape from the beginning to the end. (l 59)
Preparation
≥Select the unit viewing channel (e.g. AV input) on the TV.
VHS (Recording source) ≥Press [VHS].
≥Insert the video cassette containing the programme to be copied. (l 48)
≥Press [AUDIO] to select the audio you wish to record.
≥Stop the tape at the position where you wish to start recording.
DVD (Recording target)
≥Press [DVD].
≥Release protection. (disc l 28, cartridge l 28) [RAM]
≥Insert a disc and confirm there is sufficient empty space for recording on it. (l 8, 47)
Settings (l 42, TV System)
≥When transferring (dubbing) an NTSC tape to a DVD
-Set “TV System” on “Connection” in SETUP to “NTSC”. ≥When transferring (dubbing) a PAL tape to a DVD
-Set “TV System” on “Connection” in SETUP to “PAL”.
≥About FR mode (l 59) (4)Press [2].
(5)Press [4].
[6] | Set the time limit. |
|
|
|
|
|
|
|
|
| DUBBING |
|
|
|
|
| |||
| ≥If you are not going to change |
|
| Cancel All |
|
|
|
|
|
|
|
|
|
|
|
| Time Setting | Off |
|
| the recording time, press [4], |
| Dubbing Direction |
|
|
|
| ||
|
|
| VHS DVD |
|
|
|
|
| |
| then skip to step 7. |
| Dubbing Mode |
| Destination Capacity: 2:00 | ||||
|
|
|
| SP |
| ||||
| ∫To change the setting |
|
|
|
|
|
|
|
|
|
| Dubbing Time | Off |
|
|
|
| ||
| (1)Make sure “Dubbing Time” is |
|
|
|
|
|
|
|
|
|
|
|
|
|
|
|
|
| |
| selected and press [1]. |
|
|
|
|
|
|
|
|
| (2)Make sure “Time Setting” is selected and press [ENTER]. | ||||||||
| (3)Select time setting (“On” or “Off”) with [3, 4] and press | ||||||||
| [ENTER]. |
|
|
|
|
|
|
|
|
| ≥When you select “Off”, proceed to Step (6) below. | ||||||||
| (4)Press [3, 4] to select “Dubbing Time” and press [ENTER]. | ||||||||
| (5)Press [2, 1] to select “Hour” and “Min.” and press [3, 4] to | ||||||||
| set the recording time, and then press [ENTER]. | ||||||||
| ≥You can also set the time with the numeric buttons. | ||||||||
| ≥Maximum recording time is 8 hours. |
|
|
|
|
| |||
| (6)Press [2]. |
|
|
|
|
|
|
|
|
| (7)Press [4]. |
|
|
|
|
|
|
|
|
[7] | Make sure “Start |
|
|
|
|
|
|
|
|
| DUBBING |
|
|
|
|
| |||
| Dubbing” is selected |
|
| Cancel All |
|
|
|
|
|
| and press [ENTER]. |
|
| Dubbing Direction |
|
|
|
| |
|
|
| VHS DVD |
|
|
|
|
| |
|
|
|
|
|
|
|
|
| |
| ≥The confirmation screen |
|
| Dubbing Mode |
| Press ENTER to start dubbing. | |||
|
|
| SP |
| |||||
|
|
|
|
|
|
|
|
|
|
| appears. |
|
| Dubbing Time | 1:15 |
|
|
|
|
|
|
|
|
|
|
|
|
| |
[8] | Select “Yes” with [2] |
|
|
|
|
|
|
|
|
|
| Start Dubbing |
|
|
|
|
| ||
| and press [ENTER]. |
|
| ENTER |
|
|
|
|
|
|
|
| RETURN |
|
|
|
|
| |
≥Transfer (dubbing) is started.
≥Transfer (dubbing) is automatically stopped when the tape reaches the end or the remaining capacity of the disc is filled. (A message appears on the TV screen and then disappears a few seconds later.)
∫To stop transfer (dubbing) in the middle
Press and hold [RETURN] for about 3 seconds or more.
58
VQT0P03