Getting started
∫ Connecting an amplifier or system |
| ∫ To enjoy even higher fidelity |
component |
|
|
| 1 Connection to the S Video terminal | |
|
| |
|
|
|
started
1To enjoy
DVD only
DVD only
S VIDEO OUT terminal
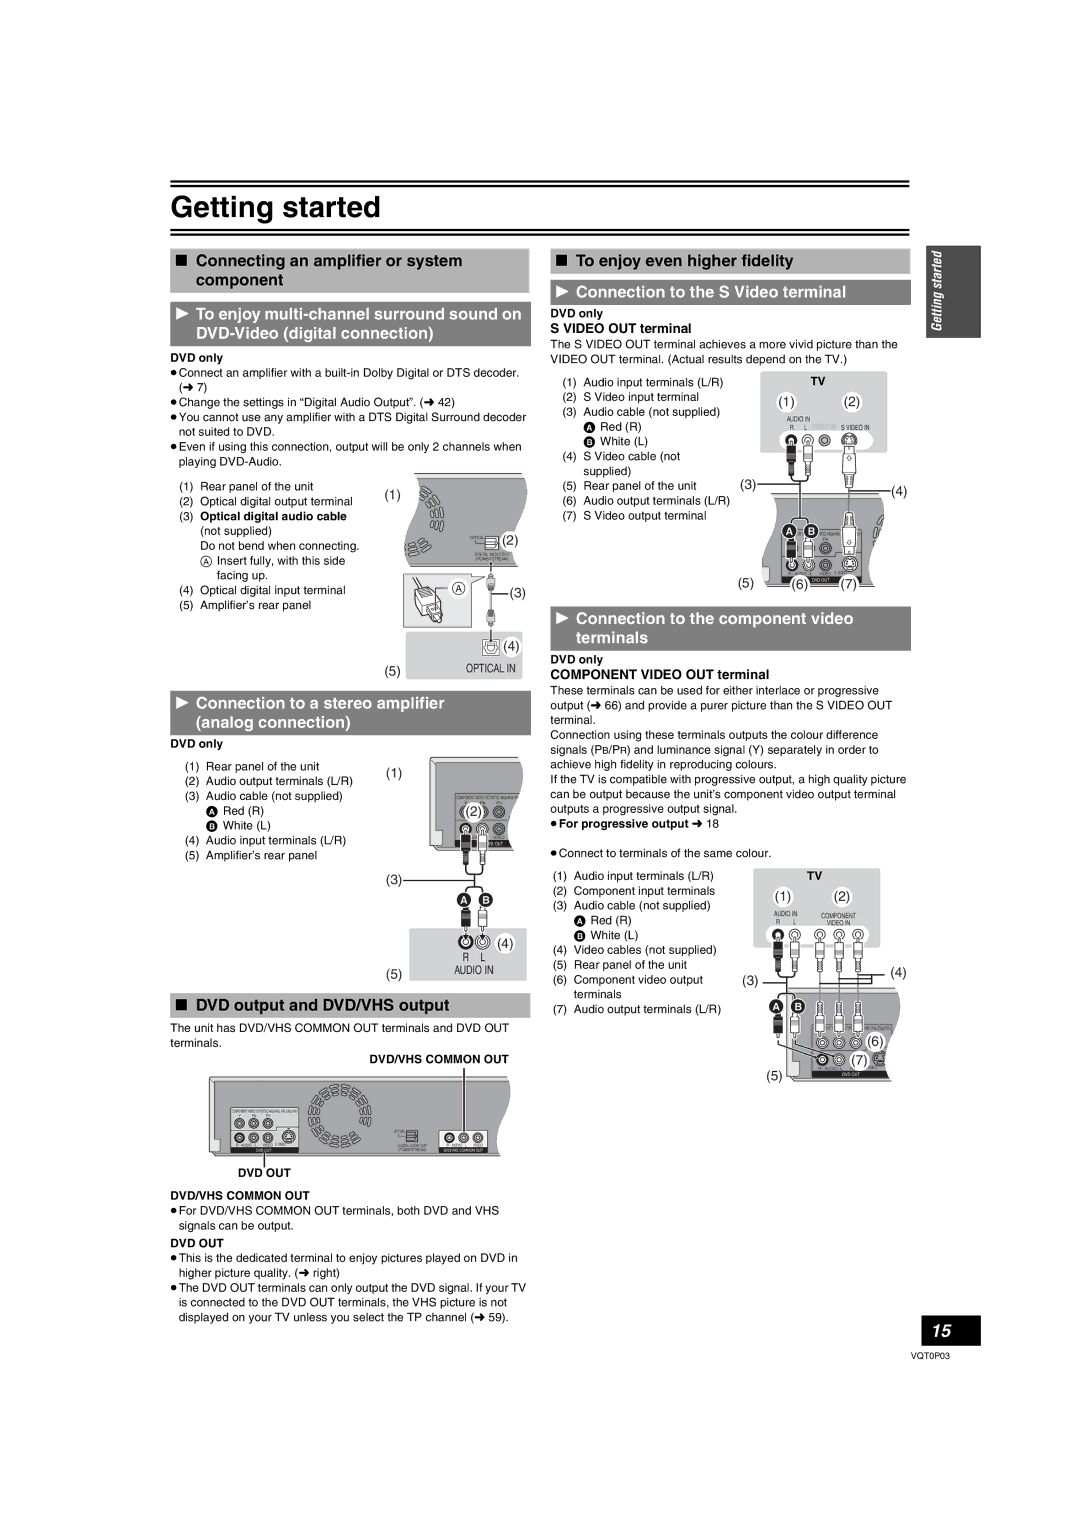
The S VIDEO OUT terminal achieves a more vivid picture than the VIDEO OUT terminal. (Actual results depend on the TV.)
Getting
≥Connect an amplifier with a
≥Change the settings in “Digital Audio Output”. (l 42)
≥You cannot use any amplifier with a DTS Digital Surround decoder not suited to DVD.
≥Even if using this connection, output will be only 2 channels when playing
(1) | Audio input terminals (L/R) |
(2) | S Video input terminal |
(3) | Audio cable (not supplied) |
| A Red (R) |
| B White (L) |
(4) | S Video cable (not |
| supplied) |
TV
(1)(2)
AUDIO IN
R L VIDEO IN S VIDEO IN
(1)Rear panel of the unit
(2)Optical digital output terminal
(3)Optical digital audio cable (not supplied)
Do not bend when connecting. A Insert fully, with this side
facing up.
(4)Optical digital input terminal
(5)Amplifier’s rear panel
(1) ![]()
![]()
![]()
![]()
OPTICAL (2)
DIGITAL AUDIO OUT (PCM/BITSTREAM)
A ![]() (3)
(3)
(5) | Rear panel of the unit |
(6) | Audio output terminals (L/R) |
(7) | S Video output terminal |
(3)![]()
![]() (4)
(4)
COMPONENT VIDEO OUT(NTSC:480p/480i, PAL:576p/576i)
| Y PB | PR |
(5) | R - AUDIO - L | VIDEO S VIDEO |
(6) DVD OUT (7) | ||
![]() (4)
(4)
(5)OPTICAL IN
1Connection to the component video terminals
DVD only
COMPONENT VIDEO OUT terminal
1Connection to a stereo amplifier (analog connection)
DVD only
(1) Rear panel of the unit
(1)
(2) Audio output terminals (L/R)
(3) Audio cable (not supplied) A Red (R)
B White (L)
(4) Audio input terminals (L/R)
(5) Amplifier’s rear panel
COMPONENT VIDEO OUT(NTSC:480p/480i, PAL:57
Y PB PR
(2)
R - AUDIO - L VIDEO S VIDEO
DVD OUT
These terminals can be used for either interlace or progressive output (l 66) and provide a purer picture than the S VIDEO OUT terminal.
Connection using these terminals outputs the colour difference signals (PB/PR) and luminance signal (Y) separately in order to achieve high fidelity in reproducing colours.
If the TV is compatible with progressive output, a high quality picture can be output because the unit’s component video output terminal outputs a progressive output signal.
≥For progressive output l 18
≥Connect to terminals of the same colour.
(3)
(5)
∫DVD output and DVD/VHS output
RL
AUDIO IN
(1)Audio input terminals (L/R)
(2)Component input terminals
(3)Audio cable (not supplied) A Red (R)
B White (L)
(4)(4) Video cables (not supplied)
(5)Rear panel of the unit
(6) | Component video output | (3) |
| terminals |
|
(7) | Audio output terminals (L/R) |
|
TV
(1)(2)
AUDIO IN | COMPONENT |
|
|
| ||||
R | L | VIDEO IN |
|
|
| |||
|
|
|
|
|
|
|
|
|
|
|
|
|
|
|
|
|
|
|
|
|
|
|
|
|
|
|
|
|
|
|
|
|
|
|
|
|
|
|
|
|
|
|
|
|
|
|
|
|
|
|
|
|
|
|
|
|
|
|
|
|
|
|
|
|
|
|
|
|
|
|
|
|
|
|
|
|
|
|
|
|
|
|
|
|
|
|
|
|
|
(4)
The unit has DVD/VHS COMMON OUT terminals and DVD OUT |
| COMPONENT VIDEO OUT(NTSC:480p/480i, PAL:576p/576i) | ||||
|
|
|
|
| Y PB | PR |
terminals. |
|
|
|
|
| (6) |
|
| DVD/VHS COMMON OUT |
|
| (7) | |
|
|
|
| (5) | R - AUDIO - L | VIDEO S VIDEO |
|
|
|
| DVD OUT | ||
COMPONENT VIDEO OUT(NTSC:480p/480i, PAL:576p/576i) |
|
|
|
|
| |
Y PB | PR |
|
|
|
|
|
|
| OPTICAL |
|
|
|
|
R - AUDIO - L | VIDEO S VIDEO | DIGITAL AUDIO OUT | R - AUDIO - L VIDEO |
|
|
|
DVD OUT | (PCM/BITSTREAM) | DVD/VHS COMMON OUT |
|
|
| |
DVD OUT
DVD/VHS COMMON OUT
≥For DVD/VHS COMMON OUT terminals, both DVD and VHS signals can be output.
DVD OUT
≥This is the dedicated terminal to enjoy pictures played on DVD in higher picture quality. (l right)
≥The DVD OUT terminals can only output the DVD signal. If your TV is connected to the DVD OUT terminals, the VHS picture is not displayed on your TV unless you select the TP channel (l 59).
15
VQT0P03
