This model is designed to be used only in the U.S.A
Model No. KX-FLB851
Operating Instructions
All in One Flatbed Laser Fax with Multi-Action Sorter
OPEN
How to use the operating instructions
Buttons Listed in alphabetical order
Location of controls
Attach your sales receipt here
Things you should keep a record of
Thank you for purchasing a Panasonic fax machine
For your future reference
Installation
Important safety instructions
Important Information
SAVE THESE INSTRUCTIONS
Fuser unit
Laser radiation
Toner cartridge
Drum unit
Toner cartridge and drum unit
For best performance
Static electricity
Environment
Table of Contents
Installation
1. Introduction and
2. Preparation
9. Help
8. Programmable Features
10.General Information
11.Index
1. Introduction and Installation
1.1 Included accessories
Part number*1
Quantity
Replacement toner cartridge*1 KX-FA85 Replacement drum unit*1 KX-FA86
1.2 Accessory information
G RESOLUTION
1.3 Description of buttons
1.4 Overview
4 Document cover 5 Top cover 6 Paper level indicator
1.4.1 Front view
P COPY
4 Multi-purpose input tray 5 Power inlet
1 Power switch 2 USB interface connector 3 Recording paper guides
1.4.2 Rear view
7 Telephone line jack 8 External telephone jack 9 Speaker
Do not expose the drum unit to light for more than 5 minutes
1.5 Toner cartridge and drum unit
Do not touch or scratch the black drum surface
Do not expose the drum unit to direct sunlight
L Close the multi-purpose input tray 3 before opening the top cover
Toner save feature
1.6 Document tray
1.7 Output tray
1.7.1 Attaching the tray label
1.8.1 Using the paper input tray
1.7.2 Installing the output tray
by using PAPER TRAY in the copy mode page in feature #380 page
1.8 Recording paper
L Push and lock the plate 2 in the paper input tray, if it is lifted
To pull the paper input tray completely out
L To insert the paper input tray
Using the optional input tray
1.8.2 Using the multi-purpose input tray
by using PAPER TRAY in the copy mode page in feature #382 page
input tray setting for faxing feature #440 on page
1.8.3 Checking the amount of
remaining recording paper
The paper level indicator green will allow you to
Using surge protectors
Using the optional handset unit
If you use this unit with a computer or subscribe to a DSL service
2.1 Connections
SYSTEM SETUP PRESS
2.2 Turning the power switch ON
2.3 Dialing mode
MENU SET
“FEATURE LIST”
“BASIC SETTINGS”
“ERRORS”
2.4 Selecting the operation mode Fax/Copy/Scan
Ringer volume While the unit is idle, press V or
2.6 Adjusting volume
Monitor volume While using the monitor, press V or
SETUP ITEM
2.8 Your logo
If you have subscribed to a Caller ID service
To correct a mistake
ZOOM/QUICK SCAN CLEAR MENU SET FLASH
FLASH
To select characters using V or
ZOOM
QUICK SCAN
MENU CLEAR SET FLASH
2.9 Your fax number
YOUR FAX NO PRESS SET
NO.=
3.2.1 Using the auto document feeder
3.1 Using the unit as a fax machine
RESOLUTION
To select the resolution 1. Press RESOLUTION
Sending from memory Quick scan feature
3.2.2 Using the scanner glass
3. Press QUICK SCAN Reserving the fax transmission Dual Access
To redial the last number
Document weight
3.3.2 Using the scanner glass
3.3.3 Note for the auto document feeder and the scanner glass
Example
3.4.1 Storing one-touch dial item
3.4 Storing names and
DIRECTORY CLEAR
LOWER SET
3.4.3 Editing a stored item
3.4.2 Storing navigator directory items
3.4.4 Erasing a stored item
Helpful hints
Using navigator directory
Using stations
To send a fax using the scanner glass
L Confirm that there are no documents on the scanner glass
3.6 Broadcast transmission
Using the dial keypad only for MANUAL BROAD
3.6.1 Programming items into the broadcast memory
3.6.2 Adding a new item into the broadcast memory
To cancel broadcast transmission
To send the same document using the scanner glass
3.6.4 Sending the same document to pre-programmed parties
MANUAL BROAD
If you have subscribed to a Distinctive Ring service
L The FAX AUTO ANSWER indicator is ON
How to receive faxes with an extension telephone
3.7 Receiving a fax automatically - Auto answer ON
3.9.1 Setting up the unit and an answering machine
3.9 Using the unit with an answering machine
How to receive faxes with the optional handset unit
To stop receiving
3.10.1 Activating the junk fax prohibitor
L This feature does not work when manual reception is performed
3.10.2 Storing undesired callers
Receiving a voice message and fax document in one call
To display the junk fax prohibitor list
To print the junk fax prohibitor list
To erase an item from the junk fax prohibitor list
4.2 Viewing and calling back using caller information
4.1 Caller ID service
4.1.1 How Caller ID is displayed
4. Caller ID
4.2.1 Erasing all caller information
L This feature is not available in the following cases
4.2.2 Erasing specific caller information
Display while viewing
already contains an item, the previous item will be replaced
L If you assign an item to a station key which
5.2 Using two or more phone numbers on a single telephone line
5.1 Distinctive Ring service from your phone company
5.3 Using three or more phone numbers on a single telephone line
5.2.1 Activating the Distinctive Ring feature
5.4 Programming the ring pattern assigned for fax
6.2.1 Using the auto document feeder
6.1 Using the unit as a copy machine
COPY STOP PAPER TRAY START RESOLUTION
6.2 Making a copy
6.2.2 Using the scanner glass
To select the input tray and paper size 1. Press PAPER TRAY
COPY START STOP
Example 150% enlarged copy Using the auto document feeder
6.3 More copying features
Using the scanner glass
6.3.1 To sort multiple copies Auto document feeder only
6.3.3 To reduce a document
Example 70% reduced copy Using the auto document feeder
7.2 Installing Multi- Function Station
7.1 Connecting to a computer
7. Multi-Function Station software
Operating System
Programs → Panasonic → KX- FLB800FLM650 Series → Uninstall or Modify
L If the Choose Setup Language dialog box does not appear
To uninstall the software
Important notice for Windows XP users
Remote Control page
7.4 Using the unit as a printer
Setup
7.3 Starting Multi-Function Station
7.4.2 Transparencies
Setting the printer properties
7.4.3 Labels
3 Select Panasonic KX-FLB851 as the active printer
L Use the multi-purpose input tray to print envelopes
7.4.4 Envelopes
L Printed envelope will be stacked on the upper output tray
L Remove each envelope after printing
7.5.2 Using other applications
To scan documents quickly
Readiris OCR software
L The Panasonic KX-FLB851 default name dialog box will appear
Using the auto document feeder
2 Select Remote Control
L The Multi-Function Remote Control window will appear
7.7.1 Sending a computer document as a fax message from your computer
7.7 Fax sending/receiving using Multi-Function Station
7.7.2 Receiving a fax into your computer
3 Select PCFAX Panasonic KX-FLB851
7.9.2 Changing the default output tray
7.9.1 Setting the optional input tray
3 Select Panasonic KX-FLB851 default name
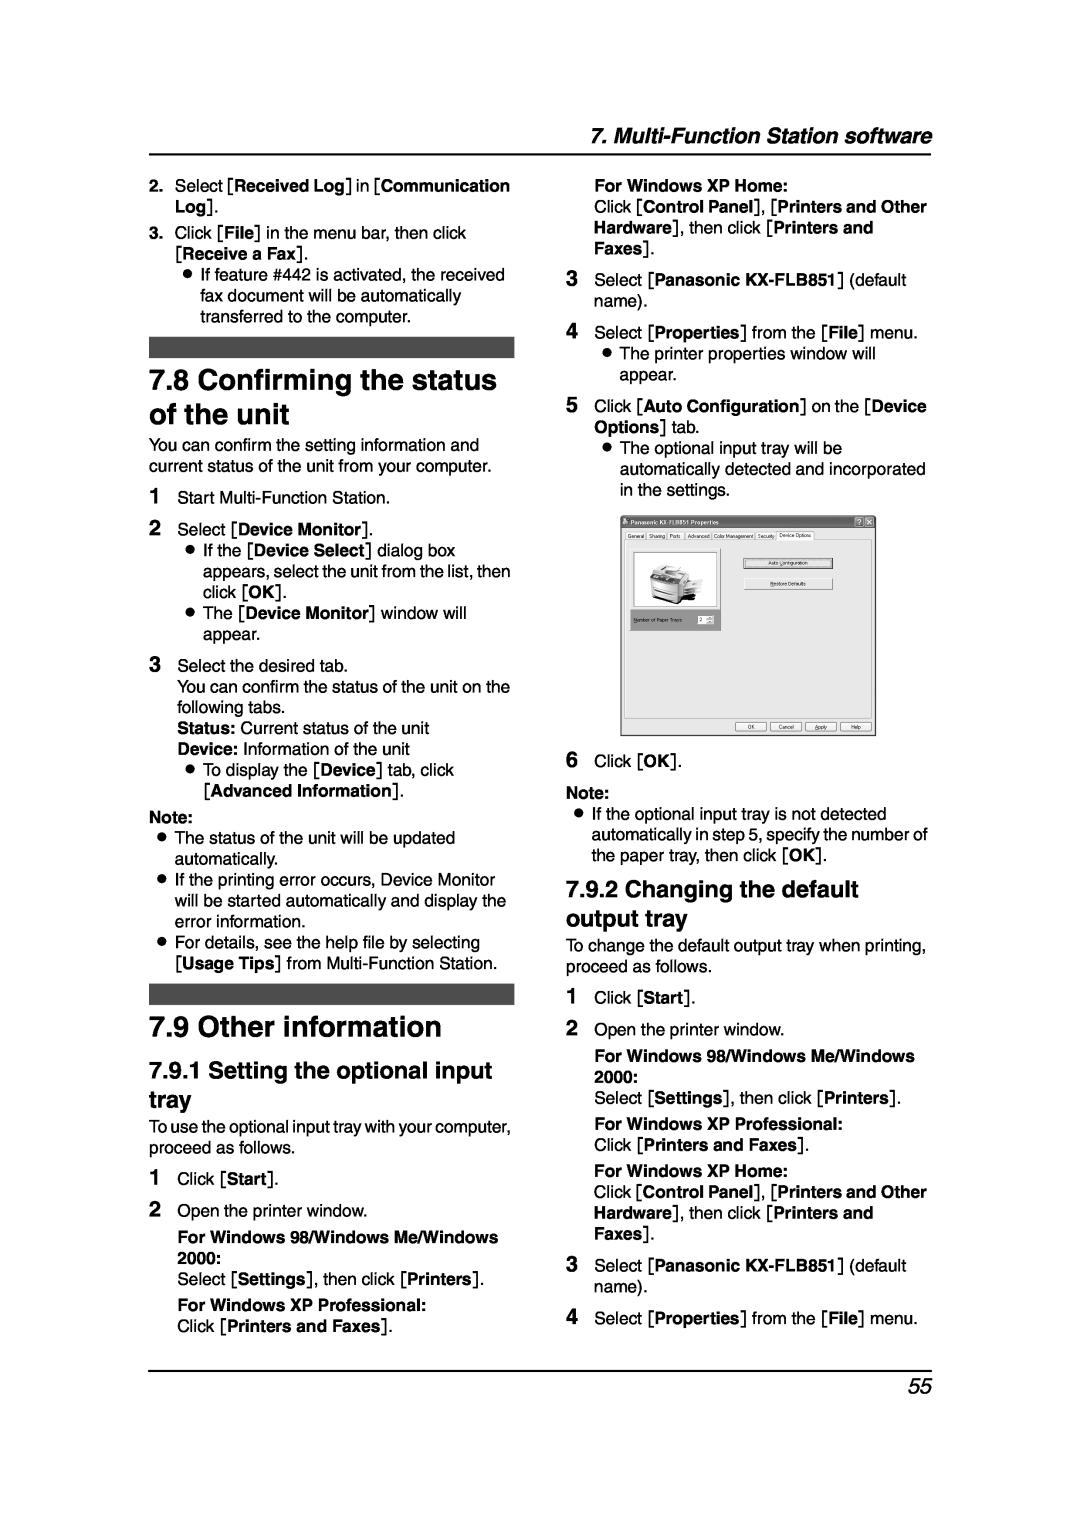
5 Click Auto Configuration on the Device Options tab
Output tab
users, click Printing Preferences... on the General tab
To cancel programming
8. Programmable Features
To select features by using the navigator key
“BASIC FEATURE” “FAX FEATURE” “COPY FEATURE” “SCAN FEATURE”
Feature
8.2 Direct command chart
Feature code
Quick setup
5 “B-D” default
Connecting tone
Input tray setting for faxing
1 “#1” default 2 “#2”
Default scan type
1 “#1” default
1 “B/W TEXT” default
Default scan resolution
#100 Setting the quick setup
8.3 Basic features
QUICK SETUP PRESS SET
#101 Setting the date and time
#381 Setting the recording paper size in the multi-purpose input tray
#380 Setting the recording paper size in the paper input tray
#382 Setting the recording paper size in the optional input tray
#403 Setting power save feature
#482 Setting toner save feature
8.4 Fax features
CONFIRM REPORT =ERROR
#402 Setting the journal report to print automatically
#413 Setting the Error Correction Mode ECM
0 “OFF” default 1 “ON” To send a document
#416 Setting the connecting tone
CONNECTING TONE MODE=ON
#438 Setting friendly reception
#437 Setting the memory reception alert
#440 Setting the input tray to use for faxing
#441 Setting the output tray to use for faxing
#460 Setting the input tray to use for copying
8.5 Copy features
#461 Changing the default copy resolution
COPY RESOLUTION =TEXT/PHOTO
8.7 LAN features
8.6 Scan features
#466 Setting the output tray to use for copying
#490 Setting the default scan type for LAN push scan
DHCP =ENABLED
#500 LAN setting with a DHCP server
#501 Setting the IP address for the LAN connection
#502Setting the Subnet mask for the LAN connection
Cause & Solution
9.1 Error messages - Reports
COMMUNICATION ERROR
ERROR-NOT YOUR UNIT
“CALL SERVICE”
9.2 Error messages - Display
“CARRIAGE ERROR”
“CHECK INSTALL
“MAINTENANCE
and will be printed out automatically when the unit warms up
L Your unit requires a scheduled maintenance. Maintenance is
contact us by our Customer Services directory page
“TRANSMIT ERROR”
recording paper or a recording paper jam. Install paper page
L A transmission error occurred. Try again
“REMOVE DOCUMENT”
9.3.1 Initial settings
9.3 When a function does not work, check here
Problem
L If you use a Distinctive Ring service, make sure you have set the
or program the features
function, adjust volumes
9.3.3 Fax - sending
9.3.4 Fax - receiving
AUTO ANSWER indicator
“CONNECTING...”, but
paper is installed
documents automatically
When an extension
9.3.6 Using an answering machine
9.3.5 Copying
A B C
answering machine on the unit with feature #322 page
L You did not program your remote access code into your unit
L The code may include “#” which is used for certain features
access code to access the
when printing from
9.3.8 If a power failure occurs
Microsoft PowerPoint or
I cannot install or
9.4 Replacing the toner cartridge and the drum unit
L Do not turn the power switch OFF. Loss of
TONER LOW TONER EMPTY
Panasonic toner cartridge and drum unit
5 Turn the two green levers 1 on the used toner cartridge firmly
Waste disposal method
9.5 Recording paper jam
9.5.1 When the recording paper has jammed inside of the unit
PAPER JAMMED
OPEN TOP COVER
Case When the recording paper has jammed near the output tray
Case When the recording paper has jammed near the fuser unit
OPEN LOWER LEFT SIDE TRAY COVER
9.5.2 When paper jam occurs near the optional input tray
CHECK PICK UP INPUT TRAY #1 CHECK PICK UP INPUT TRAY #3
Paper input tray Optional input tray
CHECK PICK UP INPUT TRAY #2
9.6 Document jams Auto document feeder
When the document has jammed near the document entrance
9.7 Cleaning the white plate and glasses
When the document has jammed near the document exit
L Be careful when handling the drum and
If the document cover comes off from the unit
9.7.2 Lower glass
4 Clean the lower glass 1 with a soft and dry cloth
9.8 Cleaning the document feeder rollers
10.1 Reference lists and reports
“SETUP LIST”
10. General Information
“TEL NO. LIST”
Scanning density FAX resolution
10.2 Specifications
Copy resolution
Scanning resolution
Recording paper weight
Recording paper specifications
Envelope size
Note for recording paper
Drum life
10.3 FCC and Other Information
Technical Support
Responsible Party
Panasonic Facsimile Product Limited Warranty
10.4 Limited Warranty
FAX categories
Parts
RESPONSIBILITY For In Limited Warranty product service
2. Panasonic Premier Service Club PPSC
When you ship the product
consumerfax@us.panasonic.com
10.5 Customer Services directory
npcparts@us.panasonic.com
or E-mail us via
10.6 Information of copyrights and licences
Copyright c 1988 Stephen Deering Copyright c 1988 University of Utah
Copyright c 1997 Manuel Bouyer. All rights reserved
10. General Information
10. General Information
10. General Information
11. Index
11.1 Index
Fax number Feature #103 FAX ONLY mode FAX ring count Feature #210
1-year limited warranty1 parts, labor, and toll-free help line2
Panasonic FAX ADVANTAGE PROGRAM
Free overnight replacement3 and repair program
NO EXTRA COST