Charge the battery for 6 hours before initial use
GHz Expandable Cordless Phone System
Model No. KX-TG5230C Pulse-or-tone dialing capability
Accessories included
Expanding Your Phone
KX-TG5230C
Contents
Contents
Battery charge
For Best Performance
Base unit location/Noise
Location of Controls
Base unit
Auto Button Program Button
Location of Controls
Handset
FLASH/CALL Wait Button
How to use the soft keys/navigator keys
Handset soft keys
Handset navigator key
Base unit navigator key
Display
Missed calls
D01
Installation
Connections
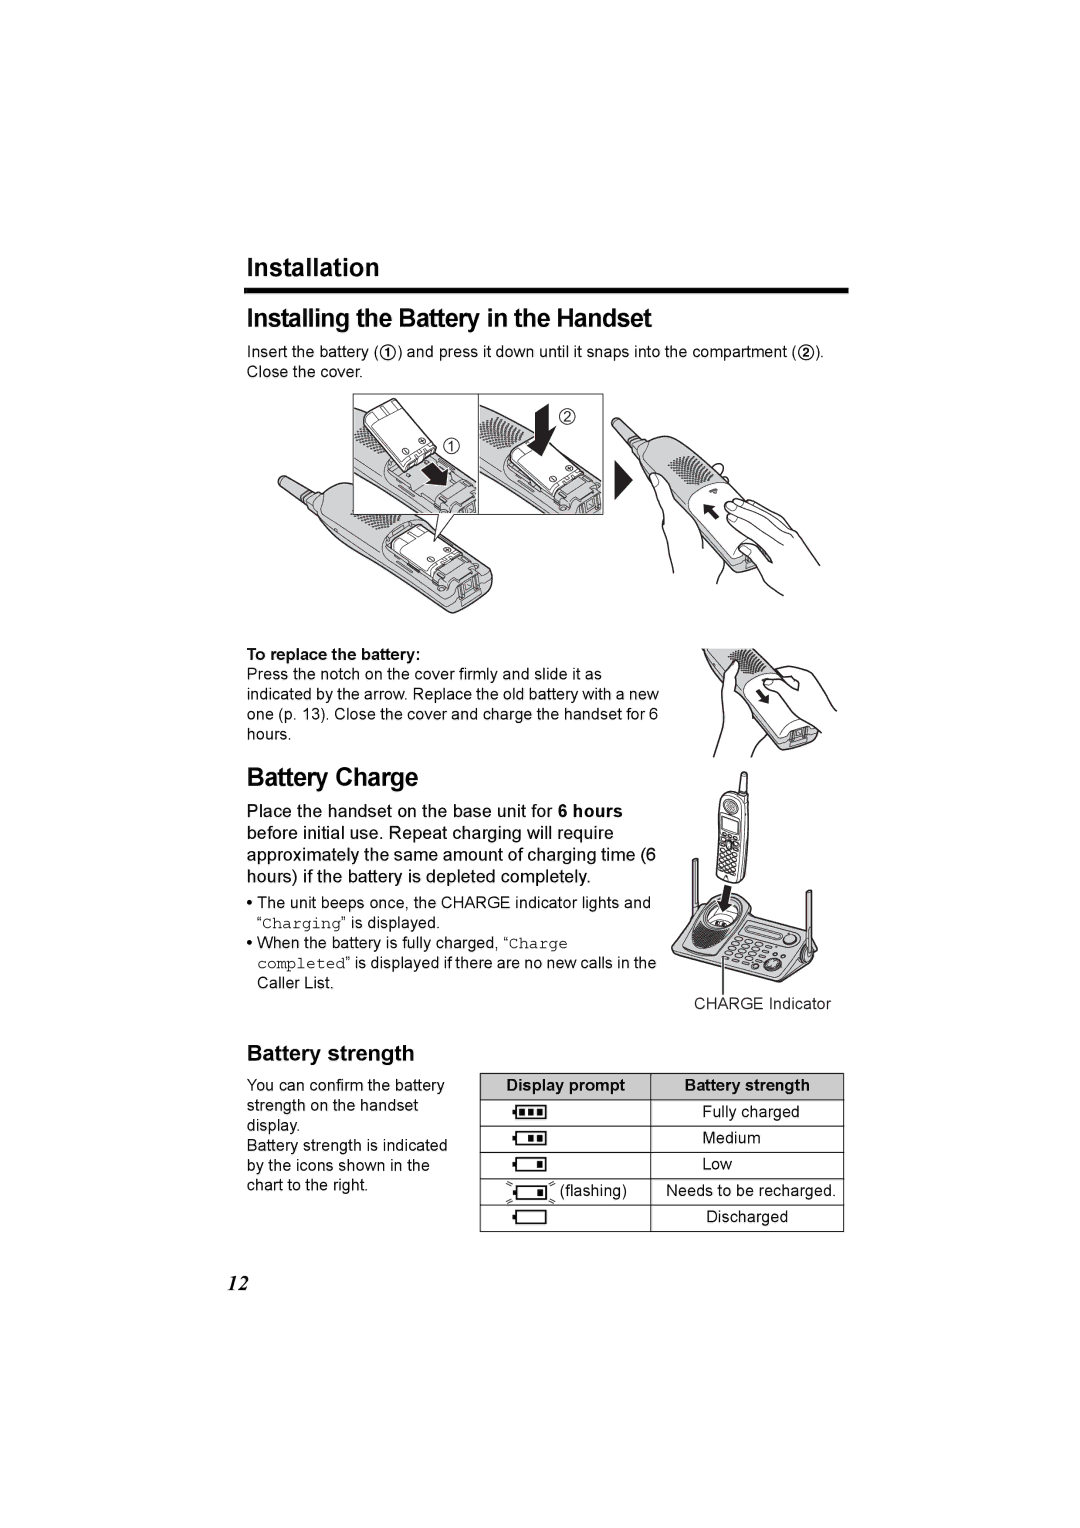
Installation Installing the Battery in the Handset
Battery Charge
Battery strength
To replace the battery
Installation
Battery information
Battery replacement
Recharge
Programmable Settings
How to select a function item from the menu
Press OFF to exit programming mode
Programming Guidelines Handset
Programmable Settings Function Menu Table Handset
Deregistration Display Voice prompt
Programmable Settings Display Language Handset
Display
English
Talking Call Display Language Handset
Programmable Settings Dialing Mode Handset
Line Mode Handset
Tone
Programmable Settings Auto Talk Handset
Ringer Volume
Handset ringer volume Handset
Off
Programmable Settings
Base unit ringer volume Base Unit
Press the soft key Save
Temporary ringer off
Programmable Settings Ringer Tone
1Tone
Handset ringer tone Handset
Selecting the base unit ringer tone by using the Handset
Press f or g
Press f or g repeatedly to select the desired tone
Scroll to Set base unit by pressing d
Programmable Settings LCD Contrast Handset
Low
Message Alert Handset
Using the Handset Handset
Making Calls
To have a hands-free phone conversation
System capabilities Operating more than one handset, p
3334444
Low High
Making Calls
To turn this feature on, press the soft key
Voice Enhancer Technology
Clarity Booster
Backlit LCD display/Lighted handset keypad
Making Calls Using the Base Unit Base Unit
To adjust the speaker volume
Press SP-PHONE
Press SP-PHONE, then press REDIAL/PAUSE
Answering Calls
Auto Talk
Speak into the MIC To hang up, press SP-PHONE
To transfer the call to another extension, see
Call Display Service
How caller information is displayed and announced
Personalized Name Display
Display Meaning
Call Display Service Talking Call Display Handset Base Unit
Call Display Service
To turn the Talking Call Display feature on or off
Handset Talking Call Display feature Handset
Base unit Talking Call Display feature Handset
Using the Caller List
Viewing the Caller List Handset
Using the Caller List
Calling Back from the Caller List Handset
What √ means
If a caller calls more than once
Or B Press the soft key Repeatedly
Until the number is
Desired Format
321-5555
To erase a specific caller
To erase all entries
Press the soft key C I D Or B to enter the Caller List
Press the soft key YES
Phone Book
Tom
Storing Names and Numbers Handset
Phone Book
Selecting characters to enter names
If you make a mistake while entering a name or number
For example, to enter Tom
Frank
To search for a name by initial
Index table
Alan
Phone Book Chain Dial Handset
While you are on a call Press Menu
Jane
456-7890
Erase?
Erased
To copy one phone book item to another handset
Copy phone book
Tom Jones
Copy all items
Scroll to Copy all items by pressing d
Receiving then Phone book Received 01/10
Speed Dialer
Storing Phone Numbers Base Unit
Dialing a Stored Phone Number Base Unit
To erase a stored number
Intercom
Making Intercom Calls
Press HOLD/INTERCOM
Press LOCATOR/INTERCOM/TRANSFER
Intercom
Answering Intercom Calls
Press C, s or HOLD/INTERCOM
Press SP-PHONE or LOCATOR/INTERCOM/TRANSFER
When finished, press SP-PHONE or LOCATOR/INTERCOM/ Transfer
Intercom Voice Paging Base Unit
To make a voice announcement to all handsets, press
Transferring a Call
Handset To complete the transfer, press OFF
During a call, press LOCATOR/INTERCOM/TRANSFER
Handset Press C, s, or HOLD/INTERCOM to answer
When the system has two or more handsets
Transferring a Call
From a Handset to another Handset
To complete the transfer, press OFF
Quick call transfer
Conference Calls
Call Share
To join a conversation Call Share
Room Monitor
To turn Room Monitor on for the handset Handset
To turn Room Monitor on for the base unit Handset
Scroll to Room monitor by pressing d or
Room Monitor
To monitor with Handset
To monitor with Base Unit
To end monitoring, press OFF
Voice Mail Service
Storing a Voice Mail Access Number Handset
Enter your access number, up to 32 digits
1234567PPP890
Voice Mail Service
Setting Voice Mail VM Tone Detection Handset
To erase a stored voice mail access number
OFF
To listen to your voice mail messages
Press the soft key Then press Or s
Press VM
Voice Mail
Special Features
To turn on the Call Privacy feature
Muting Your Conversation
Call Privacy Handset
Special Features
For Call Waiting Service Users Handset Base Unit
Visual Call Waiting Service Handset
Waiting
Special Features Call Waiting Deluxe Service Handset
To turn the C.WTG Call Waiting options mode on
Scroll to C.WTG options by pressing d
WTG options
To use Call Waiting Deluxe Service
Press FLASH/CALL Wait
Display Function
During a conference call, you can choose either
After selecting Ans Answer or Hold
After selecting Conf Conference or Conference
Special Features Temporary Tone Dialing
For Rotary or Pulse Service Users Handset Base Unit
700ms
Selecting the flash time Handset
Special Features Incoming Call Tone Handset Base Unit
Handset incoming call tone Handset
Base unit incoming call tone Handset
Incoming call
Special Features Key Tone Handset
Key tone
Scroll to Key tone by pressing d or B
Key tone
Connecting an optional headset
To switch to the speakerphone while using the headset
Belt Clip
Optional Headset
Wall Mounting
Connect the AC adaptor
Wall Mounting
To remove the wall mounting adaptor
While pushing down the Release Levers a remove the adaptor B
Direct Commands
Menu item Command Selection items
Direct Commands
During programming
To exit programming, press OFF
Cancelling Registration/Re-registration
Cancelling the Handset Registration Handset
Re-registering the Handset Handset & Base Unit
Deregistration
Cancelling Registration/Re-registration
Registration
Press and hold LOCATOR/INTERCOM/TRANSFER for 3 seconds
Press Locator on base unit for 3 sec Then press OKL
If the Following Appears on Your Display
Busy
Invalid
Display message Cause & Remedy
Denied
If the Following Appears on Your Display
Phone book full
No items stored
Troubleshooting
Problem Cause & Remedy
Refer to manual
Troubleshooting
Troubleshooting
Recharge battery is
Important Information
Safety Instructions
Specifications
Safety Instructions
Panasonic Canada Inc
Ambler Drive, Mississauga, Ontario L4W 2T3
PQQX14104ZA S0404-0
Panasonic Canada Inc