OPERATION
Press the POWER button on the front of the recorder to turn on the unit. Video from all nine cameras appears on the monitor.
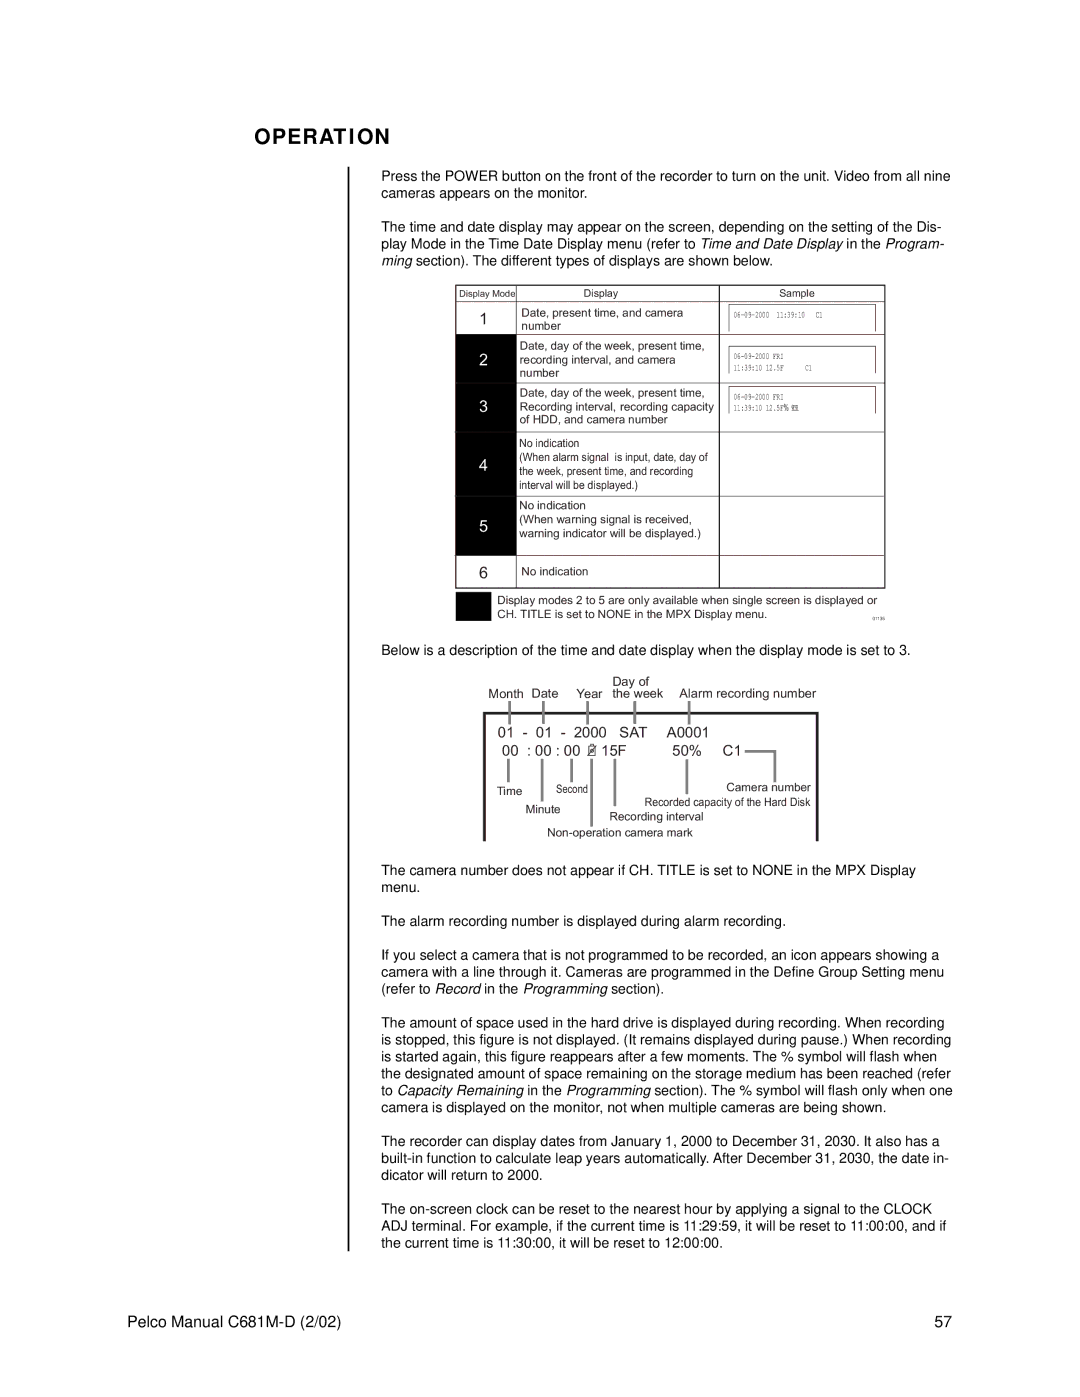
The time and date display may appear on the screen, depending on the setting of the Dis- play Mode in the Time Date Display menu (refer to Time and Date Display in the Program- ming section). The different types of displays are shown below.
Display Mode | Display | Sample |
1 | Date, present time, and camera | C1 |
| |
number |
|
|
| |
|
|
|
| |
2 | Date, day of the week, present time, |
|
|
|
recording interval, and camera |
|
| ||
11:39:10 12.5F | C1 |
| ||
| number |
| ||
|
|
|
| |
|
|
|
|
|
| Date, day of the week, present time, |
|
|
|
3 |
|
| ||
Recording interval, recording capacity |
|
| ||
11:39:10 12.5F% 99C1 |
|
| ||
| of HDD, and camera number |
|
|
|
|
|
|
|
|
| No indication |
|
|
|
4 | (When alarm signal is input, date, day of |
|
|
|
the week, present time, and recording |
|
|
| |
| interval will be displayed.) |
|
|
|
No indication
5(When warning signal is received, warning indicator will be displayed.)
6
No indication
Display modes 2 to 5 are only available when single screen is displayed or
CH. TITLE is set to NONE in the MPX Display menu. | 01135 |
Below is a description of the time and date display when the display mode is set to 3.
|
|
|
|
|
|
| Day of |
|
|
|
| |
Month Date Year | the week | Alarm recording number | ||||||||||
|
|
|
|
|
|
|
|
|
|
|
|
|
|
|
|
|
|
|
|
|
|
|
|
|
|
01 | - 01 - 2000 | SAT | A0001 | |||||||||
00 : 00 : 00 |
| 15F | 50% C1 |
|
| |||||||
|
|
| ||||||||||
|
|
|
|
|
|
|
|
|
|
|
|
|
Time Second
Minute
Camera number Recorded capacity of the Hard Disk
Recording interval
The camera number does not appear if CH. TITLE is set to NONE in the MPX Display menu.
The alarm recording number is displayed during alarm recording.
If you select a camera that is not programmed to be recorded, an icon appears showing a camera with a line through it. Cameras are programmed in the Define Group Setting menu (refer to Record in the Programming section).
The amount of space used in the hard drive is displayed during recording. When recording is stopped, this figure is not displayed. (It remains displayed during pause.) When recording is started again, this figure reappears after a few moments. The % symbol will flash when the designated amount of space remaining on the storage medium has been reached (refer to Capacity Remaining in the Programming section). The % symbol will flash only when one camera is displayed on the monitor, not when multiple cameras are being shown.
The recorder can display dates from January 1, 2000 to December 31, 2030. It also has a
The
Pelco Manual | 57 |
