PDA-5003 PDA-5004
Safety Precautions
Safety Precautions
English
Safety Precautions
Information to User
Features
Contents
Before Proceeding
Checking supplied accessories
How to use this manual
Regarding menu displays
Picture adjustment
About operations in this manual
Plasma Display Section
Part Names and Functions
Connection panel
Combination IN/OUT
Video Card PDA-5003 Section
Video Card PDA-5004 Section
Installing the video card
Installation and Connections
Installation
Connection to INPUT1 and INPUT5
When using PDA-5003
When using PDA-5004
Connections
Connection to INPUT1 or INPUT5
When connecting to Analog RGB INPUT5
When connecting to Analog RGB in INPUT1
Connection to AV components
Installation and Connections
Connection of G on Sync analog RGB source
Connection of composite Sync analog RGB Source
Installation and Connections
Connection to a personal computer
Connection of separate Sync analog RGB Source
When connecting to Analog RGB OUT INPUT1
To an external monitor
Component INPUT5
Connection to INPUT3
Connection to INPUT2
Connection to INPUT4
Personal computer
About DTV set top box connection
Video Video signal
Signal type Signal format
INPUT1 INPUT3 INPUT4 INPUT5
INPUT2
Audio connections
INPUT1
INPUT5
INPUT3
INPUT4
To remove speed clamps
How to route cables
To attach the speed clamps to the display
Once in place. Please attach carefully
Screen
System Settings
Setting the onscreen display language
With the desired language displayed, press
Use the 2/3 buttons to select the display mode
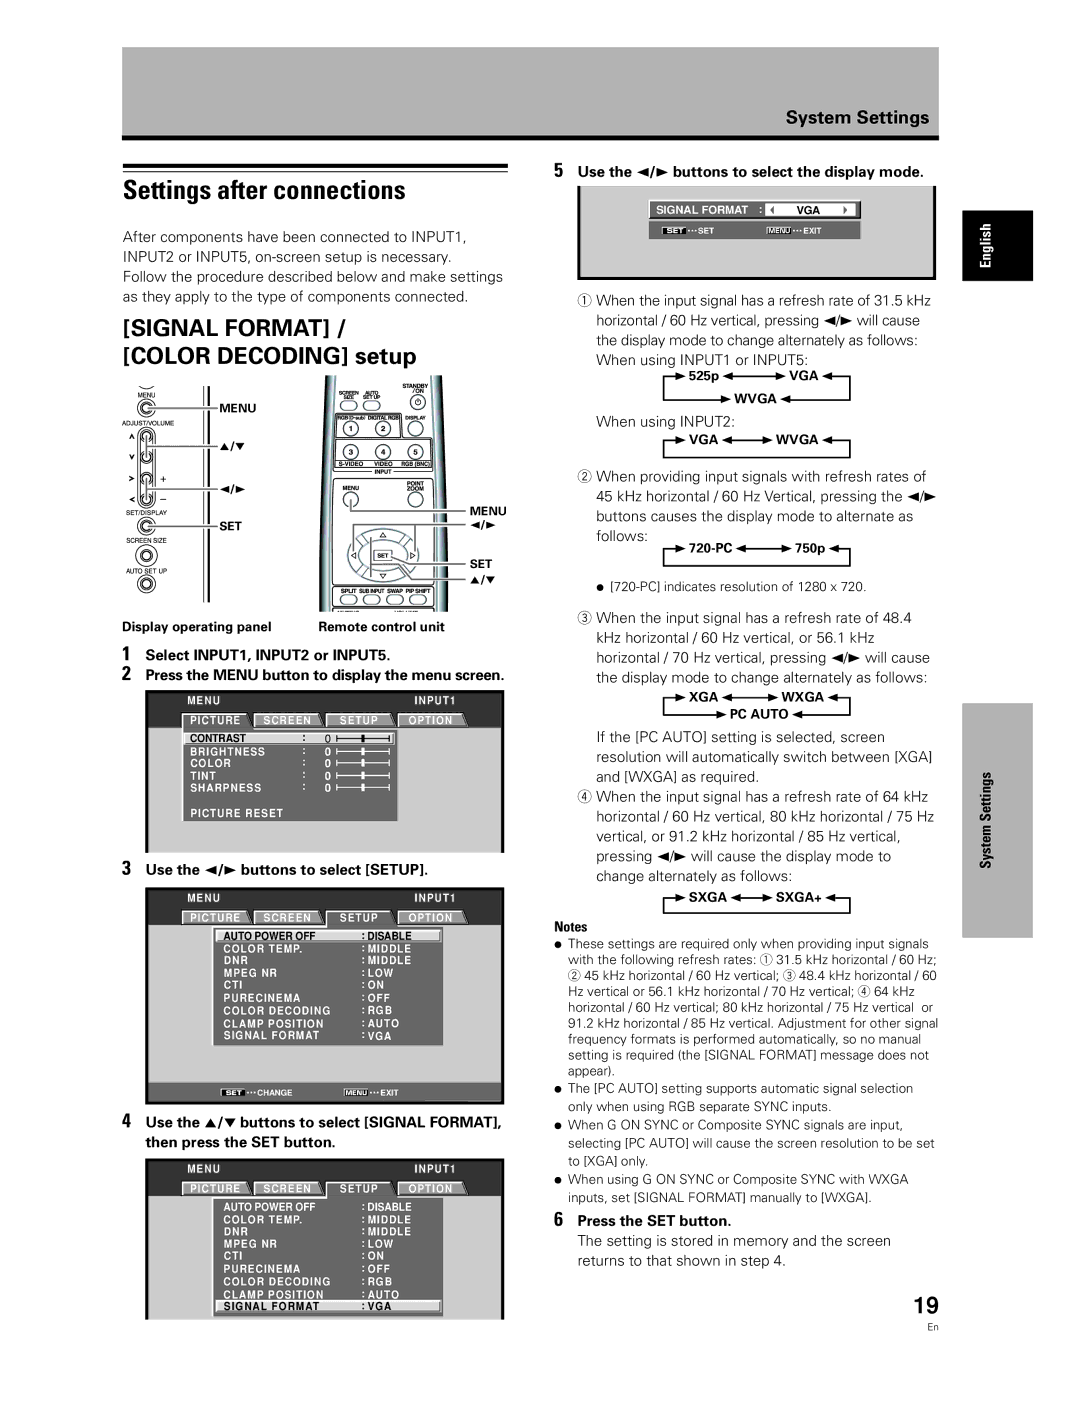
Settings after connections
Color Decoding setup
Use the 2/3 buttons to select Setup
Connected, use the 5/∞ buttons to select Color
When a component other than a computer is
System Settings Decoding INPUT1 or INPUT5
Use the 5/∞ buttons to select Clamp Position
Before you begin, make sure you have
Operation
Selecting input source
Operation
Press the Muting button on the remote control unit
Adjusting sound volume
Press the Volume buttons
Press the Display button
Changing screen size
For video signals
During video signal input
Screen size selection
Display Point Zoom
Operation Press the remote control unit’s Point Zoom Button
Enlarging one part of the screen
OFF
To exchange the main screen and subscreen inputs
To change the position of the subscreen in PinP mode
Multiscreen display
To display the currently selected input
To return to operating mode
Automatic power-off
All other cases
PICTURE/SCREEN Adjustment
Picture adjustment
When the button is pressed, the optimum
Phase automatic adjust
Adjusting screen POSITION, Clock
By pressing the Auto SET UP button on either remote
As follows
When finished with the setting, press the Menu
Appear and the Position adjustment only can be
INPUT2, 3 or 4 is selected, the following screen will
Screen mode adjustment items
To reset Screen mode settings to the default
Press the SET button
Setting the orbiter Orbiter
Other Operations
Use the 5/∞ buttons to select Status
Screen management settings Screen MGT
Other Operations Use the 5/∞ buttons to select Mask Control
Use the 2/3 buttons to select Once or Repeat
Energy saving settings
With input signal, but power
Power consumption is less than that
Used in Standard mode
÷ MODE2 ......... Brightness is controlled in accordance
Press the SET buttton
Make this setting if video noise is objectionable
Reducing video noise DNR
Middle 2 3 MID High 2 3 High
Reducing noise in Mpeg images Mpeg NR
Use the 2/ 3 buttons to select Setup
Use the 2/3 buttons to select the desired Mpeg NR setting
High Middle 2 3 LOW
Increasing color border contrast CTI
Use the 2/3 buttons to select the desired CTI setting
Enhance color contour contrast as desired
Use the 5/∞ buttons to select Purecinema
Setting the Purecinema mode
Use the 2/3 buttons to select the desired Purecinema mode
Menu SET
When the setup is finished, press the Menu
Setting the Color System
Button to exit the menu screen
Function switches alternately as shown
Automatic input switching
Function setting Factory default setting is OFF
Use the 5/∞ buttons to select Auto Function
Other Operations Use the 2/3 buttons to select Option
About audio output Audio OUT
Use the 5/∞ buttons to select Audio OUT
Fixed
PDA-5003
Specifications
Additional Information
PDA-5004
Appendix
Video signal compatibilty table INPUT1, INPUT5
Full Zoom Cinema Wide
Additional
DOT by DOT Full Partial
Information
DOT by DOT Full Zoom
Purecinema
Purecinema signal compatibility table INPUT1, INPUT5
Purecinema signal compatibility table INPUT3, INPUT4
OFF Standard
Aspect ratio
Video signal
Explanation of Terms
Jack S Video jack
Français
Précautions de sécurité
Précautions de sécurité
Les différents organes et leurs rôles
Particularités
Table des matières
Particularités
Propos des affichages de menu
Vérification des accessoires fournis
Avant de commencer
50MXE1/PDP-50MXE1-S
Avant de commencer
Description des modes opératoires
Réglage de l’IMAGE
Remarque
Section Écran à plasma
Les différents organes et leurs rôles
Panneau de raccordement
PDP-50MXE1/PDP-50MXE1-S
Section Carte vidéo PDA-5003
Section Carte vidéo PDA-5004
Installation et raccordements
Installation et raccordements
Installation de la carte vidéo
’installation présente le modèle PDA-5003
’emploi du PDA-5003
Prises d’entrée sur l’écran à plasma avec carte vidéo
Raccordements de INPUT1 et INPUT5
’emploi du PDA-5004
Pour le raccordement à Analog RGB in INPUT1
Raccordement d’un appareil vidéo
Pour le raccordement à Analog RGB INPUT5
Reliez cette prise Remarque
Pour le raccordement à Component Video INPUT5
Raccordement à un ordinateur
Utilisez cette solution si l’appareil fournit un signal de
Raccordement d’une source analogique RVB
Vert G on Sync
Fournissant le signal de synchronisation sur le
Pour le raccordement à Analog RGB OUT INPUT1
Fournissant des signaux composites de synchronisation
Si vous utilisez la prise INPUT5, réglez le sélecteur
Raccordement de INPUT4
Installationetraccordements
Raccordement de INPUT2
Raccordement de INPUT3
Signal vidéo Format du signal
Raccordement au boîtier DTV
Raccordement audio pour l’appareil relié à INPUT1
Raccordements audio
Raccordement audio pour l’appareil relié à INPUT2
Raccordement audio pour l’appareil relié à INPUT5
Raccordement audio pour l’appareil relié à INPUT4
Pour retirer les colliers rapides
Comment faire cheminer les câbles
Fixation des colliers rapides à l’écran à plasma
50MXE1-S avec la carte vidéo PDA-5003
Réglage de la langue d’affichage sur écran
Mise en œuvre pour Type DE SIGNAL/DÉCODAGE Couleur
Paramétrages du système
Paramétrages après raccordement
Modifie alternativement comme suit le mode
Si le signal d’entrée a une fréquence de
Comme suit le mode d’affichage
Type DE Signal puis appuyez sur la touche SET
Mise en œuvre pour
Position Clamp
Avant tout, assurez-vous que
Fonctionnement
Choix de la source d’entrée
Fonctionnement
Appuyez sur la touche Muting de la télécommande
Réglage du volume sonore
Appuyez sur les touches Volume
Appuyez sur la touche Display
Choix d’un format d’image
Avec un signal d’entrée vidéo
Changement de la taille de l’écran
Dans le cas des signaux vidéo
Agrandissement partiel de l’image
Arrêt 3 x 1.5 3 x 2 3 x Remarque
Affichage multi-écran
Pour afficher l’entrée actuellement sélectionnée
Chaque pression sur la touche, le réglage change Comme suit
Pour revenir au mode de fonctionnement
Dans tous les autres cas
ARRÊT/DÉSACTIVÉ MARCHE/ACTIVÉ
Réglages de l’IMAGE et de l’ÉCRAN
Réglage de l’IMAGE
Réglages de l’IMAGE et de l’ÉCRAN
Utilisez les touches 2/3 pour sélectionner Option
Utilisez les touches 2/3 pour choisir l’option Écran
Paramétrage Auto
De menu
Cran
Paramètres qui peuvent être réglés Écran
Position de masque latéral
Autres démarches
Réglage de l’orbiteur Orbiter
Utilisez les touches 5/∞ pour sélectionner Orbiter
Contrôle Masque
Réglages de gestion d’écran
Option
Utilisez les touches 2/3 pour sélectionner Option
Activation
Dénergie
Moyen 2 3 Moyen Haut
Utilisez sur les touches 2/3 pour choisir l’option Setup
Réduction du bruit vidéo DNR
Moyen BAS 2 3 BAS 2 3 Haut
La fonction de température de couleur DNR est
Le réglage par défaut effectué en usine est Moyen
÷ L’effet de réduction du bruit augmente dans l’ordre
Réglée et l’écran revient à celui présenté à l’étape
Augmentation du contraste du bord de couleur CTI
’affichage normal
Utilisez les touches 5/∞ pour choisir Purecinema
Réglage du mode Purecinema
Çais
Autres démarches De menu
Les entrées INPUT3 et INPUT4 sont compatibles avec
Réglage du système couleur
Système Couleur
Auto
Commutation d’entrée automatique Mode Auto
Utilisez les touches 5/∞ pour choisir Mode
Arrêt ENTRÉE4 2 ENTRÉE1
÷ Fixe ............... Le volume de sortie audio ne change
Au besoin, le niveau du signal fourni à la prise Audio
La fonction Volume
Pas, même si les commandes
Caractéristiques techniques
Accessoires
Informations complémentaires
Généralités
Plein
Supplément
Tableau de compatibilité des signaux vidéo INPUT1, INPUT5
Cinema Large
50MXE1-S INPUT1, INPUT5
Signification des symboles
Plein Écran Partiel
Non disponible
Mentaires
Plein Écran Zoom
Arrêt Avancé
Arrêt Standard Avancé
Composantes vidéo
Signal S-vidéo
Glossaire
Format d’image
AFTER-SALES Service for Pioneer Products