|
| R | |
E. Glass Replacement |
|
| |
| WARNING |
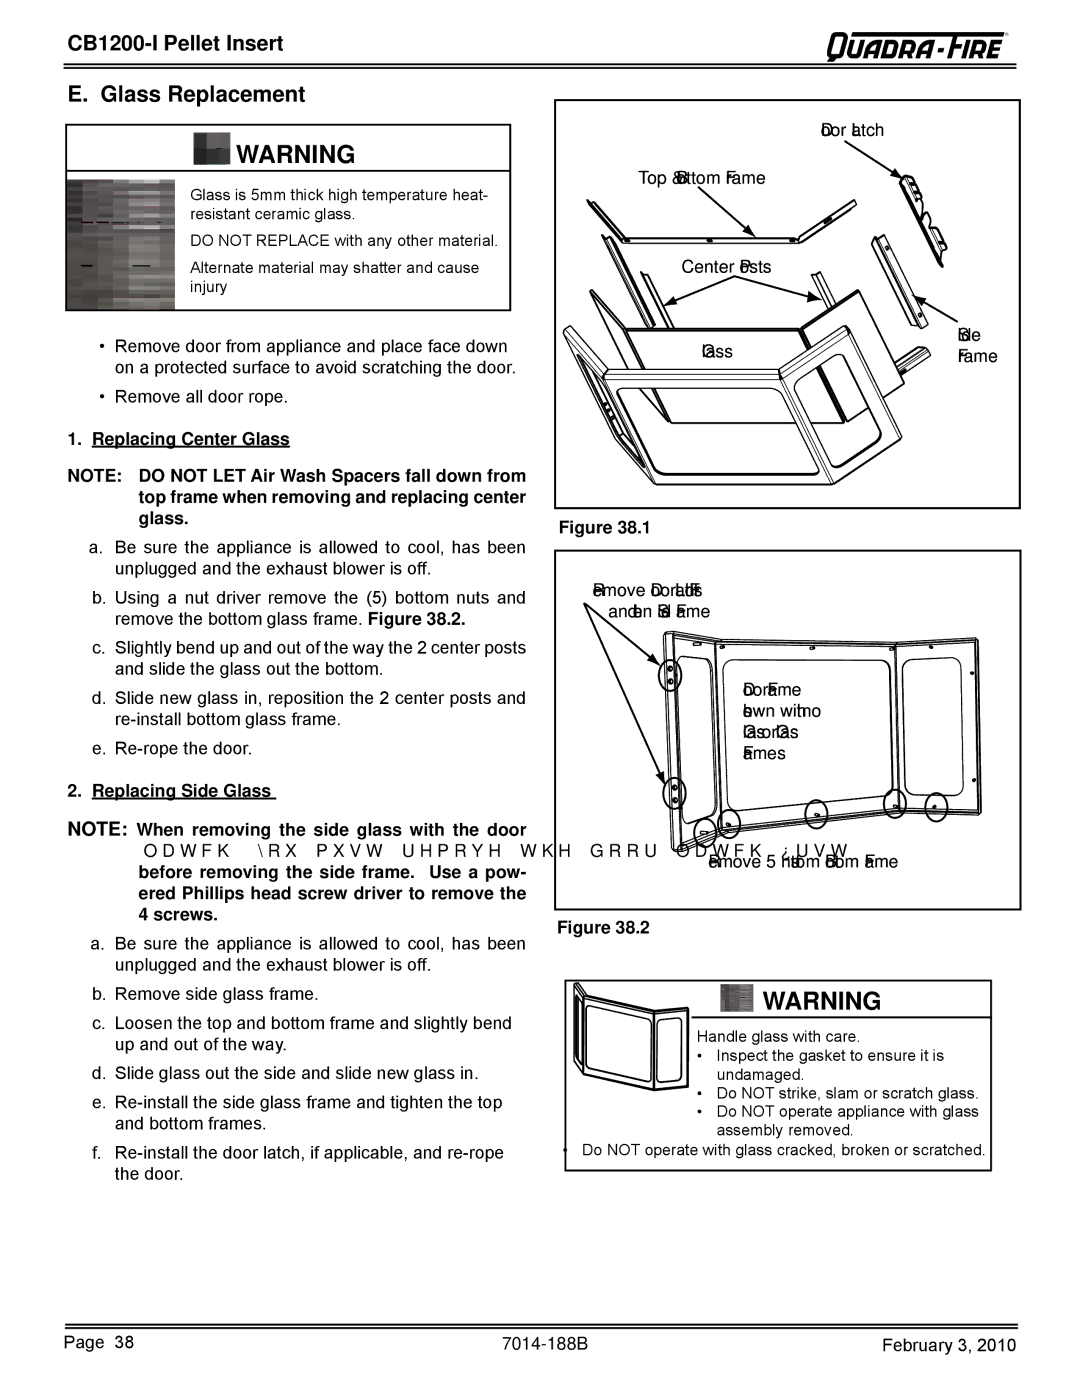
| Door Latch |
| Top & Bottom Frame |
| |
| • Glass is 5mm thick high temperature heat- |
| |
|
|
| |
| resistant ceramic glass. |
|
|
| • DO NOT REPLACE with any other material. |
|
|
| • Alternate material may shatter and cause | Center Posts |
|
| injury |
|
|
| • Remove door from appliance and place face down | Glass | Side |
| Frame | ||
| on a protected surface to avoid scratching the door. |
|
|
| • Remove all door rope. |
|
|
1. | Replacing Center Glass |
|
|
NOTE: DO NOT LET Air Wash Spacers fall down from |
|
| |
| top frame when removing and replacing center |
|
|
| glass. | Figure 38.1 |
|
|
|
| |
a.Be sure the appliance is allowed to cool, has been unplugged and the exhaust blower is off.
b. Using a nut driver remove the (5) bottom nuts and | Remove Door Latch First | |
and then Side Frame | ||
remove the bottom glass frame. Figure 38.2. | ||
| ||
c. Slightly bend up and out of the way the 2 center posts |
| |
and slide the glass out the bottom. | Door Frame | |
d. Slide new glass in, reposition the 2 center posts and | ||
shown with no | ||
Glass or Glass | ||
e. | ||
Frames | ||
2. Replacing Side Glass |
| |
NOTE: When removing the side glass with the door |
| |
latch, you must remove the door latch first | Remove 5 nuts from Bottom Frame | |
before removing the side frame. Use a pow- | ||
| ||
ered Phillips head screw driver to remove the |
| |
4 screws. |
| |
Figure 38.2 | ||
a. Be sure the appliance is allowed to cool, has been | ||
| ||
unplugged and the exhaust blower is off. |
|
b.Remove side glass frame.
c.Loosen the top and bottom frame and slightly bend up and out of the way.
d.Slide glass out the side and slide new glass in.
e.
f.
![]() WARNING
WARNING
Handle glass with care.
•Inspect the gasket to ensure it is undamaged.
•Do NOT strike, slam or scratch glass.
•Do NOT operate appliance with glass assembly removed.
•Do NOT operate with glass cracked, broken or scratched.
Page 38 | February 3, 2010 |
