Vpap III & III ST
EUR
Humidaire 2i EN Vpap
Illustrations / Abbildungen
Replacing the AIR Filter / Auswechseln DES Luftfilters
248129/2 05
Vpap III & III ST
Manufactured by
English
Page
Contents
Page
What the Vpap III and Vpap III ST are Intended for
Introduction
Medical Information
User/Owner Responsibility
Page
Adverse Effects
Page
Full Face Masks
Vpap System
Masks
Nasal Masks
Humidifiers
Accessories
Attaching a HumidAire 2i Humidifier
Setting up the Vpap System
Setting Up The Vpap
Attaching a Humidifier
Attaching a HumidAire Humidifier
Attaching a HumidAire 2iC Humidifier
Attaching a Passover Humidifier
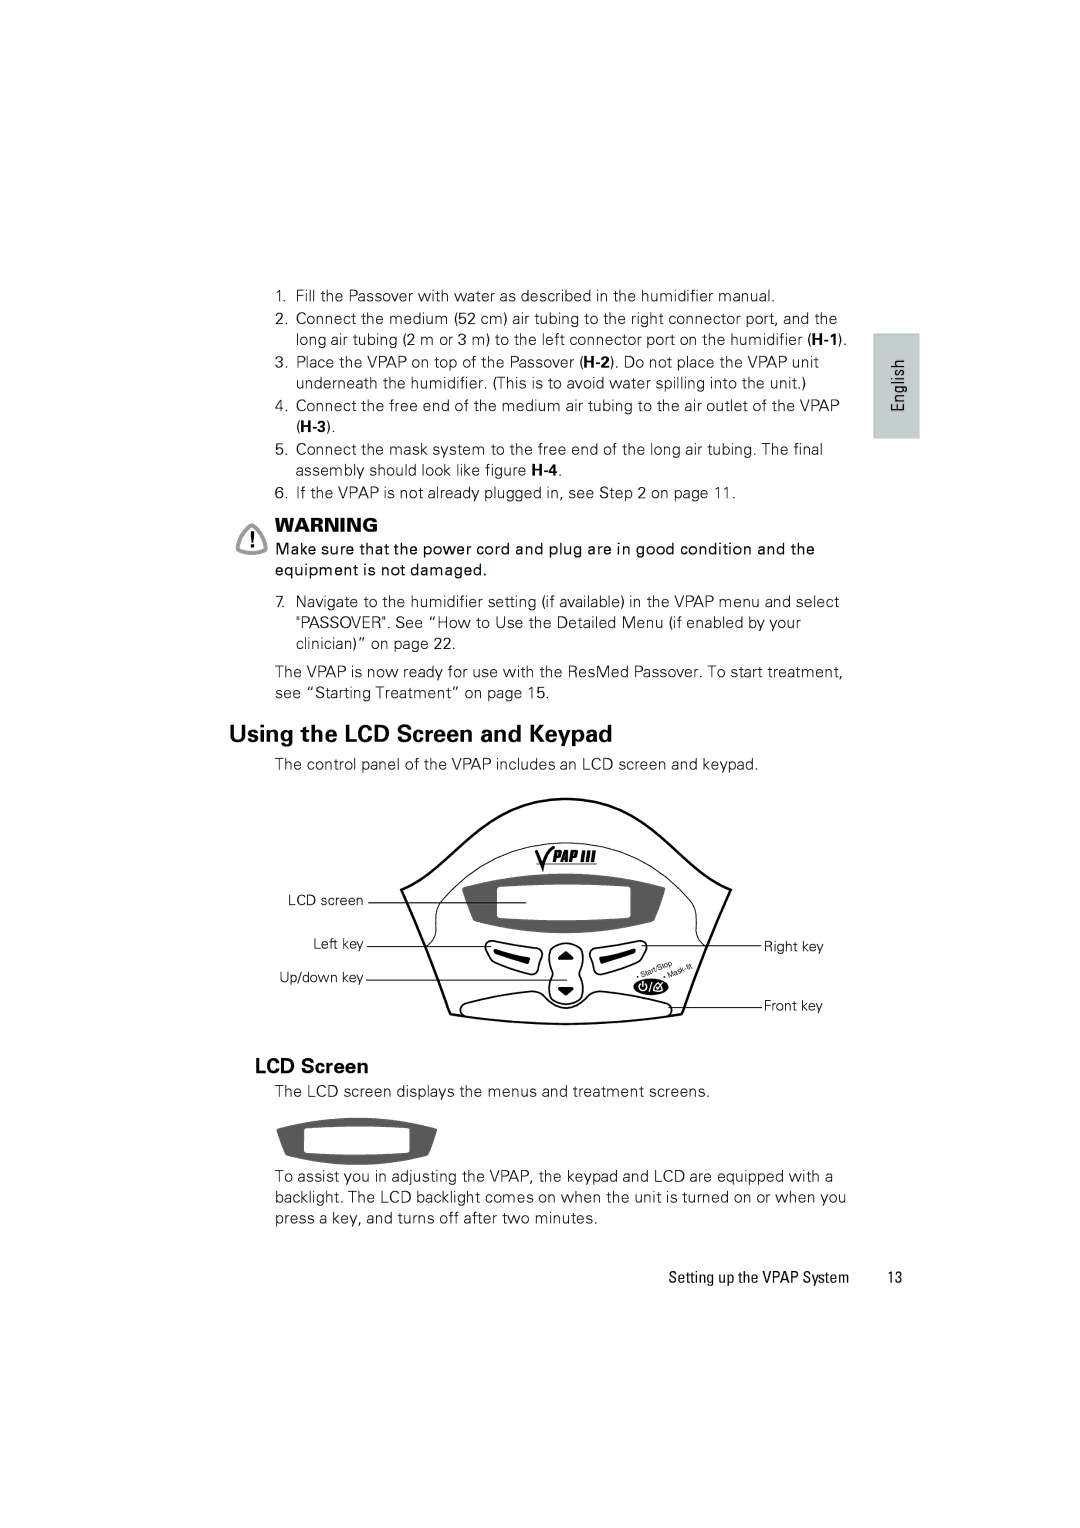
LCD Screen
Using the LCD Screen and Keypad
Control panel of the Vpap includes an LCD screen and keypad
Menu, enter, change and apply
Exit and cancel
Keypad Keys
Vpap keypad has the following keys
Ramp time
Starting Treatment
Using the Mask-Fitting Feature
Using the HumidAire 2i Warm-Up Feature
Stopping Treatment
High Leak
Page
Periodic Cleaning
Cleaning and Maintenance
Daily Cleaning
Weekly Cleaning
Servicing
Replacing the Air Filter
Vpap screen Ramp screen
How to Use the Vpap Menus
How to Use the Standard Menu
Ramp Screen
Summarises the Vpap detailed menu series
How to Use the Detailed Menu if enabled by your clinician
MIRAGE, MIR Full
Menu Functions Detailed menu only
Settings Menu
SmartStart
Settings for Mask Types
Options Menu
Results Menu
Servicing Menu
Treatment Screens
Page
Nasal Irritation
Using a Battery and an Inverter
Helpful Hints
Starting out
Page
Troubleshooting
Troubleshooting
System Error
High leak in last
Page
Environmental Conditions
System Specifications
Dynamic pressure characteristics
Dimensions L x W x H 270 mm x 230 mm x 141 mm Weight 2.3 kg
Breaths
Pressure Variation
IEC 60601-1 Classifications
Class II double insulation Type CF
Start/Stop or Mask-Fit
Pressure Volume curve
Symbols which appear on the product
Class II equipment Type CF equipment Drip Proof
Environmental information
Guidance
Emissions test Compliance
Next
Portable and mobile RF communications
Separation distance according to frequency of transmitter
Limited Warranty
Page
Index
Index
Page
Bedienungsanleitung
Page
Inhalt
Page
Anwendungsgebiete des Vpap III und des Vpap III ST
Einleitung
Medizinische Hinweise
Verantwortung des Benutzers/Eigentümers
Warnungen
Nebenwirkungen
Vorsicht
Page
Full Face Maske
Das VPAP-System
Masken
Nasenmasken
Zubehör
Atemluftbefeuchter
Aufstellen des Vpap
Aufstellen des Vpap
Anschluss eines HumidAire Atemluftbefeuchters
Anschluss des Atemluftbefeuchters
Anschluss eines HumidAire 2i Atemluftbefeuchters
Anschluss eines HumidAire 2iC Atemluftbefeuchters
Siehe Illustrationen in Abschnitt H der Illustrationsseite
Anschließen eines Passover-Atemluftbefeuchters
Das Tastenfeld des Vpap verfügt über die folgenden Tasten
Benutzung des LCD-Displays und Tastenfelds
LCD-Display
Tasten
Beend. und Abbrechen
Menü, Zugang, Ändern und Akzept
Page
Rampenzeit
Behandlungsbeginn
Oder
Beenden der Behandlung
Benutzung der Aufwärmfunktion des HumidAire
Benutzung der Maskenanlegefunktion
Starke Leckage
Page
Tägliche Reinigung
Reinigung und Wartung
Wöchentliche Reinigung
Auswechseln des Luftfilters
Regelmäßige Reinigung
Wartung
Vorsicht
Page
Rampen-Anzeige
Benutzung der VPAP-Menüs
Verwendung des Menüs „Standard
VPAP-Anzeige Rampen-Anzeige
Benutzung des Detailmenüs falls vom Arzt aktiviert
EIN, AUS
Menüfunktionen nur im Detailmenü
Das Menü „Einstellungen
Einstellungen für Maskentypen
Das Menü „Optionen
Das Menü „Ergebnisse
Das Menü „Wartung
Behandlungsbildschirme
Deutsch
Page
Reisen mit dem Vpap
Hilfreiche Hinweise
Zu Beginn
Nasenreizungen
Benutzung einer Batterie und eines Wechselrichters
Fehlersuche
Fehlersuche
Der Vpap stoppt nicht
Systemfehler
Page
Eigenschaften des dynamischen Druckes
Technische Daten
Elektromagnetische Verträglichkeit
Klasse II Doppelisolierung Typ CF
Druckvariationen
Schlauchsystem Flexibler Kunststoff, 2 m bzw m Länge
IEC 601-1 Klassifikationen
Druckkurve
Auf dem Produkt erscheinende Symbole
Umweltinformationen
Deutsch
Fortsetzung nächste Seite
Bei der Verwendung von tragbarer und mobiler
Abstand je nach der Senderfrequenz m
Beschränkte Garantie
Page
Index
Page
Manuel utilisateur
100
Sommaire
102
Contre-indications
Informations médicales
Responsabilité de l’utilisateur/du propriétaire
Usage prévu pour la Vpap III et la Vpap III ST
Avertissements
Effets secondaires
Précautions
105
106
Masques faciaux
La Vpap
Masques
Masques nasaux
Humidificateurs
Accessoires
109
Installation de la Vpap
Installation de la Vpap
Fixation d’un humidificateur
Fixation d’un humidificateur HumidAire 2iC
Fixation d’un humidificateur HumidAire
111
Fixation d’un humidificateur Passover
Le clavier de la Vpap comprend les touches suivantes
Utilisation de l’écran LCD et du clavier
Ecran LCD
Touches du clavier
Touche Gauche verte Fonction
113
114
Durée de rampe
Début du traitement
116
Arrêt du traitement
Utilisation de la fonction de préchauffage d’un HumidAire
Utilisation de la fonction d’ajustement du masque
Début du traitement 117
118
Nettoyage périodique
Nettoyage et entretien
Nettoyage quotidien
Nettoyage hebdomadaire
Réparations
Remplacement du filtre à air
121
Utilisation des menus de la Vpap
Ecran Rampe
Utilisation du menu standard
Pour faire défiler les options d’un menu
Appuyez sur la touche de déplacement vers le haut/bas
MIRAGE, Facial
123
Menu Réglages
Fonctions de menu menu détaillé uniquement
124
125
Options de réglage pour les différents types de masque
126
Menu Résultats
Menu Entretien
Menu Options
127
Ecran de traitement
Ecrans de traitement
129
130
Voyager avec la Vpap
Astuces
Initialement
Irritation nasale
132
Utilisation d’une batterie et d’un onduleur
133
Stratégie de dépannage
Retirez le masque
134
App. s/touche
135
136
Compatibilité électromagnétique
Caractéristiques
Caractéristiques de pression dynamique
Conditions ambiantes
Pression cm H2O
Variation de la pression
Respirations 138
Symboles figurant sur l’appareil
Courbe Volume/Pression
140
Informations concernant lenvironnement
Français
Guide et déclaration du fabricant Immunité électromagnétique
Suite page suivante 142
Les équipements de communication RF
144
R001-307/2 05 145
Garantie limitée
146
Index
148
149
Vpap III E III ST
150
Indice
Garanzia Limitata Indice analitico 152
Indicazioni per l’uso degli apparecchi Vpap III e
Introduzione
Informazioni mediche
Responsabilità del proprietario o dell’utente
Avvertenze
Effetti collaterali
Precauzioni
155
156
Maschere complete
Il sistema Vpap
Maschere
Maschere nasali
Umidificatori
Accessori
Configurazione del Vpap
Configurazione del sistema Vpap
159
Connessione di un umidificatore HumidAire
Connessione di un umidificatore
Connessione di un umidificatore HumidAire 2iC
161
Connessione di un umidificatore Passover
Il tastierino del Vpap comprende i seguenti tasti
Uso dello schermo a cristalli liquidi e del tastierino
Schermo a cristalli liquidi
Tasti del tastierino
163
164
Tempo di incremento
Avvio del trattamento
Avvio del trattamento 165
Oppure
Uso della funzione di installazione della maschera
Interruzione della terapia
Uso della funzione di riscaldamento dello HumidAire
Avvio del trattamento 167
168
Pulizia periodica
Pulizia e manutenzione
Pulizia quotidiana
Pulizia settimanale
Manutenzione
Sostituzione del filtro dell’aria
171
Uso dei menu del Vpap
Schermata Incremento
Uso del menu standard
Schermata Vpap Schermata Incremento
Uso del menu avanzato se abilitato dal medico
173
Menu Impostazioni
Funzioni dei menu solo menu avanzato
174
175
Impostazioni a seconda del tipo di maschera
176
Menu Risultati
Menu Manutenzione
Menu Opzioni
177
Sincr
Schermate di trattamento
179
180
Inizio del trattamento
Consigli utili
Irritazioni nasali
Viaggiare con il Vpap
Uso di una batteria e di un invertitore
Uso nei vari Paesi
183
Risoluzione dei problemi
Interrompe quando ci si Toglie la maschera
184
Premi se fatto
185
186
Condizioni ambientali
Dimensioni P X L X a 270 mm x 230 mm x 141 mm Peso 2,3 kg
Specifiche del sistema
Caratteristiche dinamiche della pressione
188
Compatibilità elettromagnetica
Respirazione
Curva di pressione e volume
Variazione di pressione
Pressione massima
Start/Stop o Tenuta maschera
Simboli che compaiono sul prodotto
Informazioni ambientali
191
CEI60601-1-2 Conformità Raccomandazioni
Continua alla pagina seguente 192
Livello test Livello di Ambiente
Elettromagnetico
193
Distanza di separazione in funzione della frequenza del
194
Trasmettitore
R001-307/2 05 195
Garanzia Limitata
196
Indice analitico 197
Indice analitico
198
199
Vpap III y III ST
200
Índice
202
Para qué sirven el Vpap III y el Vpap III ST
Introducción
Información médica
Responsabilidad del usuario/propietario
Advertencias
Efectos secundarios
Precauciones
Información médica 205
206
Mascarillas Faciales
El sistema Vpap
Mascarillas
Mascarillas nasales
Accesorios
Humidificadores
209
Configuración del Sistema Vpap
Configuración del Vpap
Conexión de un humidificador
Conexión de un humidificador HumidAire 2iC
Conexión de un humidificador HumidAire
Conexión de un humidificador Passover
Uso del visor y el teclado
211
El teclado del Vpap tiene las siguientes teclas
Cancelar
Visor
Teclado
Inicio del tratamiento 213
Inicio del tratamiento
Tiempo de rampa
Detención del tratamiento
Uso de la función de calentamiento del HumidAire
Uso de la función Ajuste de mascarilla
Inicio del tratamiento 215
216
Limpieza periódica
Limpieza y mantenimiento
Limpieza diaria
Limpieza semanal
Servicio de mantenimiento
Cambio del filtro de aire
219
Cómo usar los menús del Vpap
Pantalla de Rampa
Cómo usar el menú estándar
Figura 2 resume el Menú detallado del Vpap 220
NINGUNO, PASSOVER, Humidaire
221
222
Funciones del menú Menú detallado únicamente
223
Menú Parámetros
224
Configuraciones de los tipos de mascarillas
Menú de Opciones
Menú de Resultados
225
Menú de Servicio
Pantallas de Tratamiento
226
227
228
Viajes con el Vpap
Consejos útiles
Para comenzar
Irritación nasal
Uso de una batería y un inversor
231
Solución de problemas
Mascarilla
232
Pulse c/hecho
233
234
Compatibilidad electromagnética
Especificaciones del sistema
Características de la presión dinámica
Condiciones ambientales
Ón cm
Variación de presión
Clasificaciones CEI
Clase II doble aislamiento Tipo CF
Símbolos que aparecen en el producto
Curva de Presión/Volumen
237
238
Información medioambiental
239
Guía y declaración del fabricante inmunidad electromagnética
Continúa en la página siguiente 240
241
Distancia según la frecuencia del transmisor m
242
Garantía Limitada 243
Garantía Limitada
R001-307/2 05 244
Índice alfabético 245
Índice alfabético
246
247
Vpap III e III ST
248
Iniciar o tratamento
Informação médica
Sistema Vpap
Montagem do sistema Vpap
Garantia Limitada Índice remissivo 250
Qual é a função do Vpap III e do Vpap III ST
Introdução
Informação médica
Responsabilidade do Utilizador/Proprietário
Avisos
Efeitos adversos
Precauções
Informação médica 253
254
Máscaras Faciais
Sistema Vpap
Máscaras
Máscaras Nasais
Acessórios
257
Montagem do sistema Vpap
Montagem do Vpap
Conexão de um humidificador
Conexão de um humidificador HumidAire 2iC
Conexão de um humidificador HumidAire
Conexão de um humidificador Passover
Utilização do mostrador LCD e do teclado
259
Teclado do Vpap possui as seguintes teclas
Mostrador LCD
Tempo de subida
Iniciar o tratamento
Iniciar o tratamento 261
Uso da função de aquecimento do HumidAire
Parar o tratamento
Utilização da Função de Ajuste da Máscara
Iniciar o tratamento 263
264
Limpeza periodicamente
Limpeza e manutenção
Limpeza diariamente
Limpeza semanalmente
Manutenção
Substituição do Filtro de Ar
267
Como usar os menus do Vpap
Ecrã de Subida
Como usar o menu standard
Para sair do menu Prima a tecla Direita sair
Humid Nenhum
269
Menu de Parâmetros
Funções do menu apenas com o Menu em Detalhe
270
271
Parâmetros para variados tipos de máscaras
272
Menu de resultados
Menu de manutenção
Menu de Opções
273
Esub
Ecrãs de tratamento
275
276
Viagens com o Vpap
Sugestões úteis
Para começar
Irritação nasal
Uso de bateria e inversor
279
Detecção e resolução de problemas
Sua máscara
280
Erro DE Sistema
281
282
Compatibilidade electromagnética
Especificações do sistema
Características de pressão dinâmica
Condições ambientais
Pressão cm H2O
Variação da pressão
Classificações IEC
Classe II isolamento duplo Tipo CF
Símbolos passíveis de serem apresentados no produto
Curva de Pressão/Volume
285
Informações ambientais
Guia e Declaração do Fabricante Emissões Electromagnéticas
287
Guia e declaração do fabricante imunidade electromagnética
Continua na página seguinte 288
289
Distância de separação de acordo com a frequência
290
Do transmissor
Garantia Limitada 291
Garantia Limitada
Page
Índice remissivo 293
Índice remissivo
294
295
296
Inhoud
298
Beperkte garantie
Waar zijn de Vpap III en Vpap III ST voor bedoeld?
Inleiding
Medische informatie
Verantwoordelijkheid gebruiker/eigenaar
Waarschuwingen
Nadelige effecten
Voorzichtig
Medische informatie 301
302
Volgelaatsmaskers
Het VPAP-systeem
Maskers
Neusmaskers
Opmerkingen
Bevochtigers
Positie en op hetzelfde niveau of lager dan de Vpap
Instellen van het VPAP-systeem
Instellen van het VPAP-systeem
Een bevochtiger aansluiten
Het aansluiten van een HumidAire 2iC bevochtiger
Aansluiten van een HumidAire 2i bevochtiger
Aansluiten van een HumidAire bevochtiger
Aansluiten van een Passover bevochtiger
Het gebruik van het LCD-scherm en het toetsenpaneel
307
Toetsen op het toetsenpaneel
LCD-scherm
Het toetsenpaneel van de Vpap bevat de volgende toetsen
Aanlooptijd
Beginnen met de behandeling
309
Het gebruik van HumidAire 2i verwarmingsfunctie
De behandeling beëindigen
Gebruik van de maskerpasvorm-functie
311
312
Periodieke reiniging
Reiniging en onderhoud
Dagelijkse reiniging
Wekelijkse reiniging
Het luchtfilter vervangen
Service
315
Het gebruik van de Vpap menu’s
Aanloopscherm
Het standaardmenu gebruiken
Om het menu te verlaten Druk op de toets Rechts verlaten
GEEN, PASSOVER, Humidaire
317
Menu Instellingen
Menu Functies alleen menu Gedetailleerd
318
Maskertype dient te selecteren
Instellingen voor maskertypes
319
320
Menu Resultaten
Menu Opties
Menu Service
321
Behandelingsschermen
Behandelingsscherm Cyclus-indicator TiMn / C / TiMx
323
324
Reizen met de Vpap
Nuttige aanwijzingen
Beginnen
Neusirritatie
Page
327
Opsporen en oplossen van problemen
Afneemt
328
Systeemfout
329
330
Elektromagnetische compatibiliteit
Systeemspecificaties
Dynamische druk-kenmerken
Omgevingsvoorwaarden
IEC 60601-1 classificaties
Drukvariatie
Symbolen die op het product verschijnen
Drukvolume-curve
Start/Stop of Maskerpasvorm
Milieu-informatie
Richtlijn
Emissietest Compliantie
Gaat verder op de volgende bladzijde 336
Draagbare en mobiele RF
338
Beperkte garantie 339
Beperkte garantie
340
Index
342