DVD-R150 DVD-R155
Getting Started
Be Sure to Operate Recorder Correctly AS Instructed
Maintenance of Cabinet
Precaution
Important Safety Instructions
Handling Cautions
Disc Specifications
Disc Storage
Protection
DVD+RW Disc Playback and Recording
DVD-RAM Disc Playback and Recording
Do not use the following discs
Contents
Additional Information
General Features
Select the disc type
How to use the DVD Recorder
Recording
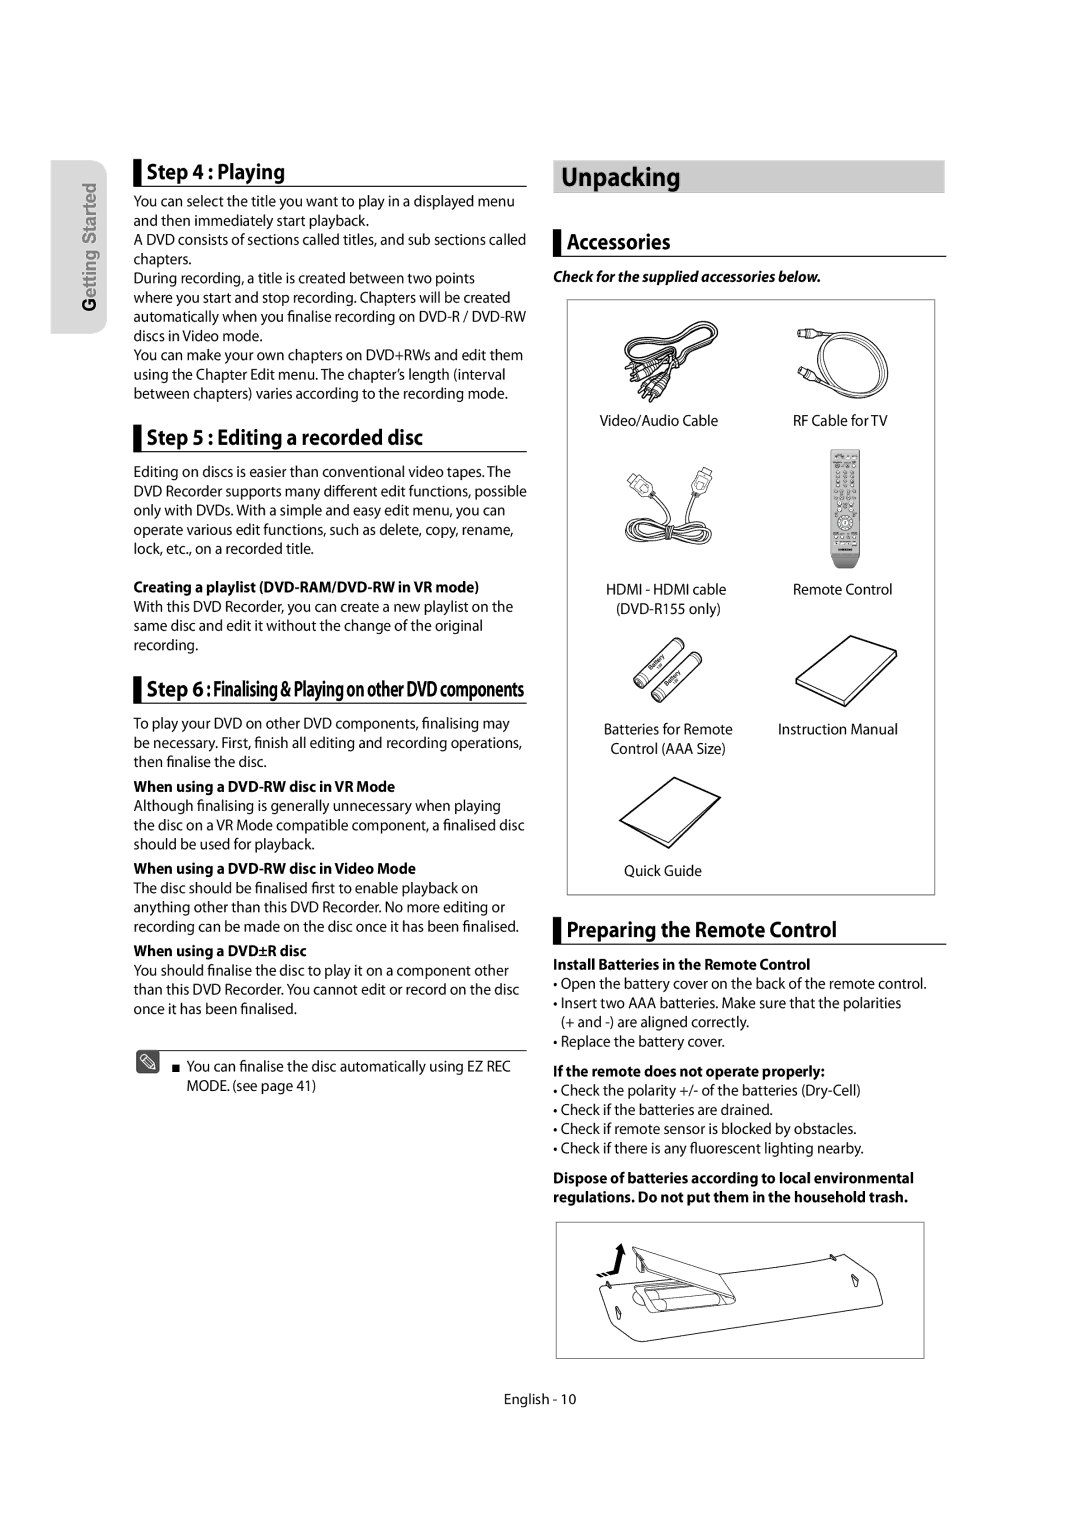
Unpacking
Accessories
Preparing the Remote Control
Playing
Controllable TV Codes
Front Panel
Description
Front Panel Display
Rear Panel DVD-R150
Rear Panel DVD-R155
Tour of the Remote Control
TV mode
Connecting & Setting Up
Connecting the DVD Recorder
Video, Component video and Progressive Output Modes
Case 1 Connecting to a Video Composite output jack
Case 2 Connecting to an S-Video output jack
See page 17~18
Case 1 Connecting to your TV
If your TV has audio input jacks, use this connection
Case 2 Connecting to a stereo amplifier with AV output jacks
Case 1 Connecting to a TV with Hdmi Jack
Connecting HDMI/DVI to a TV DVD-R155 only
Case 2 Connecting to a TV with DVI Jack
Connecting to AV2 IN, DV input jack
Case 2 Connecting a Camcorder to the DV in jack
Plug & Auto Setup
System Setup
On-Screen Menu Navigation
Setting the Clock
System Setup
Presetting Channels with the Auto Setup function
Presetting Channels with the Manual Setup function
Setting up the Language Options
Quick Recording Setting
Setting up the System Options
EP Mode Time Setting
This function allows you to setup the system setting
Anynet+HDMI-CEC DVD-R155 only
For using Anynet+HDMI-CEC
TV Menu
Setting up the Audio Options
Digital Output
This function allows you to setup the TV screen setting
Setting up Video Options
This is only active when a Dolby Digital signal is detected
Dynamic Compression
Setting up the Progressive scan
Canceling the Progressive scan
HDMI/DVI Resolution DVD-R155 only
DivXR Registration
About the Change Password
Setting up the Parental Control
About the Rating Level
This section shows various DVD recording methods
Recording
Recordable discs
DVD-RAM DVD-RW DVD-R
Recording Formats
DVD-RAM/-RWVR mode
DVD-RWVideo mode/-R
Mode Characteristic Recording Times Data
Recording Mode
Unrecordable video
Content Protection for Recordable Media Cprm
Concerning Copy Control Signals
DVD-RW Ver.1.1 With Cprm VR mode Video mode
About Info Button
To pause recording
Recording immediately
Before you start
To stop recording
Wait until Load disappears from the front panel display
Copying from a Camcorder
Press the OPEN/CLOSE button to close the disc tray
To stop recording
Making a One Touch Recording OTR
030 100 .. 500 .. normal
Speed Recording Mode
Making a Timer Recording
03 TUE
Follow these directions to edit the timer record list
If the timer settings overlap
You can make the Timer Recording up to 12 programmes
Editing the Scheduled Record List
EZ REC Mode is set up
Deleting the Scheduled Record List
Disc types that can be played
Playback
Region code DVD-Video only
DTS
Playing a Disc
Discs that cannot be played
For DVD-VIDEO discs
Using the Disc Menu & Title Menu
Using the playback related buttons
For DVD-RAM/DVD±RW/±R discs
Skipping Chapters or Tracks
Slow Motion play/Step Motion Play
Step Motion Play
If you press the Skip button
Moving to a desired scene directly
Using the Anykey button
Repeat Play
Playing Repeatedly
Selecting the Audio Language
Using one Touch button
Selecting the Subtitle Language
Changing the Camera Angle
Zooming-In
Using Bookmarks
Setting Bookmarks
Playing back a bookmark
Clearing a bookmark
Using the Markers
Setting Markers
Playing back a Marker
Playing an Audio CDCD-DA
Playing back an Audio CDCD-DA/MP3
Audio CDCD-DA Screen Elements
Repeat Playback of an Audio/MP3 Disc
Press the Cancel button to return to normal playback
Playing back an MP3 Disc
MP3 Screen Elements
To Programme Tracks
Play Option Mode
Playing back a Picture Disc
You can register a maximum of 30 tracks in the playlist
MPEG4 Function Description
Playing back MPEG4 Disc
Adpcm
Recording on Free space
Playing the Title List
Title List Screen Elements
Rename, Delete, Edit, Protection See pages
RenamingLabeling a Title
Editing
Basic Editing Title List
Title List
Deleting a Title
Locking Protecting a Title
Status
Deleting a Section of a Title
Edit Title List Screen Elements
Deleting a chapter
Editing a Chapter
Adding a chapter
Chapter Edit Screen Elements
Deleting all chapters
Dividing a Title
Hiding a chapter
Follow steps 1 to 3
Playing Entries in the Playlist
Advanced Editing Playlist
Creating a Playlist
Follow these instructions to play the playlist entries
Playing a Selected Scene
Renaming a Playlist Entry
Editing a Scene for the Playlist
Follow these instructions to edit scenes for a playlist
Modifying a Scene Replacing a Scene
Moving a Scene Changing the Position of a Scene
Adding a Scene
Deleting a Scene
Deleting a Playlist Entry from the Playlist
Disc Manager
Copying a Playlist Entry to the Playlist
Editing the Disc Name
Do you want to continue?
Disc Protection
Formatting a Disc
DVD-VR Disc
DVD-RW can be finalised or unfinalised in VR mode
Unfinalising a disc V/VR mode
Finalising a disc
Delete All Title Lists
Edit Compatible
Additional Information
Troubleshooting
Power
Playback
Sound
Remote Control Unit
Timer Recording
Hdmi DVD-R155 only
MPEG-II
Specifications
PAL-B/G, D/K
DVD Audio CDCD-DA
Region Country Customer Care Center Web Site
English Français AK68-01274J
DVD-R150 DVD-R155
Premiers pas avec l’appareil
Avertissement
Manipulation du disque
Précautions
Entretien du boîtier
Tenue du disque
CD audio
Stockage du disque
Spécifications du disque
Lecture et enregistrement de disques DVD±R
Lecture et enregistrement de disques DVD-RW
DVD-RW mode VR
DVD-RW mode Vidéo
’utilisez pas les disques suivants
Compression Dynamique
Cas Connexion d’un caméscope à la prise ’entrée DV
Nicam
Disques ne pouvant être lus avec cet appareil
Mode EZ REC
Code de régionDVD-Video uniquement
Dépannage
Caractéristiques générales
Utilisation d’un DVD-RAM
Avant de lire le manuel de l’utilisateur
Étape 2 Formatez le disque pour commencer l’enregistrement
Utilisation d’un DVD±RW/+R
Déballage
Prog ou
Codes TV contrôlables
Bouton Fonction
Utilisé pour activer et désactiver le son
Affichage en façade
Panneau arrière DVD-R155
Panneau arrière DVD-R150
Composant excellente qualité vidéo
Aperçu de la télécommande
Autre type de connexion du câble de sortie vidéo
Mode TV
Connexion & Configuration
Modes S-Vidéo, Vidéo composant et Sortie progressive
Cas 1 Connexion à une prise de sortie vidéo composite
Cas 2 Connexion à une prise de sortie S-Vidéo
Cas 3 Prises de sortie Vidéo composant
Autre type de connexion du câble de sortie audio
Cas 1 Connexion à votre téléviseur
Haut-parleur
Cas 2 Raccordement à un téléviseur prise DVI
Cas 1 Raccordement à un téléviseur prise Hdmi
Pourquoi Samsung utilise-t-il HDMI?
Utilisez le bouton Input SEL. pour sélectionner
Connexion à la prise d’entrée AV2 IN, DV
Qu’est ce que le HDCP?
’entrée correcte
Navigation dans le menu à l’écran
Installation du système
Branchement et réglage automatique
Installation du système
Réglage de l’horloge
Pré-réglage des canaux avec la fonction de réglage manuel
Configuration des options du système
Configuration des options de langue
Cette fonction vous permet de configurer le système
Configuration de l’enregistrement rapide
Réglage de l’heure en mode EP
Création automatique de chapitre
Automatique de chapitres
Utilisation d’Anynet+HDMI-CEC
Anynet+HDMI-CEC DVD-R155 uniquement
Menu du téléviseur
Configuration des options audio
Non Aucune sortie de signal DTS
Sortie Numérique
Format du téléviseur
Configuration des options vidéo
Compression Dynamique
Réduction Bruit 3D réduction du bruit adaptée au mouvement
‹ Pour activer le réglage Progressif
‹ Pour annuler le réglage Progressif
Résolution HDMI/DVI DVD-R155 uniquement
Enregistrement DivXR
Propos du niveau d’évaluation
Configuration du contrôle parental
Propos du Changement de mot de passe
DVD-RAM DVD-RW DVD-R DVD+RW DVD+R
Enregistrement
Disques enregistrables
Enregistrable
DVD-RAM/-RW mode VR
DVD-RW mode Vidéo/-R
Formats d’enregistrement
Mode Caractéristique Durées d’enreg
Mode enregistrement
Films non enregistrables
Propos du bouton Info
DVD-RW Ver.1.1 DVD-RWVer.1.1 Avec Cprm Mode VR Mode Vidéo
Propos des signaux anti-copie
Avant de commencer
Enregistrement immédiat
Enregistrement du programme télévisé que vous regardez
Pour mettre l’enregistrement en pause
Appuyez sur la touche OPEN/CLOSE et insérez un disque
Copie à partir d’un caméscope
Assurez-vous que le disque a suffisamment d’espace disque
Enregistrable dans le tiroir à disque
Enregistrement avec une seule touche OTR
LU-SA
Vitesse Mode d’enregistrement
LU-VE
Editer une Minuterie Standard
Si les réglages du programmateur se chevauchent
Mode EZ REC
Supprimer une minuterie standard
Lecture
Type de disques pouvant être lus avec cet appareil
Lecture d’un disque
Disques ne pouvant être lus avec cet appareil
Cas des disques DVD-VIDEO
Utilisation des chapitres ou des pistes
Utilisation des boutons de lecture
Cas des disques DVD-RAM/DVD±RW/DVD±R
Lecture par sauts
Lecture au ralenti/Lecture par sauts
Lecture au ralenti
Sauter des chapitres ou des pistes
Accès direct à la scène souhaitée
Utilisation du bouton Anykey
Répétition de la lecture
Lecture répétée
Changement dangle de la caméra
Sélection de la langue de sous-titrage
Sélection de la langue audio
Utilisation du bouton One Touch Touche unique
Réglage de signets
Zoom avant
Utilisation des signets
Lire un signet
Réglage de repères
Utilisation des marqueurs
Effacer un signet
Lire un marqueur
Appuyez sur la touche Search / lecture rapide X2, X4
Lecture dun CD Audio CD-DA/MP3
Lecture d’un CD audio CD-DA
Piste
Pour retourner en mode de lecture normale
Lecture d’un disque MP3
Lecture dun disque vidéo
Mode Options de lecture
Programmer des pistes
AVI, .DIVX, .avi, .divx
Lecture dun disque MPEG4
‹ Description de la fonction MPEG4
Éléments de l’écran Liste de Titres
Lecture de la liste de titres
Enregistrement dans l’espace libre
Renommer Étiqueter un titre
Édition
Édition de base Liste de titres
Liste de titres
Verrouiller Protéger un titre
Supprimer un titre
Supprimer une section d’un titre
DÉPLA. OK Revenir Quitter DVD-RWVR
Lire une scène sélectionnée
Modification d’un chapitre
Suppression d’un chapitre
Suppression de tous les chapitres
Fractionnement d’un titre
Masquage d’un chapitre
Suivez les étapes 1 à 3 de la procédure indiquée en
Lire les entrées de la Liste de lecture
Édition avancée Liste de lecture
Créer une Liste de lecture
Pour créer une nouvelle liste de lecture
Renommer une entrée dans une liste de lecture
Éditer une scène pour une liste de lecture
Déplacer une scène Changer une scène de position
Modifier une scène Remplacer une scène
Suivez les étapes 1 à 3 de la
Ajouter une scène
Supprimer une scène
Gestionnaire de disque
Éditer le nom d’un disque
Le disque est formaté
Protection du disque
Formater un disque
DVD-VR Disque DVD-RAM DVD-RW
Finaliser un disque
Ne pas finaliser un dique mode V/VR
Ment
Supprimer toutes les listes de titres
Compatibilité à la modification
Informations Complémentaires
Dépannage
Enregitrement par minuterie
Télécommande
Son
Hdmi DVD-R155 uniquement
Caractéristiques techniques
PAL-B/G, DK
Contact Samsung World Wide
Comment contacter Samsung dans le monde
English Français AK68-01274J