ENGLISH |
|
Advanced Recording | Filmación avanzada |
ESPAÑOL
CUSTOM - Creating your own customized recording settings | CUSTOM - Crear sus ajustes de grabación personalizados | |||||||||
✤ You can customize the settings and save them for future use. | ✤ Usted puede crear sus ajustes de grabacion personalizados y | |||||||||
| ■ The CUSTOM function only operates in CAMERA mode. | guardarlos. | ■ La función CUSTOM solo funciona en | |||||||
|
|
|
|
|
|
|
| |||
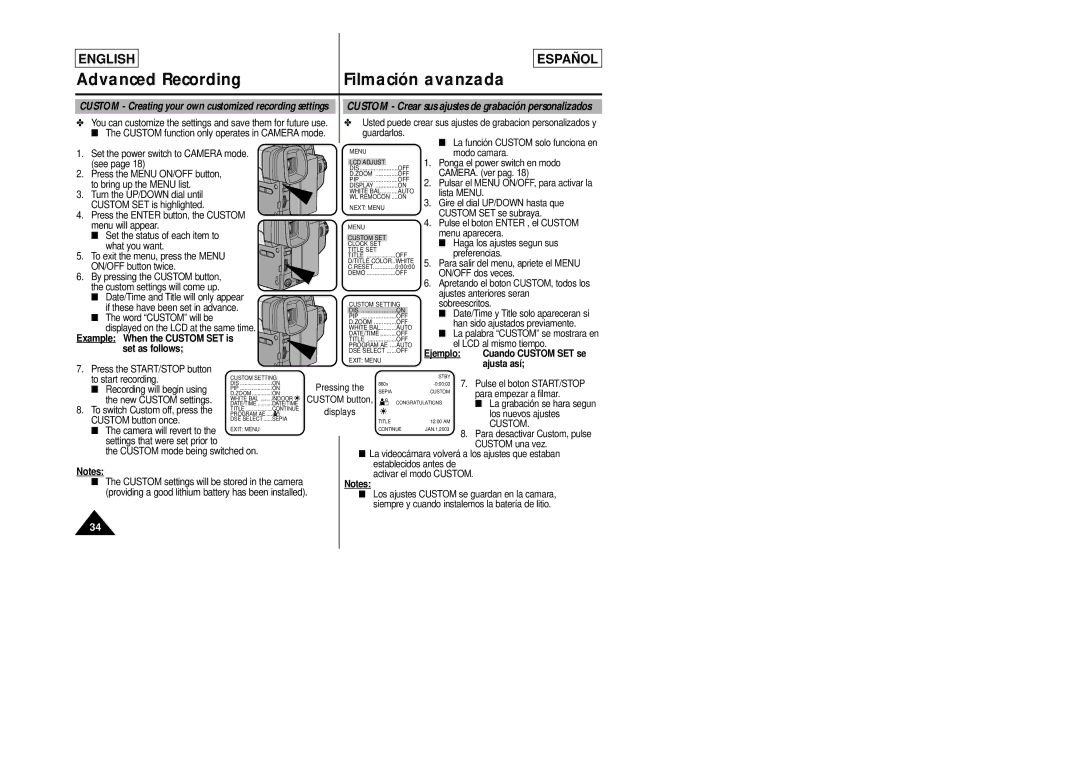
1. | Set the power switch to CAMERA mode. |
|
| MENU |
|
|
| modo camara. | ||
|
|
|
|
|
| |||||
| (see page 18) |
|
|
| LCD........................ADJUST | OFF | 1. Ponga el power switch en modo | |||
2. |
|
|
| DIS |
| |||||
Press the MENU ON/OFF button, |
|
|
| D.ZOOM | .............. | OFF | CAMERA. (ver pag. 18) | |||
| to bring up the MENU list. |
|
|
| PIP | OFF | 2. Pulsar el MENU ON/OFF, para activar la | |||
|
|
|
| DISPLAY | ON | |||||
3. Turn the UP/DOWN dial until |
|
|
| WHITE BAL | AUTO | lista MENU. | ||||
|
|
| WL REMOCON .... | ON | ||||||
| CUSTOM SET is highlighted. |
|
|
| NEXT: MENU |
| 3. Gire el dial UP/DOWN hasta que | |||
4. Press the ENTER button, the CUSTOM |
|
|
|
|
| CUSTOM SET se subraya. | ||||
| menu will appear. |
|
|
| MENU |
|
| 4. Pulse el boton ENTER , el CUSTOM | ||
| ■ Set the status of each item to |
|
|
| CUSTOM SET |
| menu aparecera. | |||
| what you want. |
|
|
| CLOCK SET |
| ■ Haga los ajustes segun sus | |||
5. |
|
|
| TITLE SET |
| |||||
To exit the menu, press the MENU |
|
|
| TITLE | OFF |
| preferencias. | |||
| ON/OFF button twice. |
|
|
| D/TITLE COLOR..WHITE | 5. Para salir del menu, apriete el MENU | ||||
|
|
|
| C.RESET | 0:00:00 | |||||
|
|
|
| ON/OFF dos veces. | ||||||
6. By pressing the CUSTOM button, |
|
|
| DEMO | OFF | |||||
|
|
|
|
|
| 6. Apretando el boton CUSTOM, todos los | ||||
| the custom settings will come up. |
|
|
|
|
|
| |||
|
|
|
|
|
|
| ajustes anteriores seran | |||
| ■ Date/Time and Title will only appear |
|
|
|
|
| ||||
|
|
| CUSTOM SETTING | sobreescritos. | ||||||
| if these have been set in advance. |
|
| |||||||
|
|
| DIS | ON | ■ Date/Time y Title solo apareceran si | |||||
| ■ The word “CUSTOM” will be |
|
|
| PIP | OFF | ||||
|
|
|
| D.ZOOM | .............. | OFF |
| han sido ajustados previamente. | ||
| displayed on the LCD at the same time. |
|
|
|
| |||||
|
|
| WHITE BAL | AUTO | ■ | La palabra “CUSTOM” se mostrara en | ||||
Example: When the CUSTOM SET is |
|
| DATE/TIME | OFF | ||||||
|
| TITLE | OFF |
| el LCD al mismo tiempo. | |||||
| set as follows; |
|
|
| PROGRAM AE .... | AUTO |
| |||
|
|
|
| DSE SELECT | OFF | Ejemplo: | Cuando CUSTOM SET se | |||
|
|
|
|
| EXIT: MENU |
| ||||
7. Press the START/STOP button |
|
|
|
|
|
| ajusta así; | |||
|
|
|
|
|
|
|
| |||
|
|
|
|
|
|
|
|
| ||
| to start recording. | CUSTOM SETTING |
|
|
|
| STBY | 7. | Pulse el boton START/STOP | |
| DIS | ON | Pressing the | 880x |
| |||||
| ■ Recording will begin using |
| ||||||||
| PIP | ON | SEPIA |
| CUSTOM |
| para empezar a filmar. | |||
| the new CUSTOM settings. | D.ZOOM | ON | CUSTOM button, |
|
|
|
| ||
| WHITE BAL | INDOOR |
| CONGRATULATIONS |
| ■ La grabación se hara segun | ||||
| DATE/TIME | DATE/TIME |
|
| ||||||
8. | To switch Custom off, press the | TITLE | CONTINUE | displays |
|
|
|
| los nuevos ajustes | |
PROGRAM AE .... | SEPIA |
|
|
|
| |||||
| CUSTOM button once. | DSE SELECT |
|
| TITLE |
| 12:00 AM |
| CUSTOM. | |
|
|
|
|
|
|
| ||||
| ■ The camera will revert to the | EXIT: MENU |
|
|
| CONTINUE | JAN.1,2003 |
| ||
|
|
|
| 8. Para desactivar Custom, pulse | ||||||
|
|
|
|
|
|
|
| |||
| settings that were set prior to |
|
|
|
|
|
|
| ||
|
|
|
|
|
|
|
|
| CUSTOM una vez. | |
| the CUSTOM mode being switched on. |
|
|
|
|
|
|
| ||
|
|
| ■ La videocámara volverá a los ajustes que estaban | |||||||
Notes: |
|
|
|
| establecidos antes de |
| ||||
|
|
|
| activar el modo CUSTOM. |
| |||||
| ■ The CUSTOM settings will be stored in the camera |
| Notes: |
|
|
|
|
| ||
| (providing a good lithium battery has been installed). | ■ Los ajustes CUSTOM se guardan en la camara, | ||||||||
siempre y cuando instalemos la batería de litio.
34