Operation Guide
Model MX-C300P MX-C300PE MX-C300PL
Introduction
Name of your model, see p.6
Contents
104
Misfeed in the Paper Tray 2 Option
103
105
Conventions Used in this Manual
Using the Manual
About the Manuals
This manual covers the following models
Model Wireless LAN MX-C300P Yes
Differences Between Models
Part Names and Functions
Paper tray right side cover
Toner cartridge Y/M/C/Bk
Toner collection container
Duplex conveyor cover
Operation Panel
Display
Home Screen
Selecting an item with the arrow keys up/down
HOW to USE the Display
Use the Back key to return to the previous setting screen
Selecting an item with the arrow keys left/right
Power OFF
Power on and OFF
Power on
Power Save Modes
Useable Paper
Paper tray type Paper type Size Weight Capacity*1
Loading Paper
Plain PAPER, Special Media
Bypass tray
Print Side Face UP or Face Down
Trays 1 to
Pre-punched Left binding Letter head Pre-printed
Paper that can be used for automatic 2-sided printing
Paper that cannot be used
Non-recommended paper
Special papers
Gently lift and pull out the paper tray until it stops
Loading Paper
Loading the paper tray
Gently push the paper tray into the machine
Open out the bypass tray extension
Loading the bypass tray
Open the bypass tray
Important points when inserting paper in the bypass tray
Important points when using envelopes
Disabling Enabling Auto Tray Switching
Tray Settings
Changing the Paper Size Setting of a Tray
Inserting transparency film
When the job is finished, press the Logout key
User Authentication Mode
Using User Authentication Mode
Changing the Paper Type of a Tray
Key Characters that can be entered
Entering Characters
Characters That can be Entered
Printer Function of the Machine
Environment Printer driver type
Select the printer driver of the machine
Printing from Windows
Printer Driver Properties Window
Click the Preferences button
Click the Print button
Basic Printing Procedure
Selecting the Paper
Click the Paper tab Select the paper size
Menu
Printing on Envelopes
Click the Paper tab
Paper tray and paper type are automatically selected
Printing When the User Authentication Function is Enabled
Information icon
Viewing Printer Driver Help
Pop-up help
Click the OK button Start printing
Saving Frequently Used Print Settings
Saving Settings AT the Time of Printing
Using Saved Settings
Deleting saved settings
Changing the Printer Driver Default Settings
Printing from a Macintosh
Selecting Paper Settings
Select paper settings
Printing
Select print settings Click the Print button
Select the paper size
Select the bypass tray
Enter your user information
Select Print from the applications Start printing File menu
Display the job handling screen
Click the Print button
Select the Color Mode that you wish to use
Selecting the Colour Mode
When Color Mode is set to Automatic
Frequently Used Function
Black and White Printing
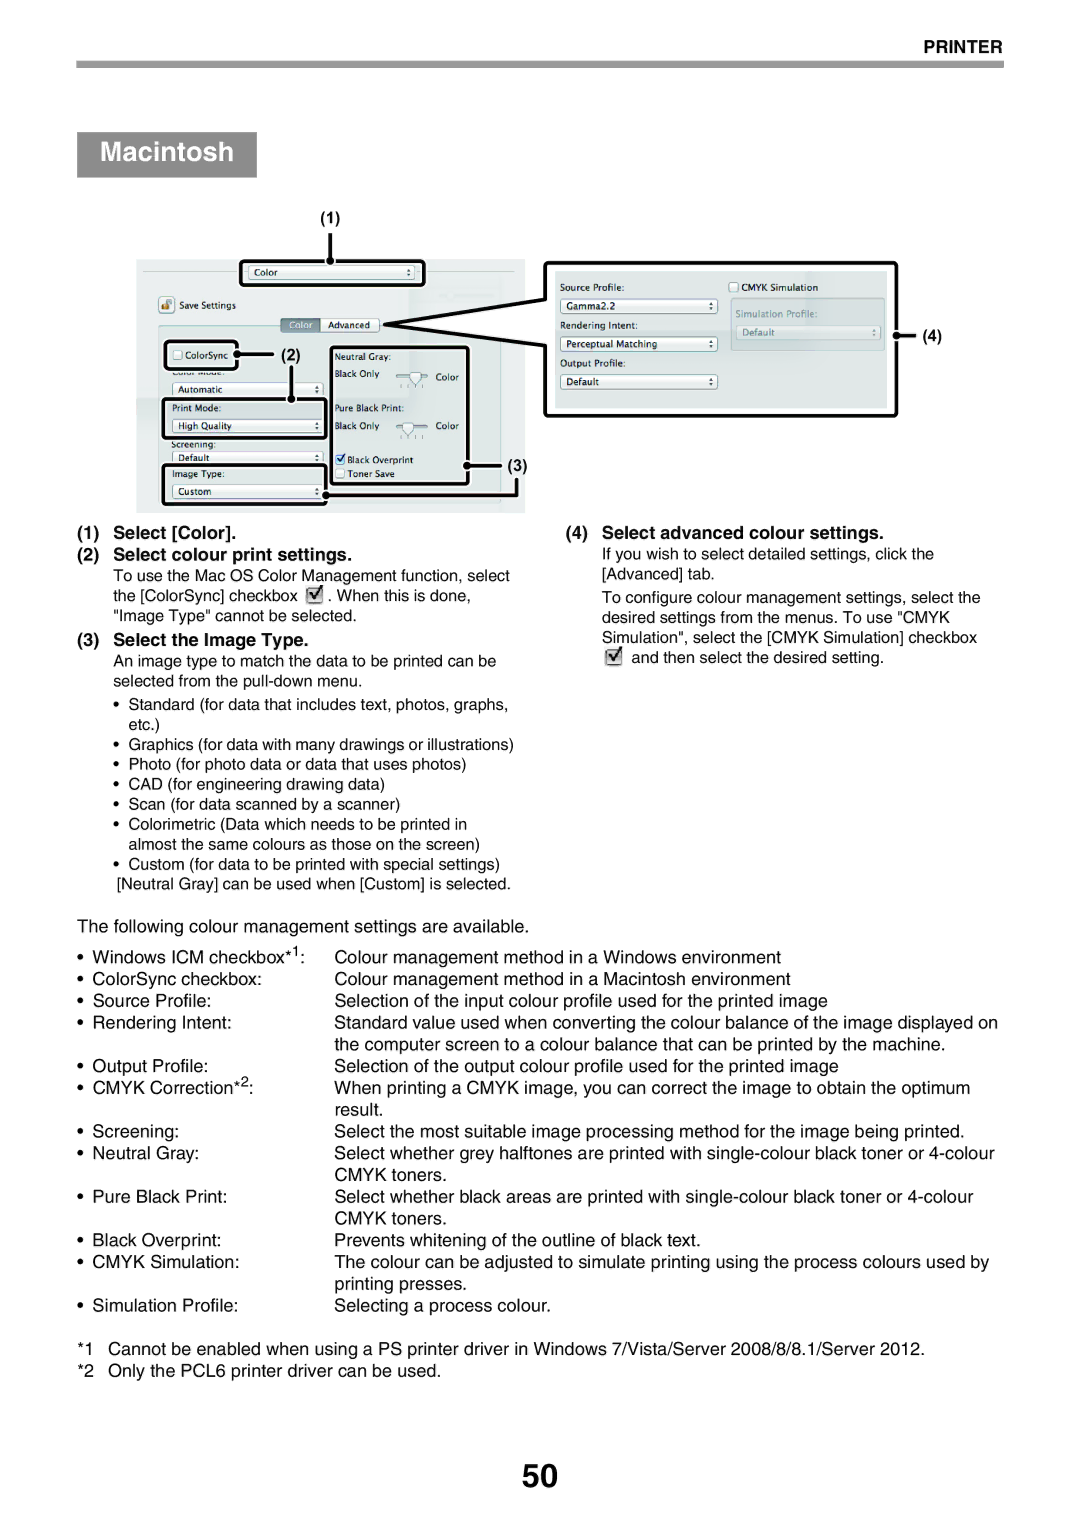
Select Color
Click the Advanced tab
Selecting a Print Mode Setting
Select the Print Mode
TWO-SIDED Printing
Print results Orientation
Fitting the Print Image to the Paper
Select Paper Handling
Orientation is landscape
Printing Multiple Pages on ONE
Sheet
Windows Macintosh
Creating a Pamphlet Pamphlet
Convenient Printing Functions
Convenient Functions for Creating Pamphlets and Posters
Select Printer Features
Increasing the Margin Margin Shift
Creating a Large Poster Poster Printing
This function is only available in Windows
Functions to Adjust the Size and Orientation of the Image
Rotating the Print Image 180 Degrees Rotate 180 degrees
ENLARGING/REDUCING the Print Image Zoom/XY-Zoom
Select Zoom and click the Settings button
Select a mirror image setting
Reversing the Image Mirror Image
This function can not be used in Mac OS X 10.4/10.5
Colour Mode Adjustment Function
Select Layout Select a mirror image setting
This function can only be used in Mac OS X
Abcd
Select advanced colour settings
Click the Color tab Select the Image Type
Select Color Select colour print settings
Following colour management settings are available
Functions That Combine Text and Images
Adding a Watermark to Printed Pages Watermark
Click the Watermarks tab
Select the image stamp setting
Printing AN Image Over the Print Data Image Stamp
Printing with an overlay file
Creating Overlays for Print Data Overlays
Create an overlay file
Click the Edit button Create an overlay file
Print Functions for Special Purposes
Printing Specified Pages on Different Paper Different Paper
Select Job Handling Select the retention setting
Saving and Using Print Files Retention
Click the Job Handling tab Select the retention setting
Convenient Printer Functions
When retention is performed, the display appears as follows
Printing a job stored by retention
Extension
Printing Without the Printer Driver
File Type
Select the file that you wish to print with or key
Directly Printing a File in USB Flash Memory
Connect the USB flash memory to the machine
Directly Printing from a Computer
Cancelling a Print JOB from the Machine
Change the Machine to Offline Mode
FTP Print
Function
Printer Driver Specification List
Appendix
Windows Macintosh
Printer
Indicators and Display Messages Misfeed Removal
Troubleshooting Network Problems
Printing Problems
Replacing the Toner Cartridge
Printing Problems
Troubleshooting
Network Problems
Paper curled or damp
Any other indicators turned off
Energy Save indicator blinks
Paper is not loaded properly
Port setting is not correct
Problem Cause and solution Machine is set to off-line mode
Printer driver has not been installed properly
Printing is disabled
Wrinkles appear in the paper or
Black dots or smudges appear on the printed output
Cut off Paper is not loaded properly
Image disappears in places
Indicators and Display Messages
Message Action
Misfeed Removal
Misfeed in the Bypass Tray
If you are unable to remove the misfed paper
Misfeed in the Machine
If you were able to remove the misfed paper
Be careful not to tear the misfed paper during removal
Misfeed in the fusing area B
Misfeed in the paper feed area a
Remove the misfed paper
Misfeed in the transport area C
Misfeed in the Paper Tray
Replacing the Toner Cartridge
Open the front cover
Message will be cleared and printing will be possible
Place the toner collection container on a flat surface
Replacing the Toner Collection Container
Pull out the paper tray
Push the toner collection container in completely
Install a new toner collection container
Close the front cover Replace tray
List name Description
Checking the Total Output Count and Toner Remaining
List Print User
Cleaning the Main Charger of the Photoconductive Drum
Routine Maintenance
Cleaning the Bypass Tray Paper Feed Roller
Cleaning the Laser Unit
Clean the laser unit
Push down and close the laser unit cover
Repeat to clean all holes in the laser unit 4 holes
Replace the cleaning tool
Press the Special Function key
Adjusting the Display Contrast
Adjust the contrast with the or key
Select Display Contrast with the or key
Programming AN Administrator Password
Select System Settings with the or key
System Settings List
Administrator Settings Menu
Level
Level
System settings, press the Home key
Using the System Settings
Setting that has a checkbox, go to step
Key
Daylight Saving Time
Wired Settings
Date & Time Set
Confirmation of Network
Wireless Infrastructure
Wireless Access Point
Account Limit Setting
User Authentication
Function Limit Setting
User Count Reset
Registration Adjustment
Fusing Control
Fusing Cleaning
Language Setting
Enter Auto Power Shut-Off after the Remote Job
Disable Auto Key Repeat
Disable Paper Size Set
Toner Save Mode
Tone Adjustments
Easy Calibration
Configure the IKEv1 settings
Return to Default
IPsec Settings
Initialize Private Data and Data in Machine
When finished, close the Web pages
HOW to Access the WEB
Configured in the machine
About the WEB Pages
About the WEB Pages for Users
Default Settings/ PCL/PS
Configuring the Printer Condition Settings
HOW to Configure the Settings
Settings
Default Settings
Printer Condition Setting Menu
Printer Condition Settings
Code. The setting can be changed by selecting one of four
PCL Settings
PostScript settings
CR return code, LF line break code, and FF page break
About the WEB Pages for the Administrator
Configuring Smtp and DNS Server Settings
Entries will be stored
Enter passwords in User Password and Admin Password
When you have finished entering all items, click Submit
Administrator Settings
Administrator Settings
Configuring a Setting in the Administrator Settings
Click Administrator Settings in the menu frame
Smtp Setup
Mail Status and E-MAIL Alert Settings
Information Setup
Interface settings
Click Status Message in the menu frame
Status Message Setup
Alerts Message Setup
Click Alerts Message in the menu frame
Software developed by Sharp and open source software
Information on the Software License for This Product
Software composition
Obtaining source code
Trademark Acknowledgments
Operation Guide