Introduction Quick Start Setup Connections Basic Operation
Useful Features Appendix
MODEL
Standard zoom lens attached
DANGER
Model No Serial No
SPECIAL NOTE FOR USERS IN THE U.K
1. WARRANTY
2. CONSUMER PRODUCT SAFETY ACT
ENGLISH
Introduction
Caution Concerning Lamp Replacement
PRODUCT DISPOSAL
How to Read This Operation Manual
Maintenance
Troubleshooting
For Future Reference
Contents
Using
Setup
Preparing
Useful Features
Reference
Appendix
Introduction
Contents
SETUP MANUAL
How to Access the PDF Operation Manuals
Accessing the PDF manuals
Info
Introduction
IMPORTANT SAFEGUARDS
Caution concerning the setup of the pro- jector
Caution concerning the lamp unit
The projector may be safely tilted to a maximum angle of 9 degrees
Warning about placing the projector in a high position
IMPORTANT SAFEGUARDS
Using the projector in other countries
Temperature monitor function
Optional lens installation
Accessories
Supplied accessories
Optional accessories
Introduction
Accessories
The graph below is for 100-inch 254 cm screen with 43 normal mode
Throw Distance
Optional lenses
Part Names and Functions
Projector
Rear View
Front View
Refer to “Connecting the Projector to Other Equipment” on pages
Projector Rear View
Part Names and Functions
Terminals
Remote Control
17 ADJ./MOUSE switch
Mouse/adjustment button 18 47 //\
BREAK TIMER button
Using the Remote Control
When using the remote control
Usable Range
Inserting the Batteries
Using the Remote Control with a Signal Cable
Switching the Remote Control Mode
Introduction
Info
Using the Remote Control as a Wireless Computer Mouse
Using the Remote Control
switch on the remote con
When moving the cursor Press //\ When left-clicking Press L-CLICK
Setup and Projection
Quick Start
1. Place the projector facing a screen
3. Remove the lens cap and turn the projector on
4. Adjust the angle
5. Adjust the focus and the zoom
7. Select the input mode
8. Turn the power off
Setting Up the Projector
Standard Setup Front Projection
Setup
F2.5, f=25.5-32 mm
Setting Up the Projector
Standard Zoom Lens AN-P18EZ Standard Equipment with XG-P610X
Projection Using a Mirror
Ceiling-mount Setup
Projecting a Reversed Image
Projection from behind the Screen
Connecting the Projector to Other Equipment
Terminals on the Projector
Connections
Connecting the Projector to Other Equipment
When connecting to a computer using an RS-232C serial control cable
When connecting to the LAN terminal using a LAN cable
Controlling the Projector by a Computer
Connections
Connecting the Power Cord
Turning the Power Off Put
Turning the Projector On/Off
Turning the Projector On
Adjustable range
Image Projection
Shifting the Lens
Basic Operation
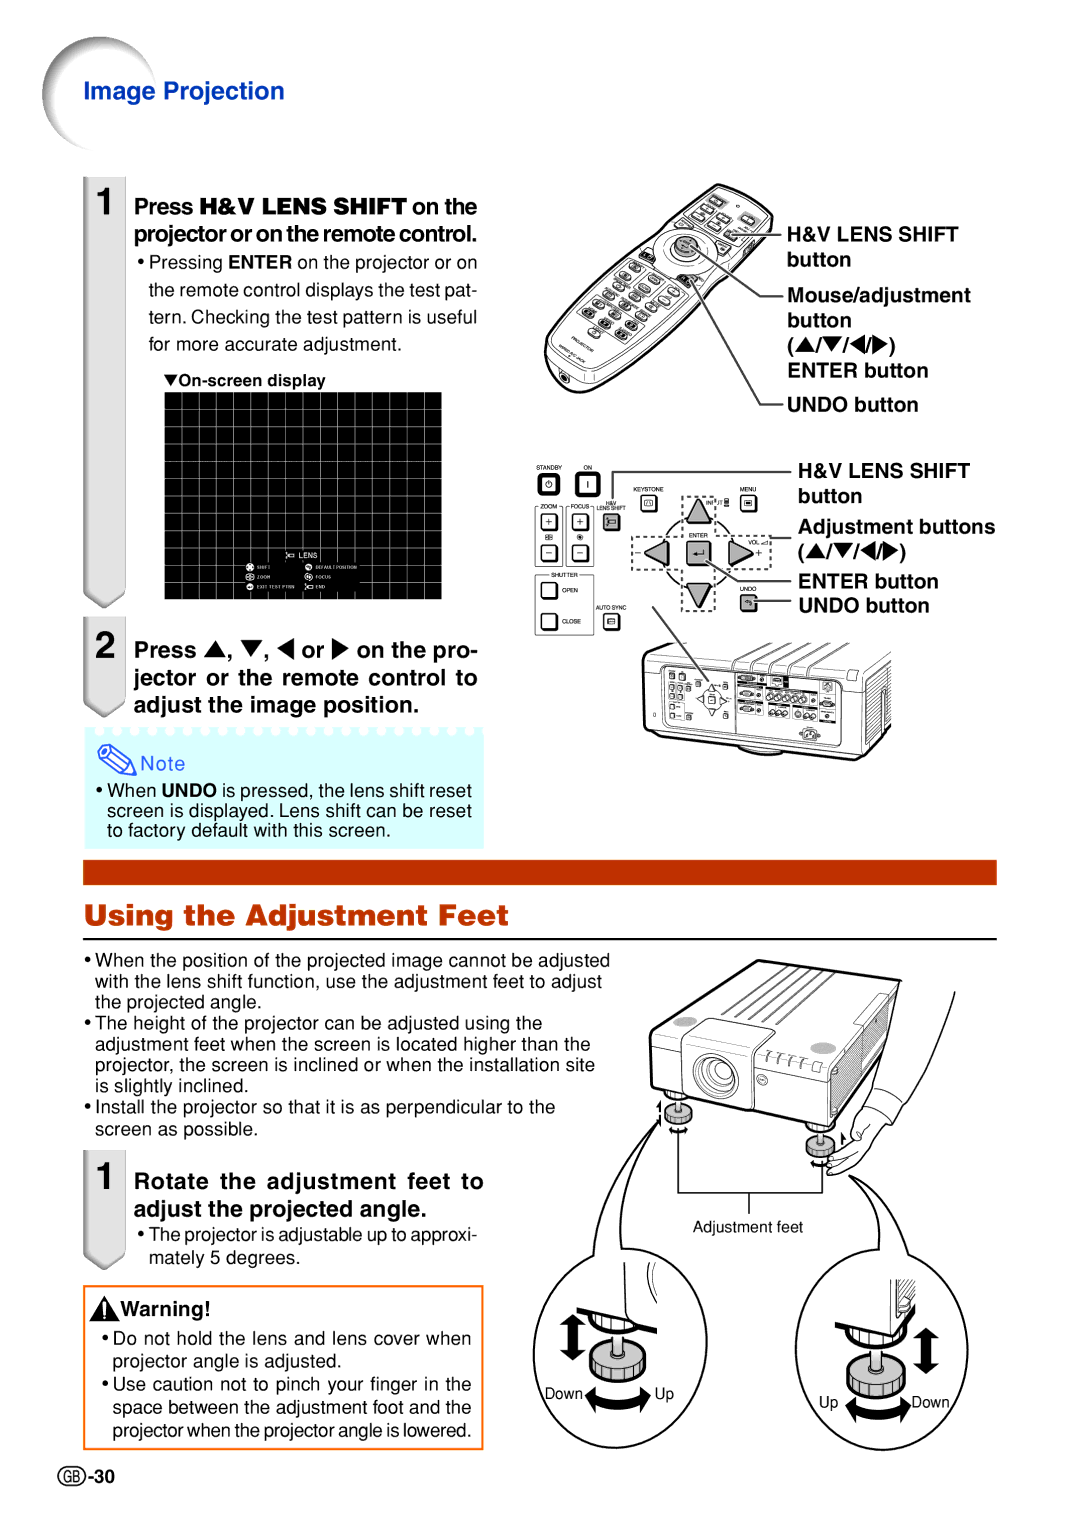
Using the Adjustment Feet
Rotate the adjustment feet to adjust the projected angle
1 Press H&V LENS SHIFT on the projector or on the remote control
H&V LENS SHIFT button Mouse/adjustment button \ ENTER button
Adjusting the Focus
Adjusting the Projected Image Size
ZOOM buttons FOCUS buttons FOCUS buttons
Basic Operation
Press KEYSTONE on the projector or on the remote control
KEYSTONE button Adjustment button //\
Correcting Trapezoidal Distortion
Selecting the Type of the Correction
Geometric Adjustment
Basic Operation
Upper Left
Upper Right
Image Projection
H&V KEYSTONE
4 Press KEYSTONE to display ÒIMAGE RESIZINGÓ
Adjustment with
Press , , \ or to correct
the image distortion
6 Press KEYSTONE to set the position
Switching the Input Mode
Adjusting the Volume
Volume buttons
buttons COMPUTER1/2 DVI, HDMI, VIDEO and S-VIDEO buttons
Press MUTE on the remote control to temporarily turn off the sound
2 Press UNDO on the remote con- trol to cancel the operation
Turning Off the Sound Temporarily
Displaying an Enlarged Portion of an Image
Selecting the Picture Mode
1 Press FREEZE on the remote control
Press PICTURE MODE on the re- mote control
FREEZE button UNDO button PICTURE MODE button
Resize Mode
Press RESIZE on the remote control
Mouse/adjustment button //\ UNDO button RESIZE button
COMPUTER
Image Projection
About Copyrights
VIDEO/DTV
Displaying and Setting the Break Timer
1 Press BREAK TIMER
2 While“”is displayed, press , , \ or to set the break timer
Mouse/adjustment
Menu Items
The following shows the items that can be set in the projector
ÒPictureÓ menu
COMPUTER1/2, DVI, HDMI
Useful Features
ÒPictureÓ menu
VIDEO/S-VIDEO
Main Menu
Menu Items
ÒC.M.S.Ó menu
ÒFine SyncÓ menu
COMPUTER1/2, DVI, HDMI
Useful Features
ÒAudioÓ menu
ÒOptions 1Ó menu
“Options 2” menu
“Language” menu
“Status” menu
11 Adjustable only when “DHCP Client” is set to “OFF”
Using the Menu Screen
Adjustment
Menu Selections
1 Press MENU
Using the Menu Screen
3 Press or to select the item you want to adjust
4 Press \ or to adjust the item selected
Example 1 Adjusting ÒBrightÓ
Picture Adjustment “Picture” menu
1 Selecting the Picture Mode
2 Adjusting the Image
Useful Features
4 Selecting the Progressive Mode
Picture Adjustment ÒPictureÓ menu
5 Reducing Image Noise DNR
Make sure to set ÒDNRÓ to ÒOffÓ in the following cases
6 Selecting the Signal Type
7 Selecting the Dynamic Range
8 Selecting the Color Space
Useful Features
1 Selecting the Color Reproduction Mode
3 Setting the Brightness of the Target Color
4 Setting the Chromatic Value of the Target Color
5 Setting the Hue of the Target Color
Computer Image Adjustment “Fine Sync” menu
1 Adjusting the Computer Image
2 Saving Adjustment Settings
3 Accessing Adjustment Settings
5 Checking the Input Signal
6 Auto Sync Adjustment
7 Setting the Auto Sync Display Function
Computer Image Adjustment ÒFine SyncÓ menu
Audio Adjustment ÒAudioÓ menu
1 Adjusting the Audio
2 Setting the Audio Output Type
3 Setting the Speaker
1 Displaying Dual Pictures Pict in Pict
Using the ÒOptions 1Ó Menu
2 Setting the Resize Mode
4 Setting On-screen Display
5 Setting the Video System
3 Shifting the Projected Image Vertically Digital Shift
6 Capturing Projected Images
0 Detecting the Input Signals Automatically
9 Setting the Eco Mode
q Setting the Auto Power Off Function
Using the “Options 1” Menu
w Setting the System Lock Function
Setting the keycode
Not displaying the keycode input screen when turning the projector on
When the System Lock is set
Using the ÒOptions 1Ó Menu
When the system lock is set
Changing the keycode
3 Enter the same keycode in ÒRecon- firmÓ
1 Setting a Password
If You Forget Your Password
Changing the password
1 Select ÒPasswordÓ from the ÒOptions 2Ó menu, and press
2 Setting the Lamp Mode
5 Controlling Multiple Projectors with the One Remote Control
Helpful Functions Set during Installation “Options 2” menu
3 Selecting the Lens Type
6 Shortcut to Make Projector Stack Settings
9 Selecting the Fan Mode
0 Setting the Auto Restart Function
8 Bypassing Unused Input Selections
w Setting the Monitor Output
e Setting the LAN/RS232C
r Setting the DHCP Client
Helpful Functions Set during Installation ÒOptions 2Ó menu
t Setting the TCP/IP
y Service Mode
u Returning to the Default Settings
Overview of All Menu Settings and the Lamp Life
Maintenance
Cleaning the projector
Cleaning the air vents and the intake vent cover
Cleaning the lens
Cleaning and Replacing the Dust Filters
Cleaning the Dust Filters
Clean the dust off the dust fil- ters and the cover with a hand broom
Remove the filter cover
Cleaning and Replacing the Dust Filters
Replacing the Dust Filters
4 Replace the filter cover
Remove Attach
About the lamp indicator
Maintenance Indicators
About the temperature warning indicator
Info
Maintenance Indicators
indicator
Regarding the Lamp
Lamp
Caution Concerning the Lamp
Replacing the Lamp
Removing and Installing the Lamp Unit
Regarding the Lamp
2 Remove the lamp unit cover
Info
3 Remove the lamp unit
4 Insert the new lamp unit
5 Replace the lamp unit cover
AN-P610LP User service screw
Resetting the Lamp Timer
1 Connect the power cord
2 Reset the lamp timer
Regarding the Lamp
Computer Compatibility Chart
Computer
Computer Compatibility Chart
Appendix
Attaching the Optional Lens
2 Remove the lens cover
Slide and attach the lens cover
4 Remove the lens cap from a re- placement lens
Attaching the Optional Lens
Troubleshooting
Appendix
Troubleshooting
For SHARP Assistance
Appendix
Specifications
Output terminals
Index
Appendix
Audio
Audio Out
SHARP CORPORATION