User Guide
Important Notice Safety and Hazards Limitation Liability
Qualcomm 3G
Patents Copyright Trademarks
Contact Information
Support@sierrawireless.com
Revision Release Changes Number Date
Revision History
Contents
Configuring your Raven
Configuring Modbus/BSAP
Contents
Contents
Contents
Circuit Switch Communications
Aleos
Introduction to the Raven
AceManager
AceWare
Monitor and Control
Simplified Deployment
Network Monitoring
AceNet
AceView
Modem Doctor
Setup Wizard
Modem Doctor
Modem Doctor USB
Steps of a connection
Connecting to the Telus Network
Dynamic vs. Static IP Addresses
Connecting to the Internet
Security
1x Communication
Specifications
Interface Port Pin-Outs
Power Connector
Activating your Raven on the 3 Telus Network
Setup Wizard
Starting the Setup Wizard
Setup Wizard
Connecting to the Modem
Selecting Tasks
Setup Wizard Connected
Aleos Update
OptionalUpdate Aleos
Activate Modem
Setup Wizard Activation Code
Setup Wizard MDN and MIN/MSID
Setup Wizard Signal Test
Test Modem Setup
10 Setup Wizard DUN driver
Optional Setting up a DUN Connection
12 Setup Wizard DUN connections
14 Setup Wizard DUN
Activating Using AT Commands
AT*PROVISION2=MSL,MDN,MIN/MSID,SID,NID
Raven 20070914
Mounting
Hardware Installation Raven
Connecting to Power
Indicator Lights
Connecting to a Computer or other Device
Light Patterns
Mounting
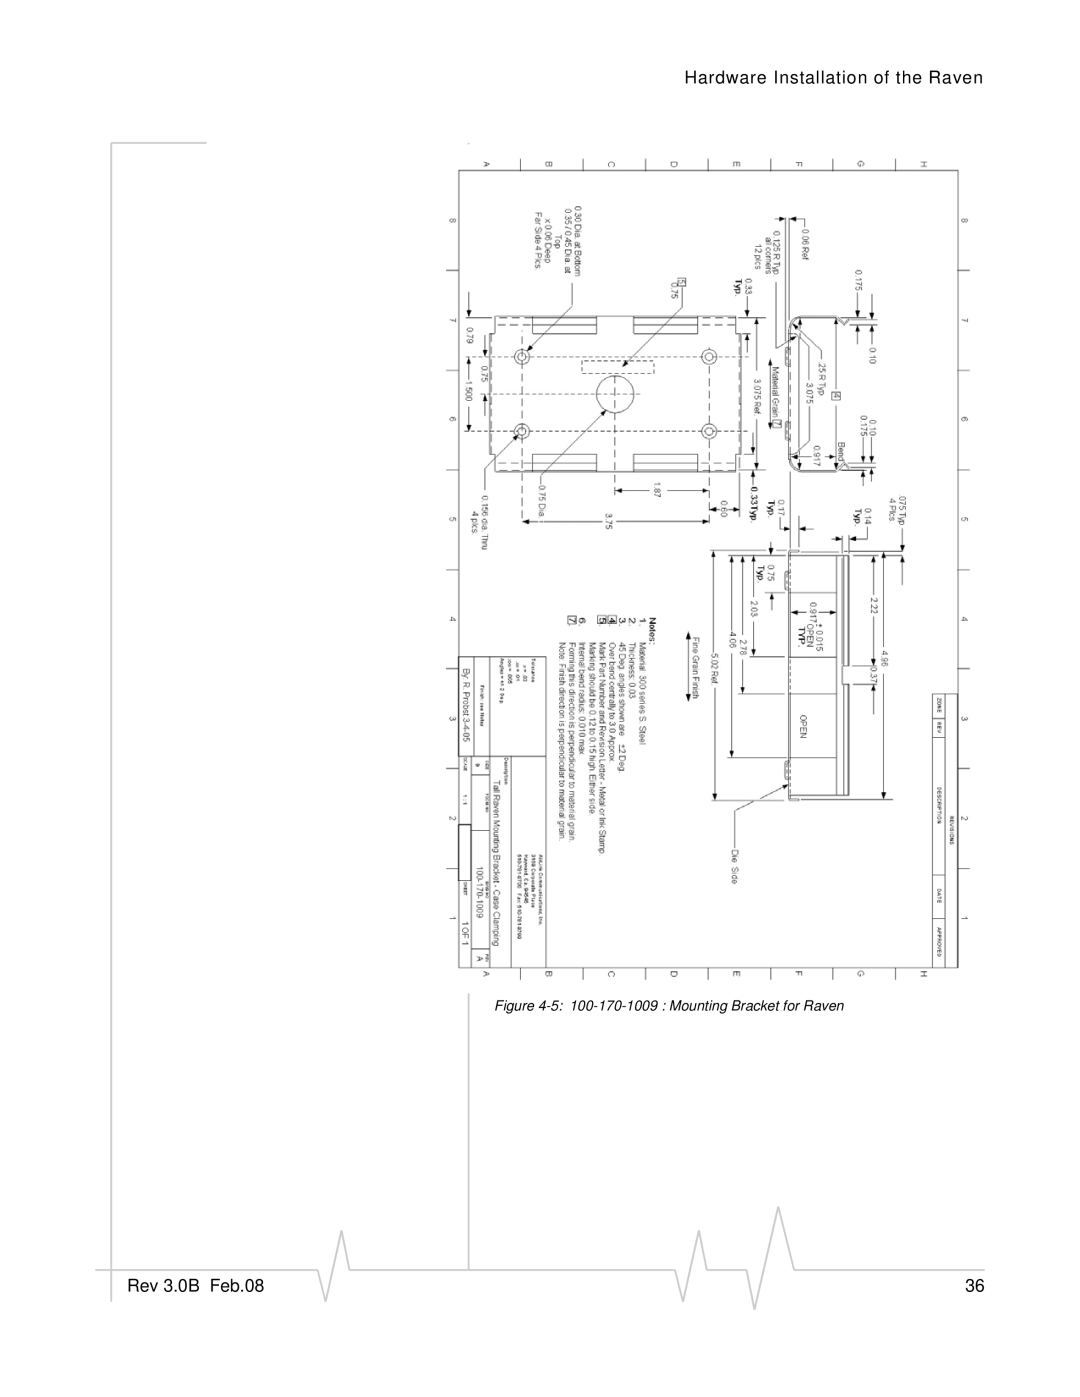
Optional Mounting Bracket
Hardware Installation of the Raven Rev 3.0B Feb.08
Hardware Installation of the Raven Rev 3.0B Feb.08
Start AceManager
Configuring your Raven
Using AceManager
AceManager Connect to Modem
Connect to your Raven
AceManager Connected
Enter the configuration options
Creating the Template with AceManager
Using Templates
Write the changes to the modem
· Cellular Technology specific settings the CDMA/EV‐DO group
Applying a Template to one modem with AceManager
Reset the modem
Configuring your Raven
10 AceNet Selected modems
Choose a name and icon for your connection
Using a Terminal Application with AT Commands
Connect To
Port Settings serial only
· Flow Control Hardware
Connected
AT Commands
Serial Modes
Data Communication and Host 6 Modes
Basic Modes
Data Communication
Start up Mode
Basic Modes
AT Mode
AceManager PassThru
PassThru Mode
Serial Modes
Telnet Mode
AT\APPP
UDP Auto Answer
UDP and UDP Pad
Reliable UDP
TCP and TCP Pad
UDP Multicast Mode
TCP Auto Answer
Hybrid Modes
Udplast
Data Communication
Public and Private Mode
Keepalive
Data usage using Keepalive
Configuring Keepalive
Ipping
Reasons to contact the modem and/or the connected device
IP Manager
Understanding Domain Names
Car54.mydomain.com.ca
Dynamic Names
Car54.mydomain.com
AceManager Dynamic IP
Using IP Manager with your Raven
Restrictions for Modem Name
Data Usage for IP Manager Server Updates
Eairlink.com
Understanding DNS
Configuring DNS
AceManager DNS
PPP-Peer Domain Name
Modbus Overview
Configuring Modbus/BSAP
Telemetry
Remote Terminal Unit RTU
Programmable Logic Controller PLC
Supervisory Control and Data Acquisition Scada
Modbus TCP/IP
Raven Modbus on UDP
Configure the listening/device ports
Configuring the Raven at Polling Host for Modbus on
Configure IP addresses for the Modbus IDs
Configure the default mode for start-up
Optional Dynamic IP Address
Configure the ports
Configuring the Remote Ravens for Modbus with UDP
AceManager UDP
Configure IP addresses for the host
Configure other RTU settings
AceManager DNS
Raven 20070914
Snmp Traps
Snmp Simple Network Management Protocol
Management Information Base MIB
Security Level
Snmp Configuration
Listening Port
AceManager Change Password menu option
User Name and Password
Community String
Snmp MIB Definition Sample
Trap Destination
Snmp Simple Network Management Protocol
Snmp Simple Network Management Protocol
Snmp Simple Network Management Protocol
Display Responses
Product ID
Info information
Configuration Commands
NETPHONE?
DEVICEID?
HOSTMODE?
Status
NETCHAN?
NETERR?
Any other value Failure
AT Commands Requiring PassThru mode
+GSN
+ECIO?
+WHWV
+WPRL?
+++
Common
Misc Miscellaneous
DS=n
Dmethodd.d.d.d/ppppp or Dmethod@name/ ppppp
Method= P UDP Method=T TCP Method=N Telnet
OPRG=n
S53=methodd.d.d.d/ppppp
=1‐65535
D.d=IP address
Serial
S5=n
S3=n
S4=n
=0‐255
=2‐10 seconds
=1‐2545
Parity=O Odd Parity=E Even Parity=N None Parity=M Mark
=tenths of a second
S50=n
S51=n
S211=n
\Qn
\APPP
+IPR=n
$QCVAD=n
Modemhispeed
CTSE=n
NUMTOIP=n
PPPNOCARRIER=n
S7=n
S0=n
=seconds
S60=n
=interval
=0 ‐
MDhh
HOR=n
Hh=01 Slip Hh=02 PPP Hh=03 UDP Hh=04 TCP
Hh=33 Bsap
DU=n
S83=n
UALL=n
UDPLAST=n
Dynamic IP
DNSUPDATE=n
D.d=IP address of domain server
DNSUSER=d.d.d.d
IPMGRKEYn=key
DOMAIN=name
Name=domain name
MODEMNAME=name
IPMGRUPDATEn=m
PPP/Ethernet
HOSTNETMASK=n.n.n.n
DHCPSERVER=n
HOSTAUTH=n
D.d=local or peer IP address of the modem
String=password
PassThru
\APASSTHRU
String=AT commands
CSX1=n
PTINIT=string
PTREFRESH=n
RESETPERIOD=n
=1‐255 minutes
=1‐255 hours
=SMS/E‐mail server number
Pw= password
Email=email address Body=message body
SMTPSTATUS?
Subject=message subject
Index= index list 0, 1 Message= message number
Cntsms
Dasms
SSMS?
Other
DAE=n
DATZ=n
=15‐255 minutes
Resetcfg
D.d=IP address Name=domain name
Name=domain name Port=port
=1 On
Host=IP address Port=TCP port
Friends
TELNETTIMEOUT=n
=minutes
TPORT=n
D.d = IP address
Logging
FM=n
DBGCOMMLVL=n
Telemetry/Addr List
DBGIPLVL=n
DBGPPPLVL=n
MVLEN=n
IPL=n
MVMSK=hh
Hh=hex value
MVOPT=n
Addr List
MVTYP=n
RKEY=n
Id=ID D.d=IP address or name
1x/EV-DO
Hexid=ID D.d=IP address or name
+CTA=n
Nnnnnn=6 digit unlock code
~NAMLCK=nnnnnn
PROVISION=MSL,MDN/MIN,SID,NID
PROVISION2=MSL,MDN,MIN,SID,NID
+WIMI=num
+WMDN=num
Nam=0 Min=phone number Msid=second number
Sid=system ID Nid=network ID
Configuring Circuit-Switch
Circuit Switch Communications B
AT Commands and the Command String
Commands Specific to the Raven 1x C3211
Commands Specific to the Raven 1x C3210 and C3216
Common AT Commands
Step by Step Configuration
Raven LEDs in Circuit-Switched Mode
Software Required
Hardware Required
Information Required for CDMA/1x only
Connect the modem to your computer
Erase the internal memory
Rev 3.0B Feb.08 139
Start All Programs AirLink Communications AceManager 3G
Activate the Raven
Save the serial setting
Configure serial port speed
12 AceManager Disconnect
Configure the Raven using a AceManager template
15 AceManager Load
Configure additional PassThru settings
Configure the Raven for your equipment
Save the configuration settings
Reset the Raven
Test the Raven Configuration
Commission the Raven Modem on Site
146 20070914
Install the driver
Installing a modem driver for Raven
Windows Dial-up Networking C DUN
Connect the Raven
Select the Modems tab
Check Don’t detect my modem I will select it from a list
Check Selected Ports
Modem Properties
Configure the driver
Modem Properties Modem
Creating a Dial-Up Networking PPP Connection
10 Windows Start menu
Create a new network connection
Select Connect to the Internet
Select Set up my connection manually
Rev 3.0B Feb.08 156
Rev 3.0B Feb.08 157
21 New Connection Finish
Configure the DUN connection
Check Show icon...when connected
Rev 3.0B Feb.08 160
Select Advanced
Start AceView
Connecting to the Internet Using DUN
Windows DUN
Enable the Connection
Select Dial to connect to the modem and the cellular network
Start the DUN session
Windows Dial-up Networking DUN Rev 3.0B Feb.08 165