Manuals
/
Toshiba
/
Computer Equipment
/
Copier
Toshiba
DP-1810
manual
Paper Jams
Models:
DP-1810
1
81
110
110
Download
110 pages
53.6 Kb
78
79
80
81
82
83
84
85
Troubleshooting
Specification
Install
With the transfer charger wire
Maintenance
Configuration of options
Adjusting Density Level
Original setting lamp
Clean the charger
How to
Page 81
Image 81
2
3
4
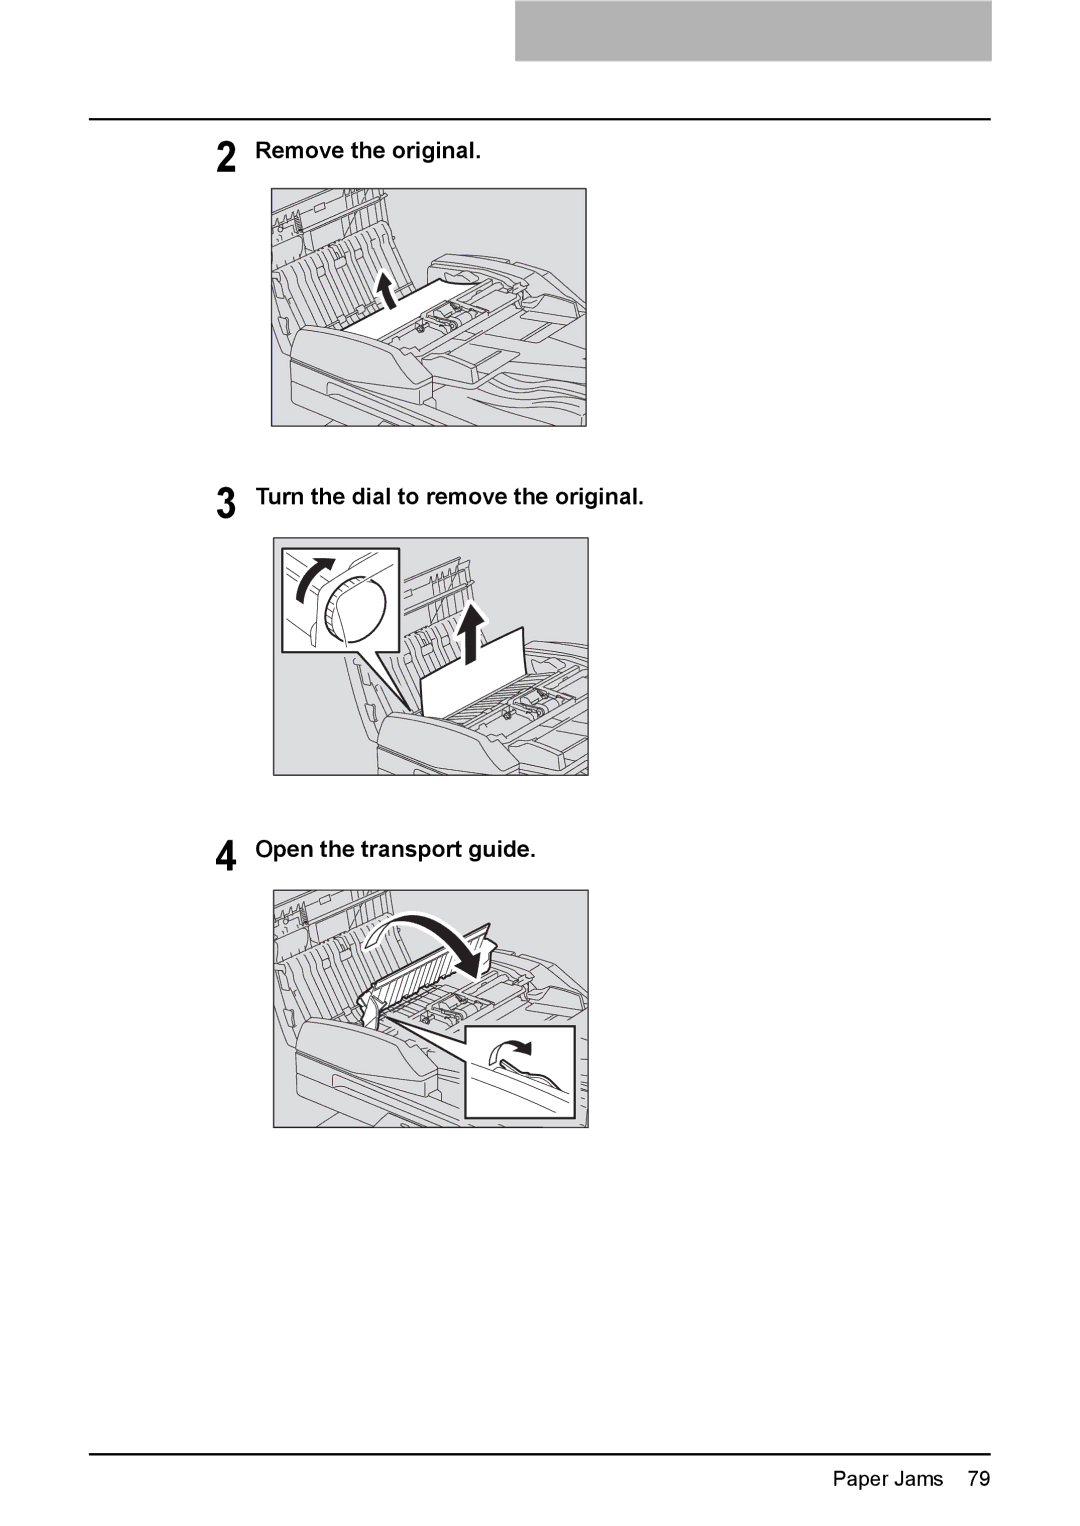
Remove the original.
Turn the dial to remove the original.
Open the transport guide.
Paper Jams 79
Page 80
Page 82
Page 81
Image 81
Page 80
Page 82
Contents
Operators Manual for Copying Functions
Page
Preface
Preface
FCC Notice
Before Reading This Manual
How to read this manual Symbols in this manual
Trademarks
Description of original/paper direction
Contents
Switching Operation Sound On/Off
Adjusting Density Level
Changing of the Enabled Energy Saving Mode
When Message Lamp is Lit/Blinking
105
Daily Inspection Cleaning charger Cleaning transfer charger
Contents
Recommended toner cartridges
Toshiba Quality Is Second to None
Cartridge detecting function
Toner remaining check function
Supplies / Parts
Toner
General
When installing or moving
General Precautions
31.5
Other points
When using the equipment
Position of Certification label, etc
When handling supplies
During maintenance or inspection
First-aid measures
Poration
Disclaimer Notice
Low power mode
Energy saving features
Sleep mode / Super sleep mode
Environmental Information
Preparation 1 Turning Power on
Description of Each Component
Preparation 2 Placing Copy Paper
Front / Right side
Description of Each Component
Platen Cover optional, KA-1650PC
Automatic Document Feeder optional, MR-2020
Left side / Inner side
Receiving tray Scanning area
USB terminal 4-pin
Original scale
Platen sheet
Configuration of options
Control panel
Density adjustment buttons/lamps
Original mode button/lamps
Original setting lamp
Interrupt button/lamp
Copy button/lamps
Original button/lamps
APS/AMS selecting button/lamps
Turning power on
Preparation 1 Turning Power on
Turning power OFF
Press the power switch to on side
Types of energy saving mode
Saving energy when not in use Energy saving mode
To turn the equipment into the energy saving mode manually
Canceling conditions for energy saving mode
Super sleep mode
Preparation 2 Placing Copy Paper
Acceptable media types
Feeder Media type Paper size Maximum sheet Capacity *1
Paper types not acceptable
Recommended paper
Storing paper
Media type Product name
Press down the paper plate
Placing paper in drawers
Widen the gap with both hands
Place paper in the drawer
Adjust the side guides to the desired paper size
Register the paper size into the equipment
Do not let your fingers be caught when closing the drawer
Registering standard size LD, LT, LT-R, LG, ST-R
Preparation 3 Registering Size of Paper Placed
Code No
Registering other standard sizes
Press the Start button
Using Bypass Tray
Placing Originals
Making Copies
Placing Originals
Setting position Type of origi
Acceptable originals
Maximum number of originals scanned in one go
Placing originals on the original glass
Placing booklet-type originals such as books or catalogs
Precautions for Automatic Document Feeder optional
Using Automatic Document Feeder optional
When black streaks appear on the copied image
Media types Maximum size Maximum number Paper weight
Placing originals on Automatic Document Feeder optional
When placing a large amount of originals with a long width
Check if paper is placed in the drawer
Making Copies
Place the original
Select the copy modes as required
When the paper has run out
When the number of sheets exiting has exceeded
Stopping/Resuming copying
Press the CLEAR/STOP button during scanning or copying
Press the Interrupt button
Interrupting copying and making another copy Interrupt copy
Media type Paper size Maximum sheet Capacity *1
Using Bypass Tray
Bypass copying
Paper size has been registered
Placed on the bypass tray is lit
Default Settings Paper Selection
Zooming In/Out Copy Image
Automatic paper selection APS Manual paper selection
Contents Default setting at installation
Default Settings
Automatic paper selection APS
Paper Selection
Place the original on the Automatic Document Feeder
Automatic paper selection APS
Place paper in the drawer Place the original
Manual paper selection
Selecting the drawer of the equipment
Automatic magnification selection AMS
Zooming In/Out Copy Image
Automatic magnification selection AMS
Specifying reproduction ratio manually
If the Function Clear lamp is blinking and copying stops
Specifying both the sizes of the original and the copy paper
Press Zooming out or
Specifying reproduction ratio manually
Desired reproduction ratio appears
Zooming in button until
Zooming In/Out Copy Image
Press the Sort button
Copying in Same Page Order as Originals Sort Copying
Button
Sort button
Original is scanned
Repeat this until all originals have been scanned
Copying Both Sides of Card into 1 Page ID Card
Page
Selecting Image Mode
To adjust the density to the desired level
Adjusting Density Level
To return it to the automatic copy density mode
Dark
Settings and Management of Equipment
All lamps on Sound on All lamps off Sound off
Switching Operation Sound On/Off
Switch the display to check the rest of the total number
Checking Total Number Copied
Press and hold Button for more than two seconds
Press Button to switch the enabled mode
Changing of the Enabled Energy Saving Mode
Auto sleep time
Zooming in button to change
When Message Lamp is Lit/Blinking Paper Jams
Troubleshooting
Cover open lamp
When Message Lamp is Lit/Blinking
Paper empty lamp
Toner lamp
Recommended toner cartridges
Paper jam lamp
Service call lamp
When paper jams occur frequently
Paper Jams
Checking position of paper jams
Paper jams within Automatic Document Feeder optional Lower
When releasing jammed paper
Open the Automatic Document Feeder
Do not tear jammed paper
Paper Jams
Raise the lever and open the upper cover
Paper jams within Automatic Document Feeder optional Upper
Paper Jams
Pull out the paper jammed on the bypass tray
Paper jams on bypass tray
Paper jam behind transfer unit
Close the transfer unit and the side cover
Paper jams within fuser unit
Paper Jams
Paper jams within Paper Feed Unit optional
Replacing Toner Cartridge
Open the front cover Hold down the green lever
Never attempt to incinerate toner cartridges
Pull out the toner cartridge
Clean the charger
Replacing Toner Cartridge
With the transfer charger wire
Before Calling Service Technician
General operation
Phenomenon Usual cause Countermeasure
Original/Copy paper-related items
Toner-related items
Image trouble
Before Calling Service Technician
Page
Daily Inspection
Maintenance and Inspection
Original glass Guides Platen sheet
Daily Inspection
Open the front cover Clean the charger
Cleaning charger
Cleaning transfer charger
Daily Inspection
Page
STUDIO181 Specifications 102
Specifications of Options 104
Continuous copying speed 103 Packing list
OPC
STUDIO181 Specifications
Continuous copying speed
Packing list
Paper size Feeder Continuous Copying speed
Specifications of Options
Automatic Document Feeder
Paper Feed Unit
Index
102
Page
Multifunctional Digital Systems
Top
Page
Image
Contents