Manuals
/
Tyan Computer
/
Computer Equipment
/
Computer Hardware
Tyan Computer
Transport GS12, B5103G12S2
manual
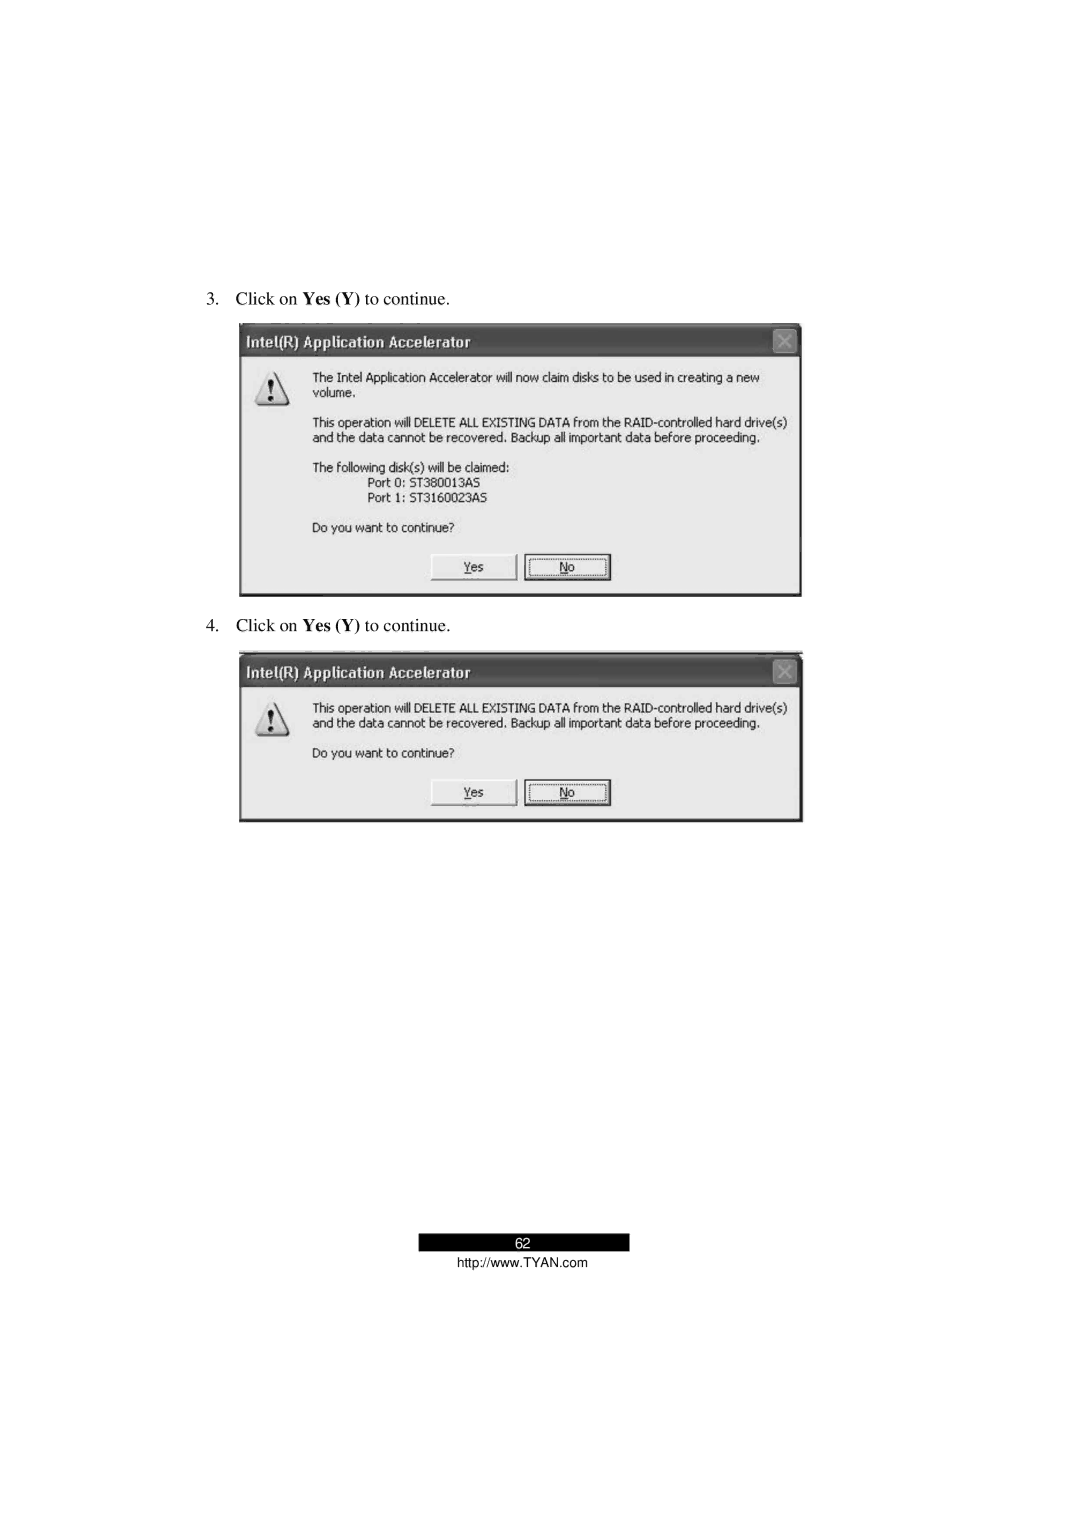
Click on Yes Y to continue
Models:
Transport GS12
B5103G12S2
1
62
87
87
Download
87 pages
28.49 Kb
59
60
61
62
63
64
65
66
Specifications
Install
System Assembly Flowchart
Configuring the System
Resetting Bios Setup
System Parts Replacement
Following accessories
Setting Up the System
Secondary IDE Connector
System Assembly
Page 62
Image 62
3. Click on
Yes (Y)
to continue.
4. Click on
Yes (Y)
to continue.
62
http://www.TYAN.com
Page 61
Page 63
Page 62
Image 62
Page 61
Page 63
Contents
Transport GS12
Table of Contents
Using the LCD Console
Expanding the System
Safety Precautions
Before You Begin
Page
Introduction
Unpacking
Following accessories
Specifications
Memory
System View
Front View
Rear View
Page
Hardware Installation
System Assembly Flowchart
Installing the CPU
System Assembly
Safety Considerations
Opening the Cover
Page
Installing System Memory
Installing a Hard Disk Drive
Page
With a Secondary Ultra ATA/100 Hard Disk Drive Installed
Adding a CD Drive
Without a Secondary Ultra ATA/100 Hard Disk Drive Installed
Rack Mounting
Cabinet Slides and Ears
Cabinet into the Rack
Placing the System
Setting Up the System
Locking Tab
Making the Connection
Page
Software Installation
Driver Available on CD
Driver Available on CD
Chipset Driver
Installation Instructions for Windows
Windows Installation Notes
VGA Driver
LCD Driver
LAN Driver
USB v.2.0 Driver
Intel Application Accelerator
ASF Alert Simulation and Watchdog Drivers
ASF Alert Standard Format 2.0 SDK
\ASF\Windows\driver\ASFSimulation\hwdriverchecked.inf
Turbo Linux 8 Installation Notes
RedHat Linux 9.0 Installation Notes
SuSE Linux 8.1 Installation Notes
Etc/modules.conf directory alias eth0 e1000 Alias eth1 e1000
Watchdog Driver
ASF Alert Simulation
Installation Instructions for FreeBSD
FreeBSD 4.7 Installation Notes
Ifemload=YES
Dev/em/ifemhw.c optional em
USB Floppy Drive Usage
Installation Instructions for Solaris
Solaris 9 Installation Notes
Page
Using the LCD Console
Configuring the System
Setting the Configuration For Windows
KEY Press Prompt Function
Value of the following appear, depending on your
Application Log when an alert occur
Setting the Configuration For Linux
Etc/lcdscript/passchange
Down arrow eighth time see below
Nine 9 times
Setting the Configuration For FreeBSD
VC0
Var/log/alertlogfile when an alert
Starting Bios Setup
Bios Setup
Bios Setup Program
Main Menu
Advanced Menu
Security Menu
Advanced Chipset Control
Power Menu
Monitor Menu
Boot Menu
Exit Menu
Resetting Bios Setup
Jumper Definition Setting Description
Using RAID and ASF
About RAID
Creating an Array
Creating an Array for Performance RAID
Page
Page
Creating a Security Array RAID
Click on Yes Y to continue
Creating RAID With an Existing Data Drive
Page
Set Up Management Console
About ASF
Check Agent and Management Console Link
Page
Obtain Traps and Push Messages
Remote Control
Page
Expanding the System
Opening the Cover
Installing an Expansion Card
Adding a Secondary Hard Disk Drive
Secondary IDE Connector
Page
Page
System Parts Replacement
Removing the Front Bezel
Replacing the Button Board
Replacing the Fan
Replacing the USB Board
Replacing the LCD Module
Replacing the Power Supply
Replacing the Blower
Replacing the Motherboard
Page
Page
Appendix
Danish
Technical Support
French
Document # D1582-100
Top
Page
Image
Contents