Manuals
/
Vulcan-Hart
/
Kitchen Appliance
/
Convection Oven
Vulcan-Hart
SG4D ML-114875, SG6D ML-114877, SG6C ML-114878, SG4C ML-114876 Assembling Stacked Ovens
Models:
SG4C ML-114876
SG6C ML-114878
SG6D ML-114877
SG4D ML-114875
1
8
56
56
Download
56 pages
33.21 Kb
5
6
7
8
9
10
11
12
Troubleshooting
Install
One-HourTimer
Maintenance
ADJUSTMENTS Air Adjustment
Cleaning
Safety
To Set the Power Level
Features
High Limit Switch
Page 8
Image 8
Page 7
Page 9
Page 8
Image 8
Page 7
Page 9
Contents
SG SERIES GAS SNORKEL CONVECTION OVENS
IMPORTANT FOR YOUR SAFETY
FOR YOUR SAFETY
TABLE OF CONTENTS
Installation, Operation and Care of
MODEL SG4D, SG4C, SG6D & SG6C
GAS SNORKEL CONVECTION OVENS
PLEASE KEEP THIS MANUAL FOR FUTURE USE GENERAL
LOCATION
INSTALLATION
UNPACKING
INSTALLATION CODES AND STANDARDS
INSTALLING BASIC OVEN
In the United States of America
In Canada
Assembling the Stand to the Oven
BACK FRONT
Assembling the Legs to the Oven
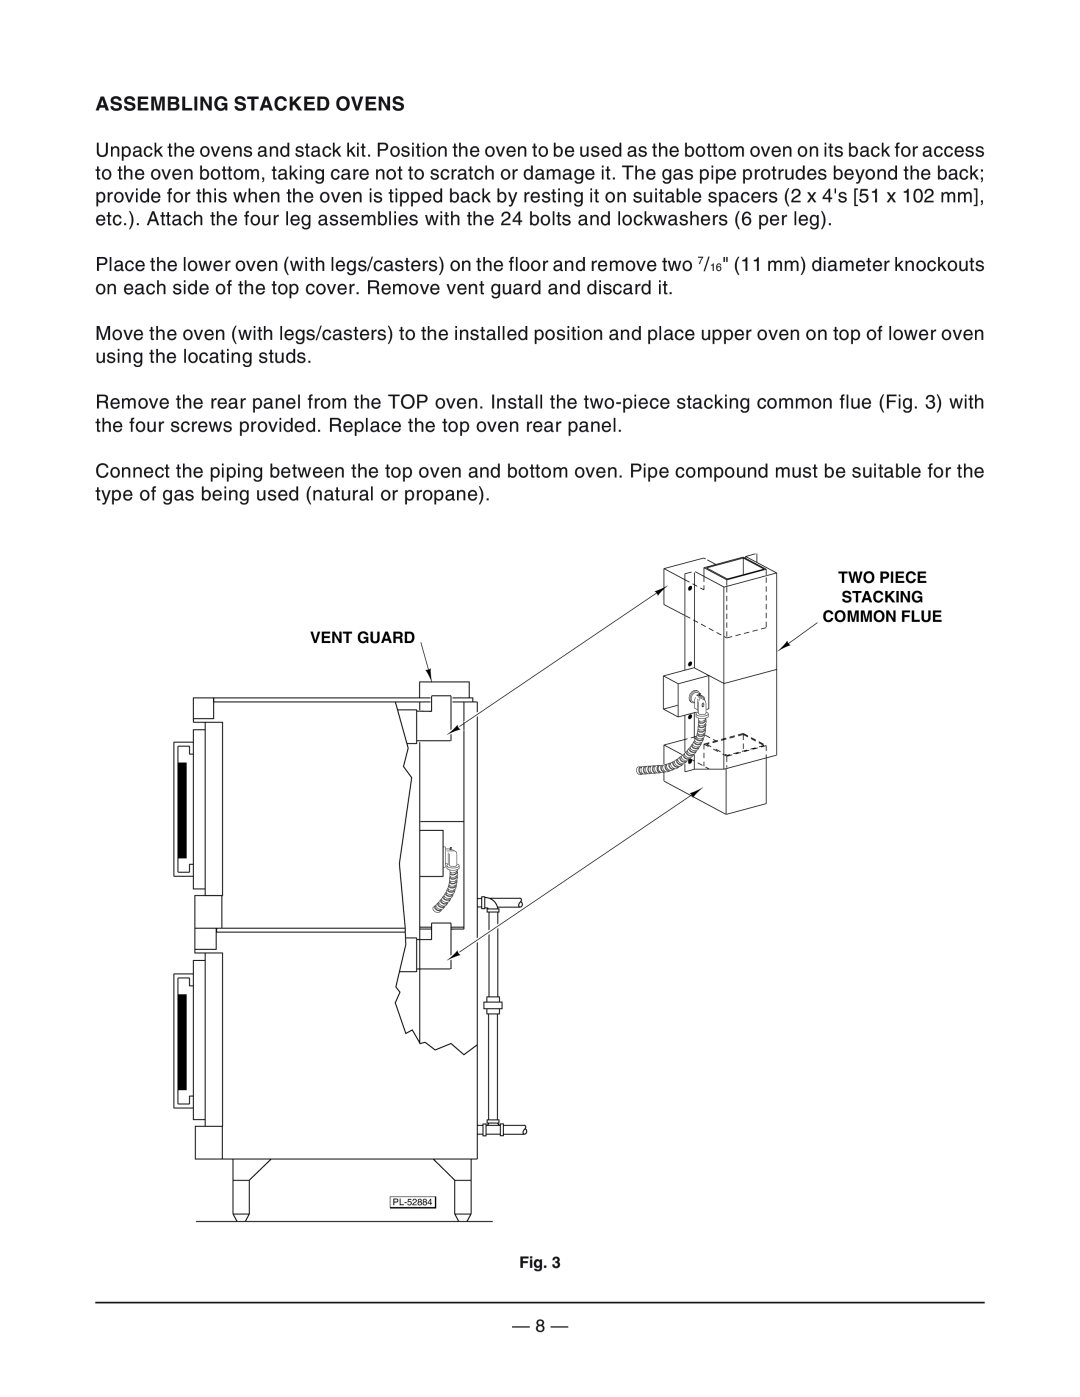
ASSEMBLING STACKED OVENS
GAS AND ELECTRICAL DATA
LEVELING
ELECTRICAL CONNECTIONS
GAS CONNECTIONS
TESTING THE GAS SUPPLY SYSTEM
ADJUSTMENTS Air Adjustment
VENT SYSTEM
OPERATION
CONTROLS - MODELS SG4D AND SG6D Fig
Master Switch
Power Level Control
Dial Setting
One-HourTimer
Cooking
USING THE SG4D AND SG6D OVENS Preheating
LIGHTING THE SG4D AND SG6D OVENS
End of Day
Extended Shutdown
MENU SELECT
3/4
To Set the Power Level
To Change the Time Setting for any Menu Item
To Set the Cook Time
To Set the Temperature
SETTING THE OVEN FOR ROAST & HOLD
Starting a Timed Cycle On All Racks
To Display the Actual Oven Temperature
To End a Cooking Cycle
ROAST AND HOLD OPERATION
ROAST AND HOLD DIAGRAM - Time vs. Temperature
300ºF
200ºF
RACK ARRANGEMENTS
Arrangement #1
Arrangement #2
Arrangement #3
ROASTING TEMPERATURE CHART
CONSERVING ENERGY
COOKING GUIDELINES
Page
Contd
REHEATING PREPARED FOODS
MISCELLANEOUS PRODUCTS
OVEN BROILING OR FRYING
CASSEROLES
NOTES ON SPECIAL PROCEDURES FOR BAKING
HIGH LIMIT SWITCH
Daily
CLEANING
Snorkel Tube
MAINTENANCE
SERVICE AND PARTS INFORMATION
LUBRICATION
VENT
TROUBLESHOOTING GUIDE
PROBLEM
CAUSE
CORRECTION
DÉPANNAGE
CORRECTIF
CAUSE
PROBLÈME
ENTRETIEN
RECHANGE DE PIÈCES ET L’ENTRETIEN DE SERVICE
quotidien Nettoyage
Snorkel Tube
AVERTISSEMENT
NETTOYAGE
FOUR AU GRILLAGE ET FRITURE
DIVERS ALIMENTS
CASSEROLES
CUISINÉS PLATS DE RÉCHAUFFAGE
Page
L’ÉNERGIE DE CONSERVATION
RÔTISSAGE DE TEMPÉRATURES
D’UTILISATION CONSEILS
4 n Arrangement
3 n Arrangement
2 n Arrangement
1 n Arrangement
CHAUD-AU-GARDEET RÔTISSAGE MODE
Page
cuisson la commencer Pour
puissance de niveau le régler Pour
température la régler Pour
cuisson de temps le régler Pour
Page
Page
prolongé Arrêt
10 à puissance de commutateur le Régler
Cuisson
SG6D ET SG4D FOURS DES UTILISATION
SG6D ET SG4D FOURS DES ALLUMAGE
UTILISATION PREMIÈRE UNE AVANT
vitesses deux à
Puissance
Réglage
FONCTIONNEMENT
4 .Fig SG6D ET SG4D MODÈLES DES COMMANDES
D’ÉVACUATION SYSTÈME
GAZ DE CANALISATION LA DE ESSAIS
GAZ DU BRANCHEMENT
NIVELAGE
GAZ DE ET ÉLECTRIQUES CARACTÉRISTIQUES
ÉLECTRIQUE RACCORDEMENT
FOURS DE SUPERPOSITION
pattes des Assemblage
FOUR DU AVANT FOUR DU ARRIÈRE
support le sur four du Assemblage
NORMES ET D’INSTALLATION CODES
BASE DE FOUR DU INSTALLATION
roulettes sur Appareils
Unis-ÉtatsAux
INSTALLATION
DÉBALLAGE
CARACTÉRISTIQUES
MATIÈRES DES TABLE
AVERTISSEMENT
AVERTISSEMENT
IMPORTANTES SÉCURITÉ DE MESURES
D’EMPLOI MODE ET DINSTALLATION MANUEL
SG SÉRIE LA DE
SNORKEL
GAZ AU PULSÉ AIR À FOUR
Top
Page
Image
Contents