Oven Safety
Table of Contents
Using EASY
Using the
Table of Contents
A Note to You
Throughout Canada for service
Thank you for buying a KITCHENAID* appliance
In the U.S.A
IMPORTANT SAFETY INSTRUCTIONS
O ven Safety
Your safety is important to us
wWARNING
When using the oven
Oven Safety
Care and cleaning
SAVE THESE INSTRUCTIONS
Getting to Know Your Oven
Feature locations
Models KEBS208D and KEBS278D shown
Automatic oven light switch p
Using the electronic oven control
Using Your Oven
double thermal-convection oven shown
Display/clock
Starting an operation
Using Your Oven
Selecting an oven
Finding out which oven is in use
Setting your single oven for the Sabbath†
Using the control lock
Prompt for start
Using Your Oven
Using Your Oven
Setting your double oven for the Sabbath†
START
BAKE
START
Using Your Oven
Using Your Oven
Oven settings
SETTING
DIAGRAM
SETTING
Using Your Oven
DIAGRAM
SETTING INFORMATION
To disable the display clock
Setting the clock
Press Clock Set/Start pad
Set time
1. Press Timer Set/Start pad
Using the timer
3. Start Timer
4. When time is up, turn off Timer
To cancel the timer during its operation
To change the timer during its operation
Baking or convection baking
1. Position racks
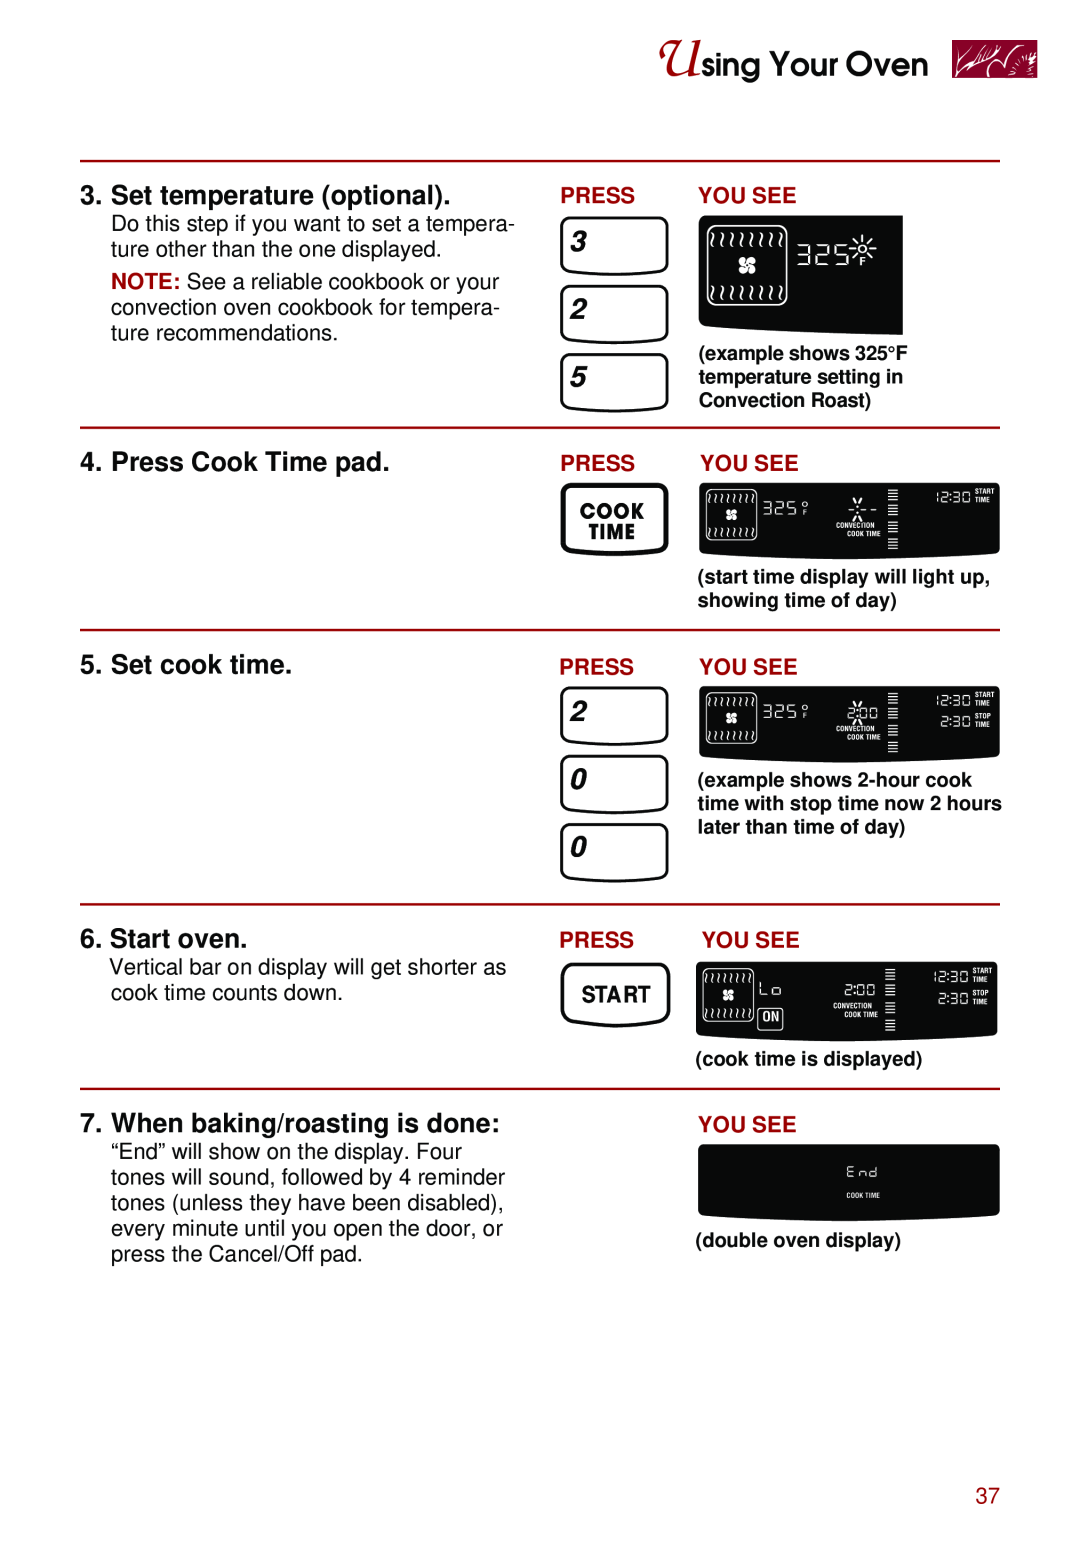
3. Set temperature optional
2. Choose baking setting
Using Your Oven
BAKE
4. Preheat oven
Convection roasting
5. Put food in oven
6. After cooking, turn off oven
4. Start oven
2. Choose setting
5. After cooking, turn off oven
Using Your Oven
Cooking tips
Using aluminum foil in the oven
Baking/convection baking tips
Baking tips
Roasting tips
Convection baking tips
Using Your Oven
Convection Bake pad
1. Press and hold Bake pad for 5 seconds
Adjusting oven temperature
2. Set new offset temperature
Using Your Oven
3. Enter the adjustment
Using the temperature probe
How to determine the amount of adjustment needed
upper/single oven only
2. Put food in oven
6. Choose cook setting
3. Connect probe to oven
4. Close oven door
8. Start oven
7. Set temperature optional
Using Your Oven
START
11. Clean probe
Using convect full meal
9. After cooking, unplug probe
10. Remove food from oven
1. Place food in cold oven
5. When the Convect Full Meal cycle is done
2. Press Convect Full Meal pad. PRESSYOU SEE
3. Press desired Number pad
Using Your Oven
Convect full meal chart
1. Place food in oven
Using EASY CONVECT* Conversion
2. Press one of three EASY
CONVECT Conversion Pads
4. Enter standard cook time
8. When stop time is reached delayed cooking only
5. Start oven
6. At end of cook time nondelayed cooking
Broiling
EASY CONVECT* Conversion setting chart
1. Position rack
Using Your Oven
4. Press Broil pad
3. Close door
Using Your Oven
2. Put food in oven
6. Start oven
7. When broiling is done
turn off oven
Variable temperature broiling
Convection broiling
Broil setting
2. Close door
3. Choose Convection
5. For best results, preheat oven for 5 minutes
7. When broiling is over, turn off oven
6. Put food in oven
Broiling tips
To start now and stop automatically 1. Prepare oven
Timed cooking
Using Your Oven
2. Choose setting
4. Press Cook Time pad
7. When baking/roasting is done
5. Set cook time
Using Your Oven
Using Your Oven
To delay start and stop automatically 1. Prepare oven
2. Choose setting
3. Set temperature optional
6. Press Stop Time pad
5. Set cook time
7. Set stop time
8. Press Start pad
Press Cancel/Off pad
9. When baking/roasting is done
Using Your Oven
To cancel timed cooking settings
1. Prepare food
Dehydrating
2. Arrange food on drying racks
4. Press and hold Convection
Raising proofing bread
7. When dehydrating is done
Using Your Oven
CANCEL
The oven vents
4. When proofing is done, turn
1. Put dough in oven
2. Press and hold Baked Goods
Caring for Your Oven
Cleaning your oven and controls
Caring for Your Oven
Removing the oven door
To remove
To replace
Replacing the oven light
Using and replacing the oven lights
Caring for Your Oven
Before you start
Using the Self-Cleaning Cycle
wWARNING
Setting the controls
Before setting the controls
Using the Self-Cleaning Cycle
To start cleaning immediately
4. After the Self-Cleaning
Using the Self-Cleaning Cycle
To delay cleaning start time
cycle ends
To stop the Self-Cleaning cycle at any time
6. After the Self-Cleaning cycle ends
4. Set stop time
5. Complete entry
How the cycle works
For best cleaning results
Using the Self-Cleaning Cycle
Other possible problems and their causes
Troubleshooting
If nothing operates, check the following
Troubleshooting
2. If you need service†
R equesting Assistance or Service in the U.S.A
3. If you are not satisfied with the action taken
Authorized Service Centres
Requesting Assistance or Service in Canada
2. For Service
For service of Inglis, Whirlpool, KitchenAid, Roper, Estate
Index
SELF-CLEANING
Index
48-50
TEMPERATURE PROBE
Electric Built-In Oven
Warranty