Manuals
/
Yamaha
/
Home Audio
/
Home Theater System
Yamaha
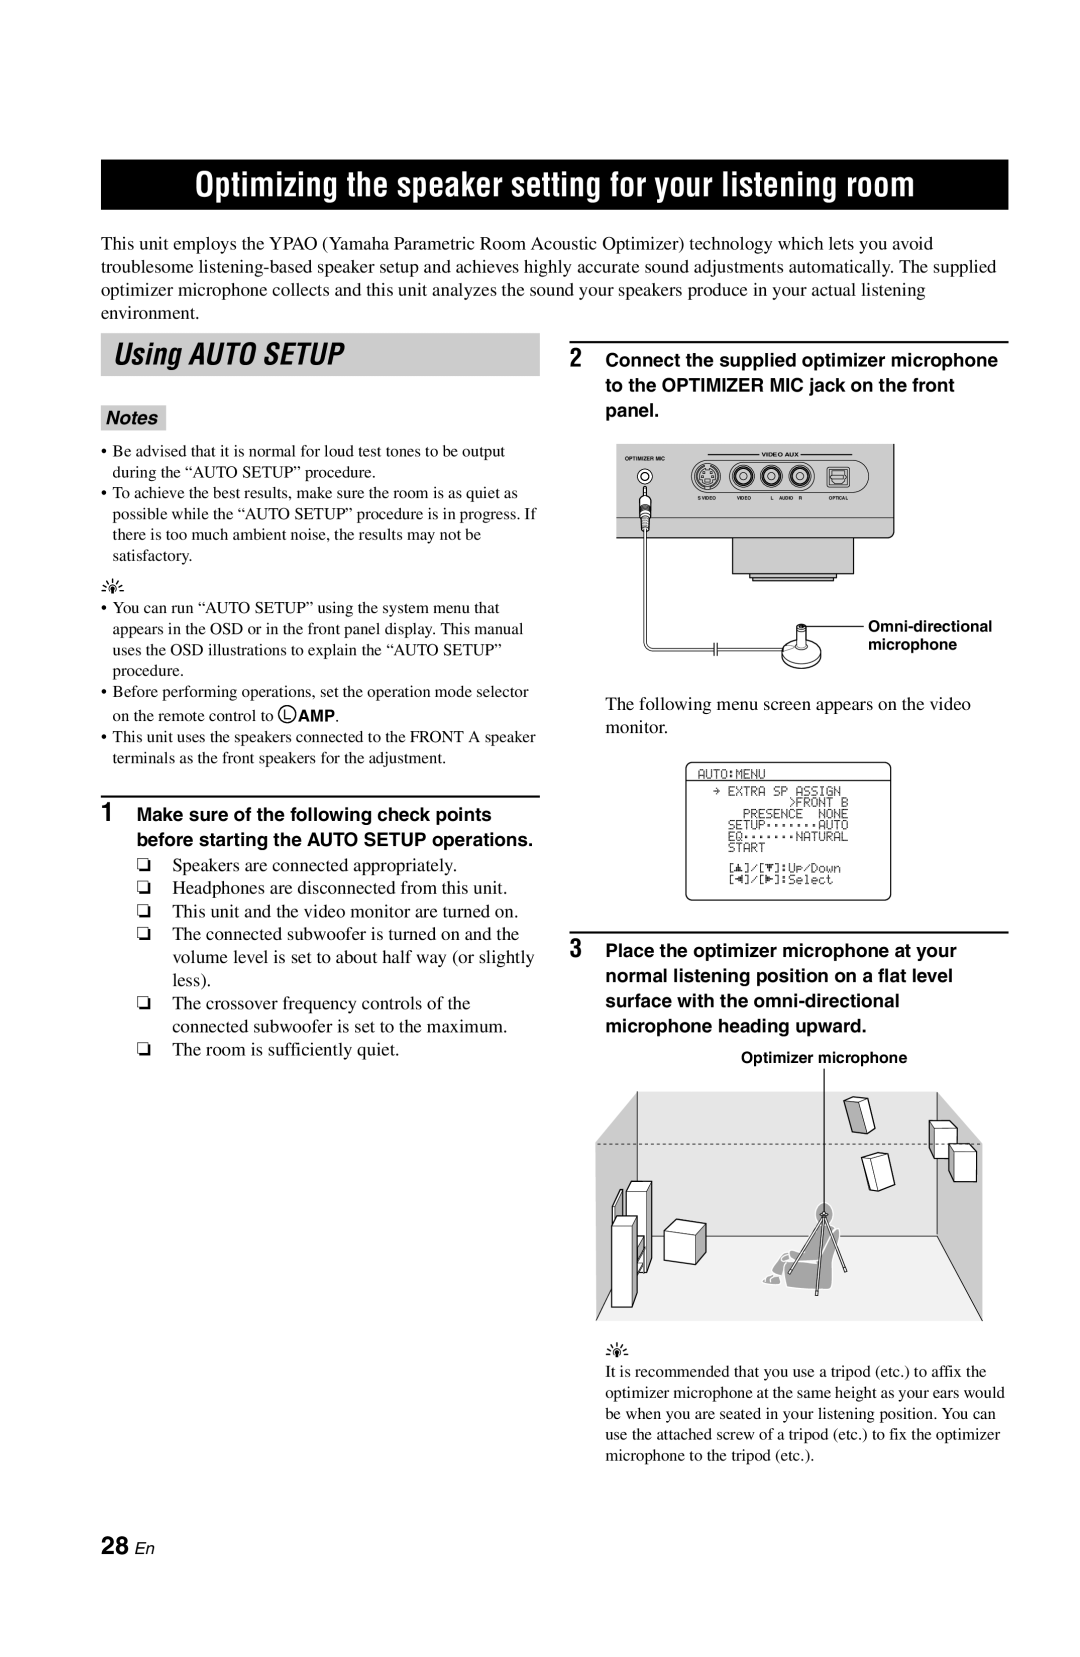
DSP-AX861SE Using AUTO SETUP, 28 En, Connect the supplied optimizer microphone, panel
Models:
DSP-AX861SE
1
30
117
117
Download
117 pages
33.39 Kb
27
28
29
30
31
32
33
34
Troubleshooting
Specification
Audio and video signal flow
If an error screen appears
1A Input signal indicators
P. •Connecting a set-topbox P
Advanced sound configurations
User presets PRESET
Supplied accessories
Set up your speakers
Page 30
Image 30
Page 29
Page 31
Page 30
Image 30
Page 29
Page 31
Contents
DSP-AX861SE
AV Amplifier
OWNER’S MANUAL
Caution: Read this before operating your unit
For U.K. customers
Special Instructions for U.K. Model
Contents
1 En
at the end of this manual
Notice
2 En
About this manual
Built-in 7-channelpower amplifier
Features
Supplied accessories
Other features
4 En
Installing batteries in the remote control 2 3
Getting started
2Insert the four supplied batteries
Preparation: Check the items
Step 1: Set up your speakers
Quick start guide
Enjoy DVD playback
2Connect speaker cables to each speaker
6 En
1Place your speakers and subwoofer in the room
Front speakers and center speaker
digital coaxial audio output jack of your DVD
7 En
1 Connect the digital coaxial audio cable to the
player and the DVD DIGITAL INPUT COAXIAL
P. •Connecting an external amplifier P.
•Using the other kind of speaker combinations P.
P. •Connecting a set-topbox P.
P. •Connecting a Yamaha iPod universal dock P.
9 En
Using the other SCENE buttons
4Rotate 4VOLUME to adjust the volume
Check the type of the connected speakers
Using various sound features
After using this unit
Using various input sources
Adjusting the parameters of this unit
Connections
Rear panel
11 En
Front left and right speakers FL and FR
Placing speakers
12 En
Center speaker C
Connecting speakers
13 En
4Tighten the knob to secure the wire
Connecting the speaker cable
Using bi-amplificationconnections
14 En
Audio jacks
Information on jacks and cable plugs
15 En
Video jacks
HDMI compatibility with this unit
Information on HDMI
16 En
HDMI jack and cable plug
Video signal flow
Audio and video signal flow
Audio signal flow
17 En
Connecting a TV monitor or projector
18 En
19 En
Connecting other components
Connecting a DVD player
Notes
20 En
Connecting a DVD recorder, PVR or VCR
Connecting a set-topbox
Connections
Connecting audio components
21 En
Notes
1FRONT PRE OUT jacks
Connecting an external amplifier
22 En
2SURROUND PRE OUT jacks
Using REMOTE OUT jacks
Using the VIDEO AUX jacks on the front panel
Connecting a Yamaha iPod universal dock
23 En
24 En
Connecting the power cable
AC OUTLET SWITCHED
Memory back-up
25 En
Setting the speaker impedance
Turning this unit on and off
Turning on this unit
2B Decoder indicators
1A Input signal indicators
9 MUTE indicator
3ENHANCER indicator
LFE indicator
Using the remote control
LInput channel and speaker indicators
Input channel indicators
2 Connect the supplied optimizer microphone
Using AUTO SETUP
28 En
to the OPTIMIZER MIC jack on the front
5Press Dl / h to select “SETUP” and then
•When you use the presence speakers see page
•When you do not use the EXTRA SP terminals
6Press Dl/ hto select the desired setting of “EQ”
Speaker size SIZE
Speaker wiring WIRING
30 En
Speaker distance DISTANCE
31 En
the setup result displays
select “SET” or “CANCEL”
9Press Dl / h repeatedly to toggle between
If “WARNING” appears
If an error screen appears
32 En
3Press DENTER to return to the top
DVD Viewing
Selecting the SCENE templates
Selecting the desired SCENE template
DVD Movie
Default SCENE buttons
34 En
Which SCENE template would you like to select?
Which source do you like to play back?
DVD Viewing
Preset SCENE templates descriptions
35 En
DVD Movie Viewing
Rename the SCENE templates
Creating your original SCENE templates
36 En
2Set the operation mode selector to LAMP
37 En
Basic procedure
Playback
the desired input source
Selecting the MULTI CH INPUT component
A quick guide to contents
Using the Zone B feature
Selecting the front speaker set
control
Selecting audio input jacks AUDIO SELECT
39 En
1Turn on the video monitor connected to this unit
4Press NSET MENU on the remote control
Using your headphones
2Press Dn repeatedly to select “SIGNAL
Muting the audio output
41 En
Using the sleep timer
Canceling the sleep timer
Audio information
Selecting sound field programs
Sound field indicators
Sound field programs
Sound field program descriptions
HiFi DSP
43 En
For audio music sources
Notes
For visual sources of music
44 En
For various sources
Notes
45 En
For movie sources
Notes
The Compressed Music Enhancer
46 En
Stereo playback
Virtual CINEMA DSP
Deactivating the “STRAIGHT” mode
STRAIGHT
47 En
Press 7STRAIGHT or QSTRAIGHT to select “STRAIGHT”
Adjusting the speaker level
Using audio features
Adjusting the tonal quality
2Press Dl / h to adjust the speaker output level
Effect.Lvl:MID
Enjoying multi-channelsources in 2-channelstereo
Selecting the night listening mode
49 En
50 En
Using iPod
Controlling iPod
Controlling iPod in the simple remote mode
1Set the operation mode selector to
51 En
The function of the play information display
playback of the selected song
1Turn on all the connected components
Recording
52 En
the source component you want to record from
adjust
Advanced sound configurations
settings
Changing sound field parameter
Increase the value of “DSP LEVEL” when
Basic configuration of sound field programs
54 En
Decrease the value of “DSP LEVEL” when
55 En
INIT.DLY P.INIT.DLY S.INIT.DLY SB INI.DLY
56 En
ROOM SIZE P.ROOM SIZE S.ROOM SIZE SB ROOM SIZE
LIVENESS S.LIVENESS SB LIVENESS
REV.DELAY
57 En
REV.TIME
REV.LEVEL
Selecting decoders used with sound
Selecting decoders
58 En
field programs Decoder Type
SURROUND DECODE
59 En
Decoder descriptions
SURROUND DECODE
60 En
Decoder parameter descriptions
Manual setup MANUAL SETUP
Customizing this unit MANUAL SETUP
Auto setup AUTO SETUP
61 En
Signal information SIGNAL INFO
62 En
settings 6Press NSET MENU to exit from “SET MENU”
Using SET MENU
SETUP”
63 En
When you do not use the EXTRA SP terminals
Speaker settings ASPEAKER SET
When you use the presence speakers see page
FRONT B speakers setting FRONT B
When the center speaker is large
When the front speakers are large
When the front speakers are small
When the center speaker is small
66 En
When you do not use a subwoofer
Subwoofer phase SUBWOOFER PHASE
LFE/Bass out LFE/BASS OUT
Unit UNIT
67 En
Speaker distance CSP DISTANCE
Speaker distances
Low-frequencyeffect level
Audio settings GAUDIO SET
68 En
Center graphic equalizer CENTER GEQ
Initial volume INI.VOL
HDMI setting HHDMI SET
Maximum volume MAX VOL
69 En
Input/output assignment
2 INPUT MENU
70 En
For COMPONENT VIDEO jacks A, B and C
For OPTICAL OUTPUT jack
5Press DENTER on the remote control to exit
71 En
For OPTICAL INPUT jacks 2, 3 and
72 En
Multi channel input settings
DTS decoder prioritize setting
Decoder select mode
73 En
Display settings ADISPLAY SET
3 OPTION MENU
Video conversion VIDEO CONV
HDMI aspect ratio HDMI ASP
Source feature OSD display time
74 En
Dimmer DIMMER
Parameter initialization DPARAM.INI
iPod universal dock setting EDOCK SET
75 En
Charge on standby STANDBY CHARGE
remote control
Remote control features
Using the remote control for the SCENE feature
76 En
Controlling this unit
Controlling this unit, a TV, or other components
77 En
Controlling a TV
78 En
Controlling other components
you want to set up
Setting remote control codes
Remote control code default settings
79 En
3Press DENTER
6Press TLEARN again to exit from the setup mode
80 En
5Press DENTER to set the number
1 Set the operation mode selector to
Programming codes from other remote controls
81 En
LSOURCE and then press an input selector
82 En
the remote control
Changing source names in the display window
5Press and hold the button you want to
MACRO operations
Macro programming features
83 En
3Press Dk / n to select and enter a character
Default macro functions
84 En
85 En
4 Press TMACRO again using a ballpoint pen
or similar object when the operation
3 Press the buttons for the functions you want
86 En
Clearing configurations
using a ballpoint pen or similar object
Clearing function sets
containing the function you want to clear
87 En
Clearing a learned function
TLEARN again to exit
a ballpoint pen or similar object
88 En
Clearing a macro function
Notes
89 En
Advanced setup
Using the advanced setup
unit
Setting remote control AMP ID codes
User presets PRESET
Remote control AMP ID REMOTE AMP
90 En
Video parameter reset V.RESET
SCENE IR code setting SCENE IR
Bi-amplifiersetting BI-AMP
Remote control AMP ID codes
General
Troubleshooting
92 En
after the power is
settings are not
93 En
speakers when the
page
The volume level is
94 En
or DTS indicator in
The volume level
“CHECK SP WIRES”
Remote control
95 En
The remote control
96 En
AUTO SETUP
Before AUTO SETUP
HDMI
97 En
During AUTO SETUP
After AUTO SETUP
Notes
4Press 5TONE CONTROL repeatedly to select “RESET”
Resetting the system
3Rotate the 6PROGRAM selector to select “PRESET”
98 En
Glossary
Component video signal
Composite video signal
99 En
DTS 96/24
S-videosignal
100 En
DTS Digital Surround
Elements of a sound field
Sound field program information
101 En
CINEMA DSP
Frequency
Parametric equalizer information
102 En
Gain
AUDIO SECTION
Specifications
103 En
VIDEO SECTION
Index
104 En
Numerics
105 En
106 En
Front panel
5 6 7 8 9 0 A
Remote control
CD PLAYER
List of remote control codes
CABLE
CD RECORDER
RECEIVER TUNER
LD PLAYER
MD RECORDER
SATELLITE TUNER
AMERICA ACTION
Page
HUGHES NETWORK SYSTEMS
DSP-AX861SE/DSP-AX761
5 6 7 8 9 0 A
VOLUME
Front panel
Top
Page
Image
Contents