Briggs & Stratton 09801-9 Stopping the Engine, Operating Automatic Idle Control

Page 12

OPERATION

CAUTION

Exceeding generator’s wattage/amperage capacity can damage generator and/or electrical devices connected to it.

See “Don’t Overload Generator”.

Start generator and let engine stabilize before connecting electrical loads.

Connect electrical loads in OFF position, then turn ON for operation.

Turn electrical loads OFF and disconnect from generator before stopping generator.

Stopping the Engine

1.Turn off and unplug all electrical loads from generator panel receptacles. NEVER start or stop engine with electrical devices plugged in and turned on.

2.Put idle control switch in “Off” position.

3.Let engine run at no–load for 30 seconds to stabilize internal temperatures of engine and generator.

4.Move Ignition switch to “Off” (o) position.

5.Close the fuel shut–off valve.

Operating Automatic Idle Control

This feature is designed to greatly improve fuel economy. When this switch is turned ON, the engine will only run at its normal high governed engine speed when electrical loads are connected.When electrical loads are removed, the engine will run at a reduced speed.

With the switch off, the engine will run at the normal high

engine speed. Always have the switch off when starting and stopping the engine.

DANGER

Storage batteries give off explosive hydrogen gas during recharging.

Hydrogen gas stays near battery for a long time after battery has been charged.

Slightest spark will ignite hydrogen and cause explosion.

You can be blinded or severely injured.

Battery electrolyte fluid contains acid and is extremely caustic.

Contact with battery fluid will cause severe chemical burns.

DO NOT allow any open flame, spark, heat, or lit cigarette during and for several minutes after charging a battery.

Wear protective goggles, rubber apron, and rubber gloves.

To recharge 12 Volt batteries, proceed as follows:

1.Check fluid level in all battery cells. If necessary, add ONLY distilled water to cover separators in battery cells. DO NOT use tap water.

2.If battery is equipped with vent caps, make sure they are installed and are tight.

3.If necessary, clean battery terminals.

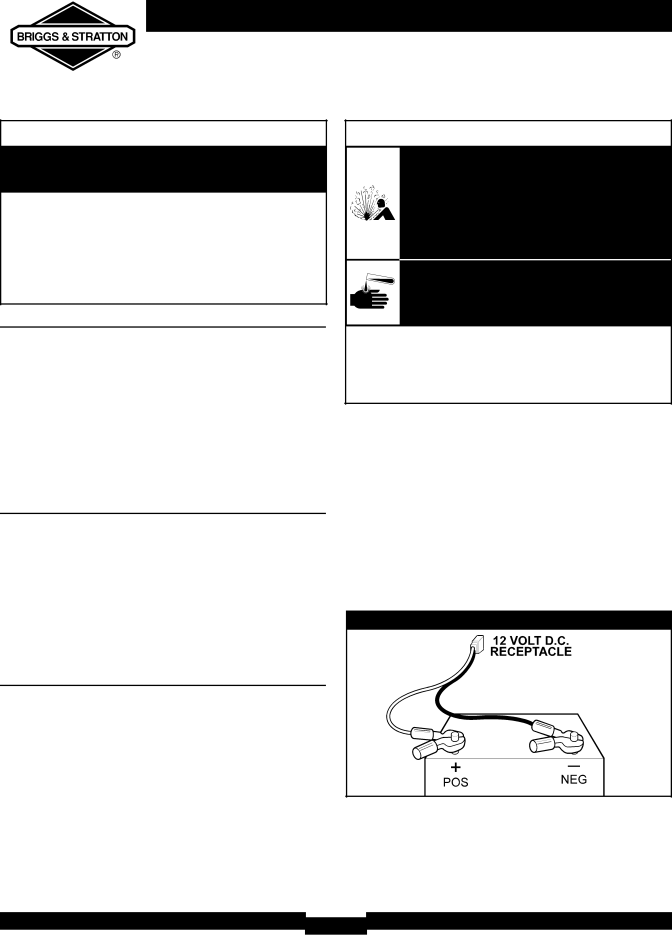
4.Connect battery charge cable connector plug to panel receptacle identified by the words “12-VOLTS D.C.”

5.Connect battery charge cable clamp with red handle to the positive (+) battery terminal (Figure 8).

Figure 8 — Battery Connections

Charging a Battery

Your generator has the capability of recharging a discharged 12 Volt automotive or utility style storage battery.

• DO NOT use the unit to charge any 6 Volt batteries.

• DO NOT use the unit to crank an engine having a discharged battery.

6. Connect battery charge cable clamp with black handle to the negative (–)battery terminal (Figure 8).

7. Start engine. Let engine run while battery recharges.

8. When battery has charged, shut down engine

12

Image 12
Contents 09801-9 10000W Table of Contents Safety RulesEquipment Description When Adding or Draining Fuel When Starting EquipmentWhen Operating Equipment When Transporting or Repairing EquipmentGenerator produces powerful voltage When Adjusting or Making Repairs to Your Generator When Testing for Engine SparkKnow Your Generator Recoil StarterSpark Arrester Muffler Assembly Install Wheel KitUnpacking the Generator VibrationCheck Battery / Attach Negative Battery Wire Always wear eye protection when installing/removing e-ringsBattery Cable When Adding Fuel Before Starting the EngineAdd Engine Oil Add FuelUsing the Generator Connecting to a Building’s Electrical SystemSystem Ground Generator LocationConnecting Electrical Loads Operating GeneratorStarting the Engine Charging a Battery Stopping the EngineOperating Automatic Idle Control HOW to USE the Battery Charger Cold WeatherOperation Creating a Temporary Shelter Creating a Permanent ShelterReceptacles Volt AC, 50 Amp Receptacle120/240 Volt AC, 30 Amp, Locking Receptacle Volt AC, 30 Amp Locking ReceptacleVolt AC, 20 Amp, Duplex Receptacle Volt, 20 Amp Locking Type ReceptacleVolt DC, 10 Amp Receptacle Power Management DON’T Overload GeneratorCapacity Specifications General Maintenance RecommendationsStorage Generator StorageEngine Storage Other Storage TipsTroubleshooting Problem Cause CorrectionContact Authorized service facility Disconnect shorted electrical loadWarranty Period Limited WarrantySymboles de Danger et Moyens Table DES MatièresDescription DE L Équipement Règles DE SécuritéLors DE Lajout OU DE LA Vidange DU Carburant Lors DU Démarrage DE LéquipementLorsque Léquipement Fonctionne Lorsque Vous Transportez OU Réparez LéquipementLorsque Vous Réglez OU Réparez Votre Générateur Lors DE Tests Dallumage DU MoteurConnaissez Votre Générateur Installe la Roue la Trousse Référez-vous à la et installez les roues comme suitAssemblage Enlever le Générateur De La BoiteInstallation Avant LE Démarrage DU MoteurAjoutez de lhuile à moteur Ajoutez de lessenceEmplacement de la Génératrice Utilisation DE LA GénératriceMise à la terre du système Branchement au système électrique dun édificeUtilisation DU Générateur Démarrage du MoteurBranchement des Charges Électriques Placez le interrupteur Marche/Arrêt en position MarcheArrêt du Moteur Fonctionnement du Contrôle Automatique du RalentiRecharge d’une Batterie Comment Utiliser LE Chargeur DE Batterie Fonctionnement PAR Temps FroidProtégez lunité contre les intempéries Création d’un abri temporaire Création d’un abri permanentVent Prises DE Courant Prise à Verrouillage de 240 Volts c.a., 50 AmpèresPrise à Verrouillage de 120/240 Volts c.a., 30 Ampères Prise à Verrouillage de 120 Volts c.a., 30 AmpèresPrise à Verrouillage de 120 Volts c.a., 20 Ampères Volts c.a., 20 Ampères Prise de Courant DoublePrise de 10 Ampères, 12 Volts c.c NE PAS Surcharger Générateur CapacitéGestion de la Consommation ExempleRecommandations Générales D’ENTRETIEN SpécificationsRemisage Remisage du GénérateurRemisage du Moteur Autres Idées de RemisageDépannage Période DE Garantie Garantie LimitéeTabla DE Contenidos Descripción DEL EquipoReglas DE Seguridad AdvertenciaPeligro Cuando Añada Combustible O Vacíe EL DepósitoCuando Ponga EN Funcionamiento EL Equipo Cuando Opere EL EquipoQuemaduras severas pueden ocurrir al hacer contacto Precaución Cuando Ajuste O Haga Reparaciones a SU GeneradorCuando Pruebe LA Bujía DEL Motor Conozca SU Generador Culatazo el Principio Usó para comenzar motorMontaje Para Retirar El Generador De La CajaInstale el Juego de Ruedas Para instalar TornilloAntes DE Darle Arranque AL Motor Agregar Aceite al MotorAgregue Combustible Coloque la generador sobre una superficie niveladaUSO DEL Generador Tierra del SistemaUbicación del Generador Conexión al Sistema Eléctrico de un EdificioOperando EL Generador Encienda el MotorConexion De Cargas Electricas Coloque el interruptor ignición a la posición On FiguraParado Del Motor Funcionamiento del Control Automático de Marcha en VacíoCarga de la Bateria Operación Durante UN Clima Frío Cómo al Uso el Corcel de BateríaProteja la unidad de la intemperie Creación de una Estructura de Protección Provisional Creación de una Estructura de Protección PermanenteReceptáculos Precaución Voltios AC, 50 Amperios Receptáculo120/240 Voltios AC, 30 Amperios, Receptáculo de Seguridad Tomacorrientes de 120 Voltios AC, 30 AmperiosTomacorrientes de 120 Voltios AC, 20 Amperios Volt AC, 20 Amperios, Receptáculos DoblesTomacorrientes de 12 Voltios DC Juego de Cable de 3 AlambresNo Sobrecargue Generador CapacidadControl de la Energía EjemploEspecificaciones Recomendaciones Generales DE MantenimientoAlmacenamiento Almacenando el GeneradorAlmacenando el Motor Otras Sugerencias Para el AlmacenandoDiagnositicos DE Averías Notas Período DE Garantía Garantía Limitada