Briggs & Stratton 09801-9 Creating a Temporary Shelter, Creating a Permanent Shelter

Page 14

Creating a Temporary Shelter

1.In an emergency, use the original shipping carton.

2.Cut off top carton flaps and one long side of carton to expose muffler side of unit. If required, tape up other sides of carton to fit over generator as shown in Figure 10.

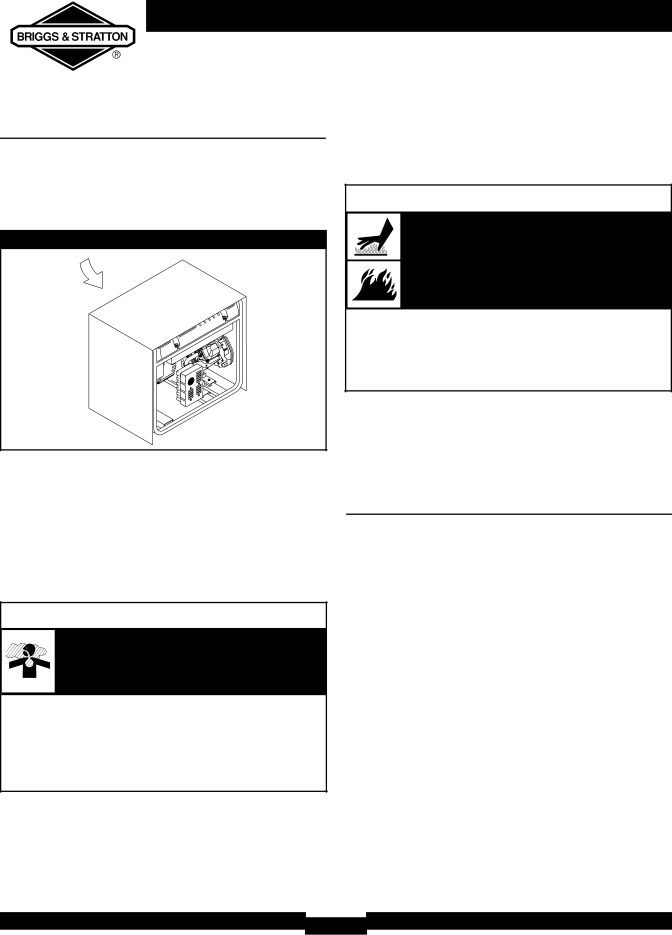
Figure 10 — Permanent Cold Weather Shelter

Wind

Typical Generator

Shown

NOTE: If required, remove wheel kit to fit carton over generator as shown in Figure 10.

3.Cut appropriate slots to access receptacles of unit.

4.Face exposed end away from wind and elements.

5.Locate generator as described in the section “Generator Location”. Keep exhaust gas from entering a confined area through windows, doors, ventilation intakes or other openings.

WARNING

Running generator gives off carbon monoxide, an odorless, colorless, poison gas.

Breathing carbon monoxide can cause nausea, fainting or death.

Operate generator ONLY outdoors.

Keep exhaust gas from entering a confined area through windows, doors, ventilation intakes or other openings.

DO NOT operate generator inside any building or enclosure (even if doors or windows are open), including the generator compartment of a recreational vehicle (RV).

OPERATION

6.Start generator as described in the section “Starting the Engine”, then place carton over generator. Keep at least 5 ft. (152 cm) clearance on all sides of generator including overhead with shelter in place.

WARNING

Running engines produce heat.Temperature of muffler and nearby areas can reach or exceed 150°F (65°C).

Severe burns can occur on contact.

Exhaust heat/gases can ignite combustibles, structures or damage fuel tank causing a fire.

DO NOT touch hot surfaces and avoid hot exhaust gases.

Allow equipment to cool before touching.

Keep at least 5 ft. (152 cm) clearance on all sides of generator including overhead.

Remove shelter when temperatures are above 40°F [4°C].

7.Remove shelter when temperatures are above 40°F [4°C].

8.Turn engine OFF and let cool two (2) minutes before refueling. Let any spilled fuel evaporate before starting engine.

Creating a Permanent Shelter

1.Build a structure that will enclose three sides and the top of the generator, making sure muffler side of generator is exposed.

NOTE: Structure should hold enough heat created by the generator to prevent icing problem.

2.DO NOT enclose generator any more than shown in Figure 10.

NOTE: If a wheel kit is installed on the generator, enlarge shelter accordingly.

3.Follow steps 3 through 8 as described previously in “Creating a Temporary Shelter”.

14

Image 14
Contents 09801-9 10000W Equipment Description Table of ContentsSafety Rules When Operating Equipment When Adding or Draining FuelWhen Starting Equipment When Transporting or Repairing EquipmentGenerator produces powerful voltage When Adjusting or Making Repairs to Your Generator When Testing for Engine SparkSpark Arrester Muffler Know Your GeneratorRecoil Starter Unpacking the Generator AssemblyInstall Wheel Kit VibrationBattery Cable Check Battery / Attach Negative Battery WireAlways wear eye protection when installing/removing e-rings Add Engine Oil When Adding FuelBefore Starting the Engine Add FuelSystem Ground Using the GeneratorConnecting to a Building’s Electrical System Generator LocationStarting the Engine Connecting Electrical LoadsOperating Generator Operating Automatic Idle Control Charging a BatteryStopping the Engine Operation HOW to USE the Battery ChargerCold Weather Creating a Temporary Shelter Creating a Permanent Shelter120/240 Volt AC, 30 Amp, Locking Receptacle ReceptaclesVolt AC, 50 Amp Receptacle Volt AC, 30 Amp Locking ReceptacleVolt DC, 10 Amp Receptacle Volt AC, 20 Amp, Duplex ReceptacleVolt, 20 Amp Locking Type Receptacle Capacity Power ManagementDON’T Overload Generator Specifications General Maintenance RecommendationsEngine Storage StorageGenerator Storage Other Storage TipsContact Authorized service facility TroubleshootingProblem Cause Correction Disconnect shorted electrical loadWarranty Period Limited WarrantyDescription DE L Équipement Symboles de Danger et MoyensTable DES Matières Règles DE SécuritéLorsque Léquipement Fonctionne Lors DE Lajout OU DE LA Vidange DU CarburantLors DU Démarrage DE Léquipement Lorsque Vous Transportez OU Réparez LéquipementLorsque Vous Réglez OU Réparez Votre Générateur Lors DE Tests Dallumage DU MoteurConnaissez Votre Générateur Assemblage Installe la Roue la TrousseRéférez-vous à la et installez les roues comme suit Enlever le Générateur De La BoiteAjoutez de lhuile à moteur InstallationAvant LE Démarrage DU Moteur Ajoutez de lessenceMise à la terre du système Emplacement de la GénératriceUtilisation DE LA Génératrice Branchement au système électrique dun édificeBranchement des Charges Électriques Utilisation DU GénérateurDémarrage du Moteur Placez le interrupteur Marche/Arrêt en position MarcheRecharge d’une Batterie Arrêt du MoteurFonctionnement du Contrôle Automatique du Ralenti Protégez lunité contre les intempéries Comment Utiliser LE Chargeur DE BatterieFonctionnement PAR Temps Froid Vent Création d’un abri temporaireCréation d’un abri permanent Prise à Verrouillage de 120/240 Volts c.a., 30 Ampères Prises DE CourantPrise à Verrouillage de 240 Volts c.a., 50 Ampères Prise à Verrouillage de 120 Volts c.a., 30 AmpèresPrise de 10 Ampères, 12 Volts c.c Prise à Verrouillage de 120 Volts c.a., 20 AmpèresVolts c.a., 20 Ampères Prise de Courant Double Gestion de la Consommation NE PAS Surcharger GénérateurCapacité ExempleRecommandations Générales D’ENTRETIEN SpécificationsRemisage du Moteur RemisageRemisage du Générateur Autres Idées de RemisageDépannage Période DE Garantie Garantie LimitéeReglas DE Seguridad Tabla DE ContenidosDescripción DEL Equipo AdvertenciaCuando Ponga EN Funcionamiento EL Equipo PeligroCuando Añada Combustible O Vacíe EL Depósito Cuando Opere EL EquipoQuemaduras severas pueden ocurrir al hacer contacto Cuando Pruebe LA Bujía DEL Motor PrecauciónCuando Ajuste O Haga Reparaciones a SU Generador Conozca SU Generador Culatazo el Principio Usó para comenzar motorInstale el Juego de Ruedas MontajePara Retirar El Generador De La Caja Para instalar TornilloAgregue Combustible Antes DE Darle Arranque AL MotorAgregar Aceite al Motor Coloque la generador sobre una superficie niveladaUbicación del Generador USO DEL GeneradorTierra del Sistema Conexión al Sistema Eléctrico de un EdificioConexion De Cargas Electricas Operando EL GeneradorEncienda el Motor Coloque el interruptor ignición a la posición On FiguraCarga de la Bateria Parado Del MotorFuncionamiento del Control Automático de Marcha en Vacío Proteja la unidad de la intemperie Operación Durante UN Clima FríoCómo al Uso el Corcel de Batería Creación de una Estructura de Protección Provisional Creación de una Estructura de Protección Permanente120/240 Voltios AC, 30 Amperios, Receptáculo de Seguridad Receptáculos PrecauciónVoltios AC, 50 Amperios Receptáculo Tomacorrientes de 120 Voltios AC, 30 AmperiosTomacorrientes de 12 Voltios DC Tomacorrientes de 120 Voltios AC, 20 AmperiosVolt AC, 20 Amperios, Receptáculos Dobles Juego de Cable de 3 AlambresControl de la Energía No Sobrecargue GeneradorCapacidad EjemploEspecificaciones Recomendaciones Generales DE MantenimientoAlmacenando el Motor AlmacenamientoAlmacenando el Generador Otras Sugerencias Para el AlmacenandoDiagnositicos DE Averías Notas Período DE Garantía Garantía Limitada