Cooper Bussmann BU-945U-E 802.11 DSSS user manual 3A1582Rev1.6

Page 33

Cooper Bussmann Wireless Ethernet & Device Server BU-945U-E 802.11 DSSS User Manual

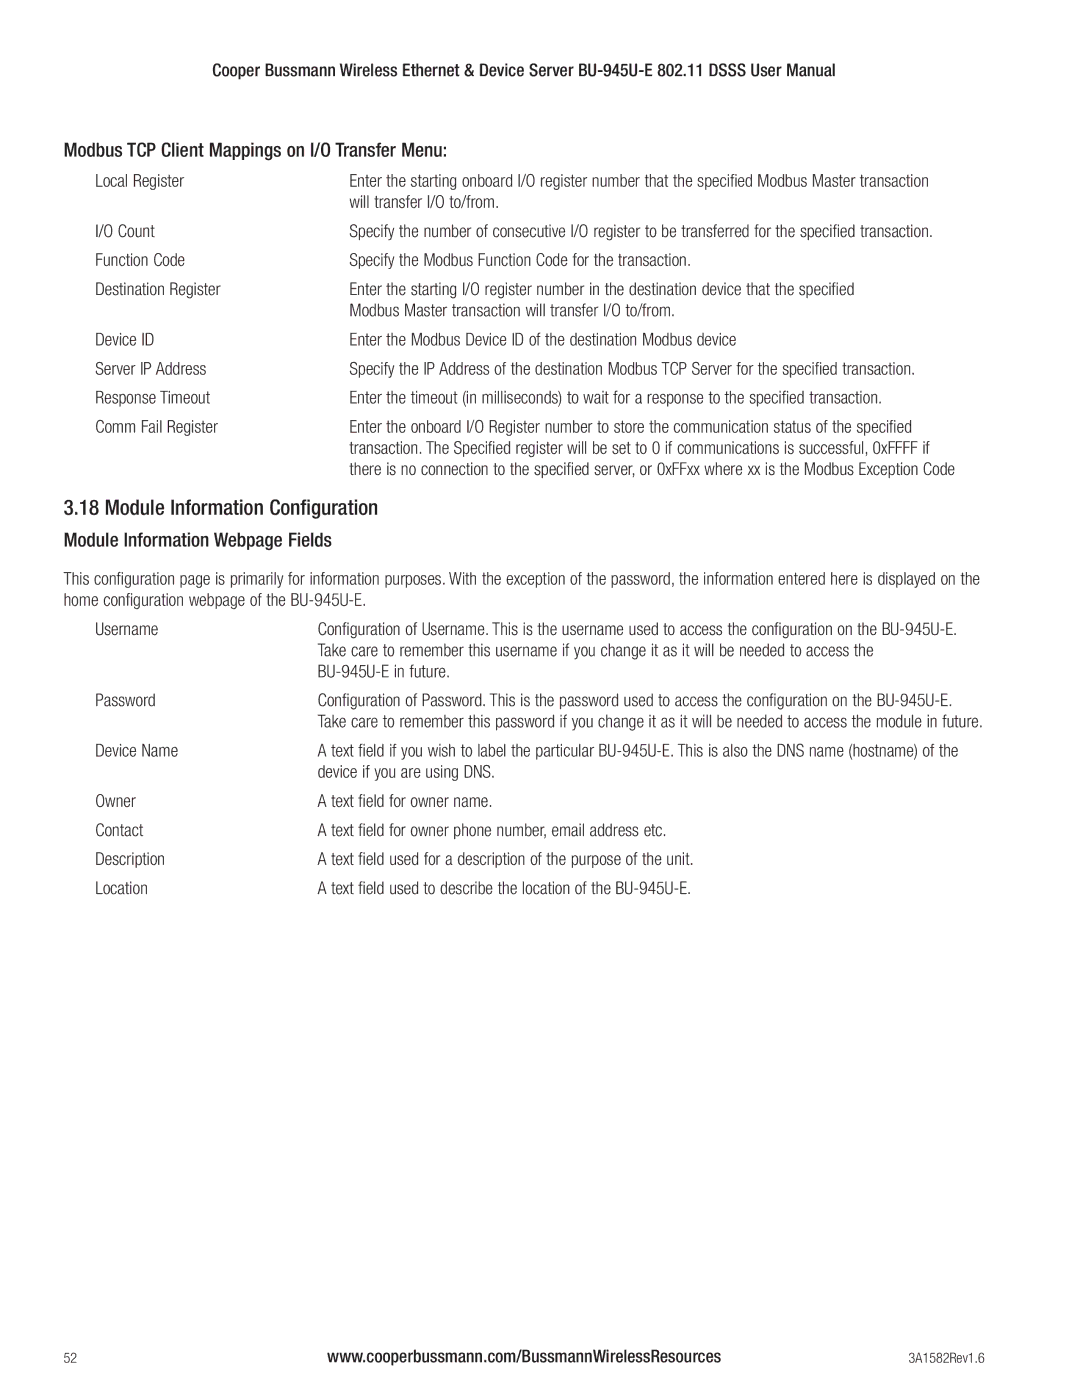
A WDS bridge interface allows traffic to be bridged to another Access Point on the same IP network. WDS bridge interfaces do not require additional IP Address configuration, as they are bridged with the standard wireless interface that is used for connections to associated clients. All of the WDS interfaces on the one Access Point may be bridged if required.

WDS bridge interfaces have the advantage that redundant paths are permitted when using the bridge Spanning Tree Protocol (see section 3.10 “Spanning Tree Algorithm / Redundancy”), thus behaving as a self-healing mesh network. Bridged networks are also not as configuration intensive as routed networks. Since WDS bridge interfaces generally do not require IP address configuration (they inherit the IP address of the standard wireless interface).

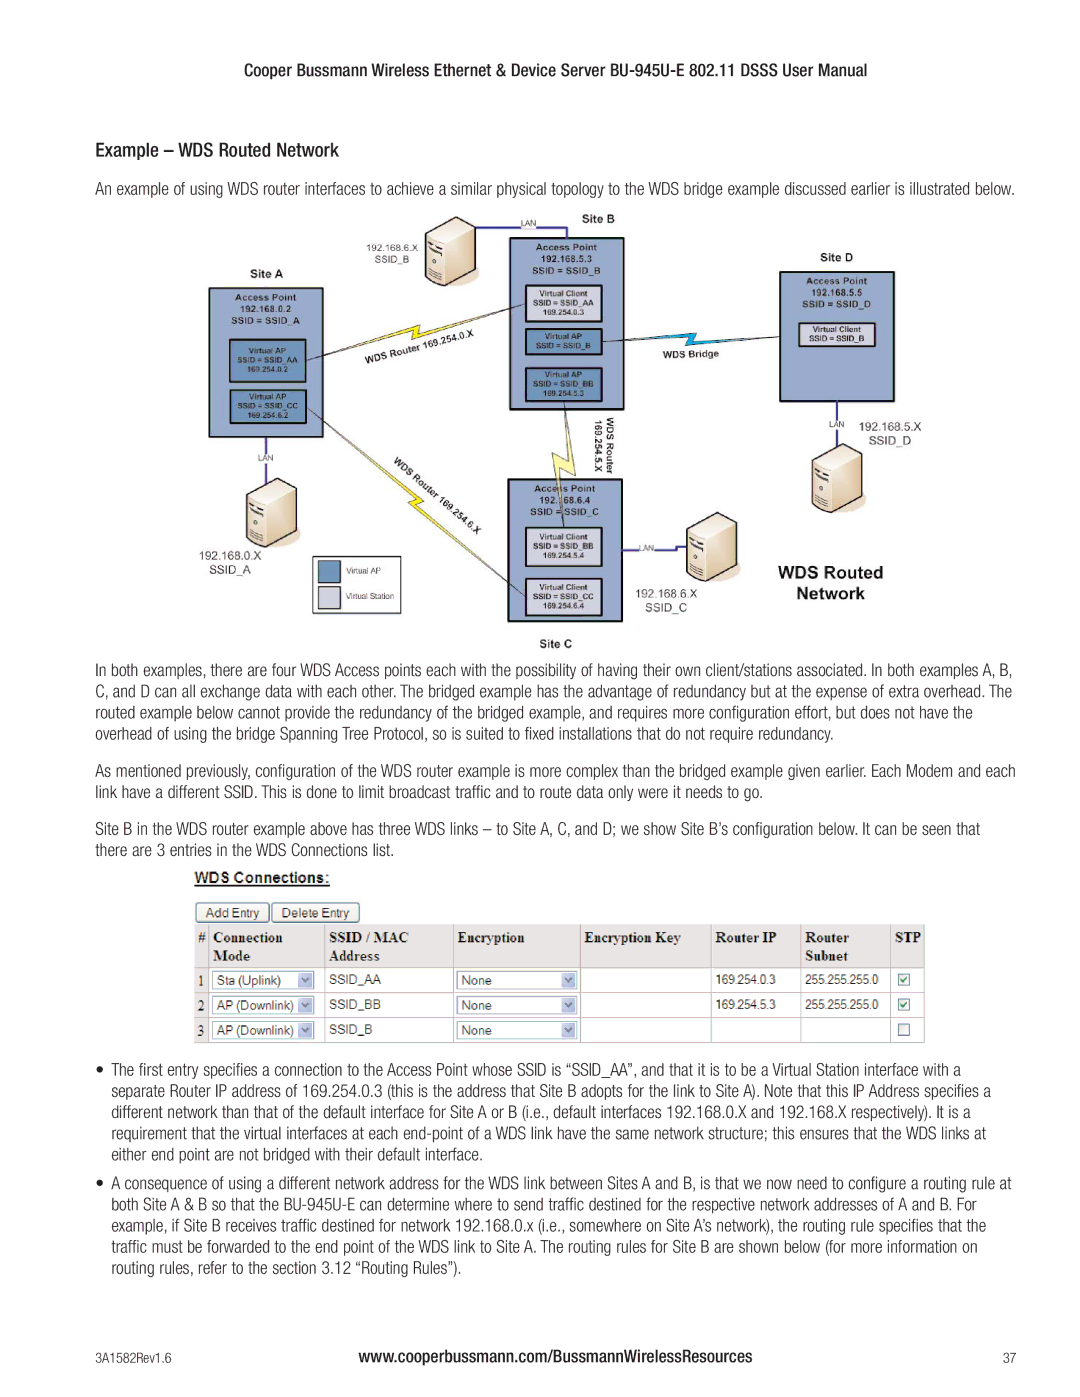
A WDS router interface allows traffic to be routed to an Access Point on a different network, and therefore requires configuration of an IP address to reflect the network address of the destination network. WDS router interfaces cannot provide the redundancy of bridge interfaces, but can be used to reduce radio bandwidth requirements because the router can determine the destination based on IP address, whereas the bridge must go through a learning phase where all broadcast traffic must be retransmitted on each interface. Routed networks may also be used in some cases to avoid the overhead introduced by the bridge Spanning Tree Protocol when network loops exist.

Each WDS interface may also be configured with a different encryption algorithm; however each side of a single WDS link must specify the same encryption algorithm and keys.

Specify SSID for AP/STA modes or MAC Address for Point to point mode.

Router IP and Subnet should be left blank unless that WDS interface is to be on a different subnet. Leaving these fields blank will mean that the WDS interface will be bridged with the default wireless interface.

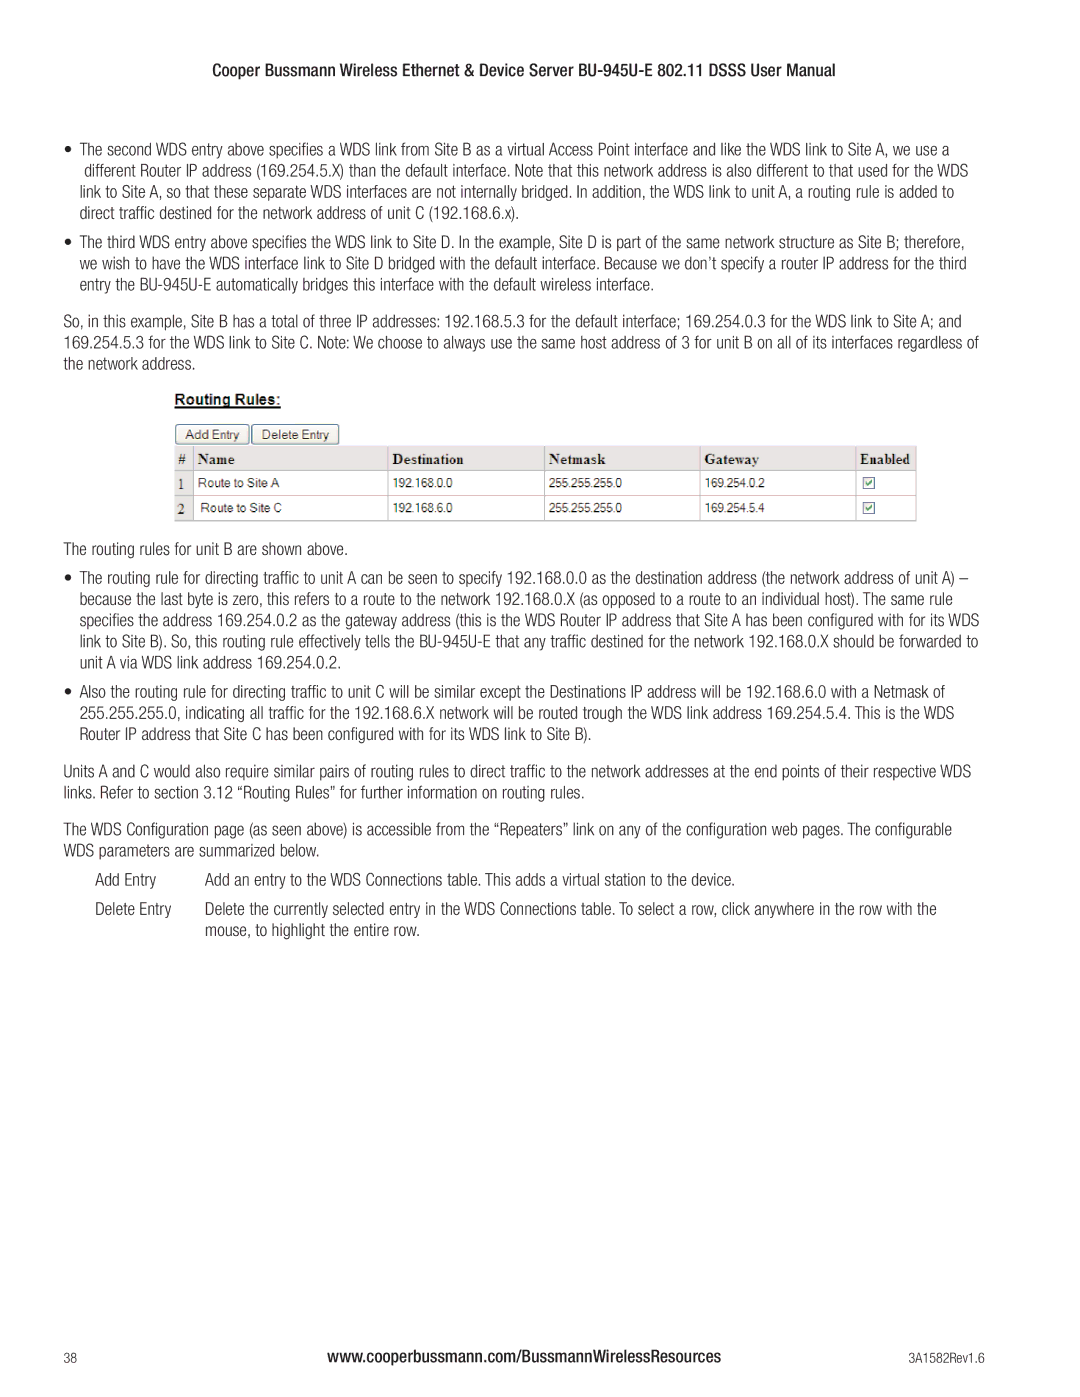
When adding WDS router interfaces, you may also need to add a Routing Rule on the Routing configuration page.

Spanning Tree Protocol (STP) column only applies when two or more interfaces are bridged.

A maximum of 10 WDS Connections can be configured. (A combined maximum of 5 AP and STA virtual modules applies.)

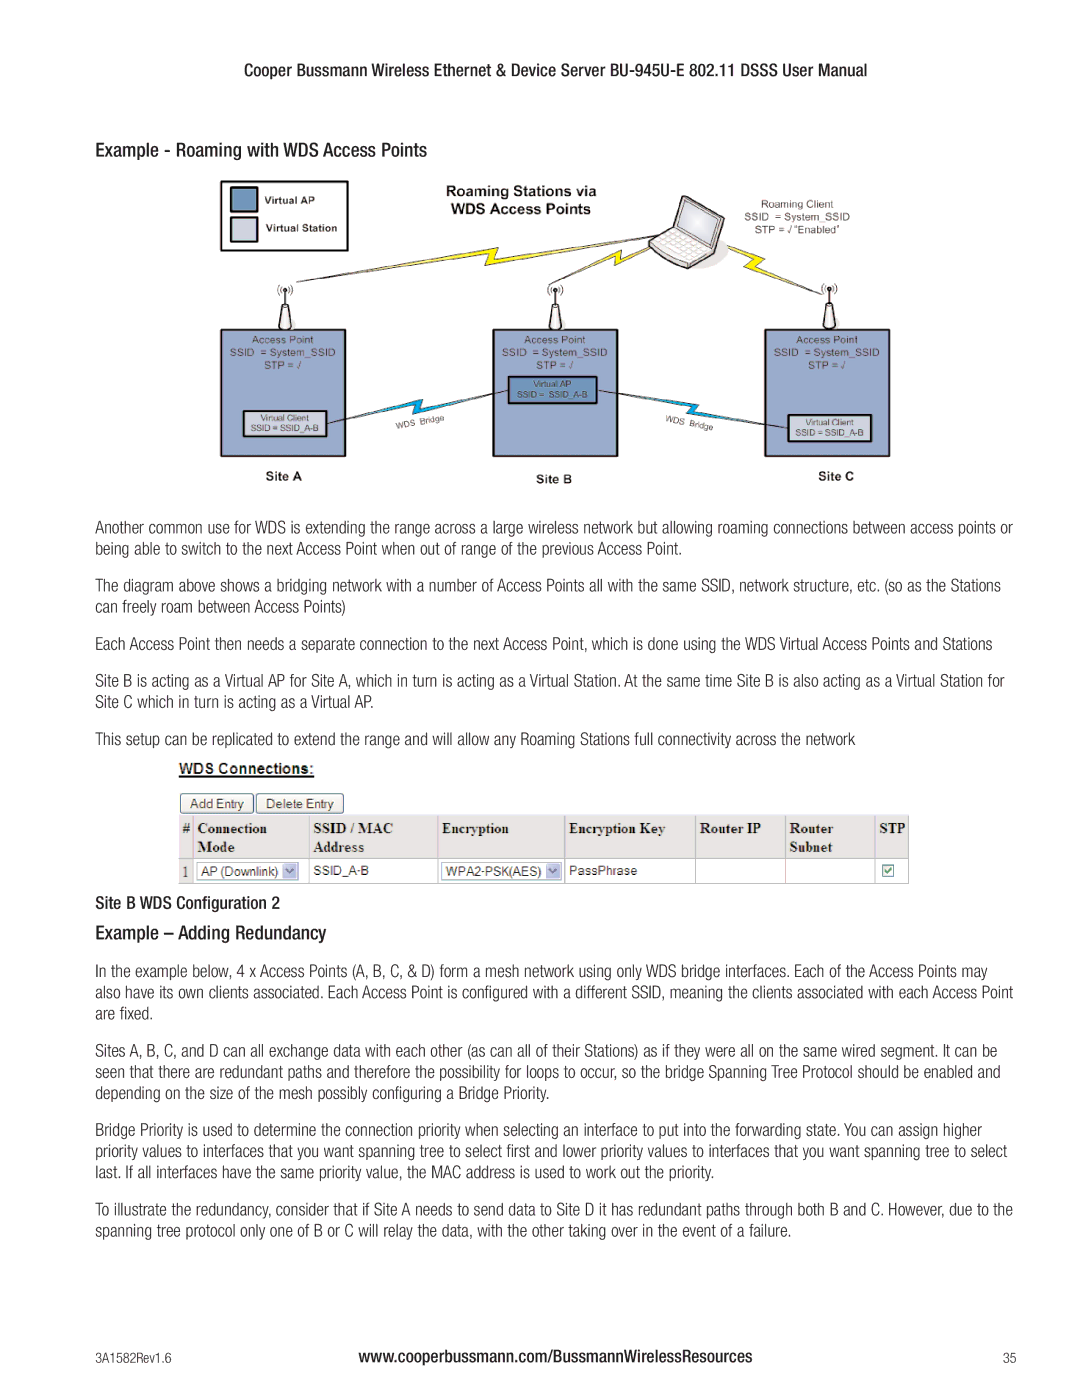
WDS Connections are made by adding one or more “Virtual Modules” to an Access Point (as illustrated in the diagram at the start of the section). Each virtual module can be configured with one of the standard Wi-Fi operating modes (Access Point or Station) or a non-standard Point-to-Point mode.

Access Point and Station virtual modules allow for the possibility of dynamically created connections (based on SSID) and support WPA Encryption. A combined maximum of 5 AP and STA virtual modules can be configured per unit.

Point to point mode virtual modules provide static connections (based on MAC addresses), and cannot support WPA Encryption. Point to point virtual modules should only be used for establishing WDS connections with third party Access Points that do not support standard WDS operation.

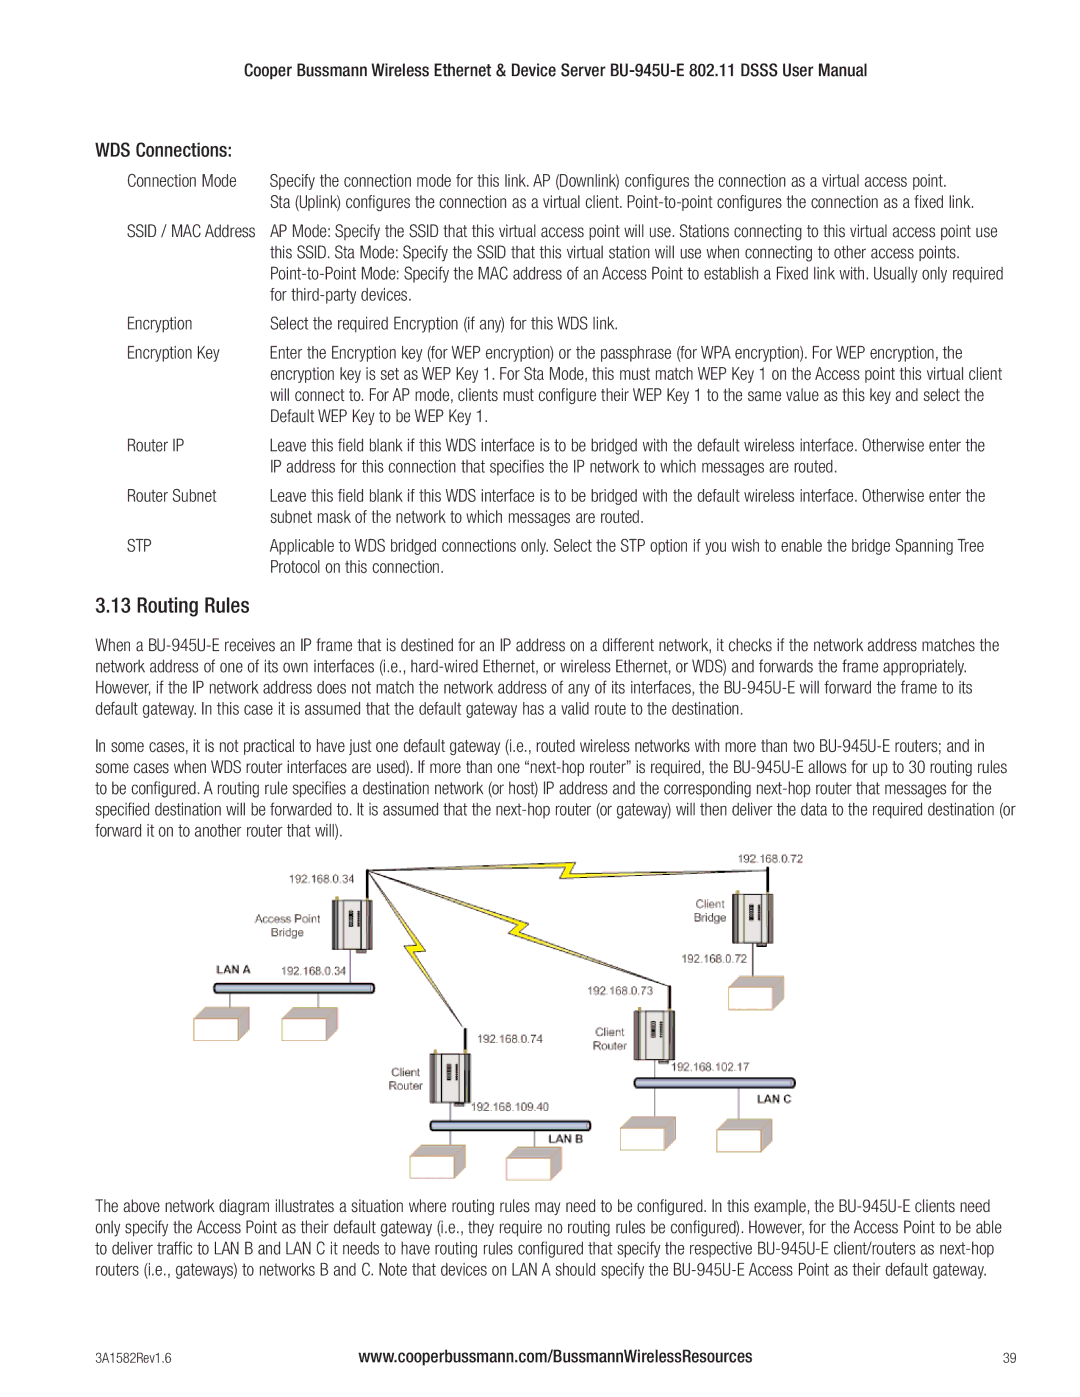
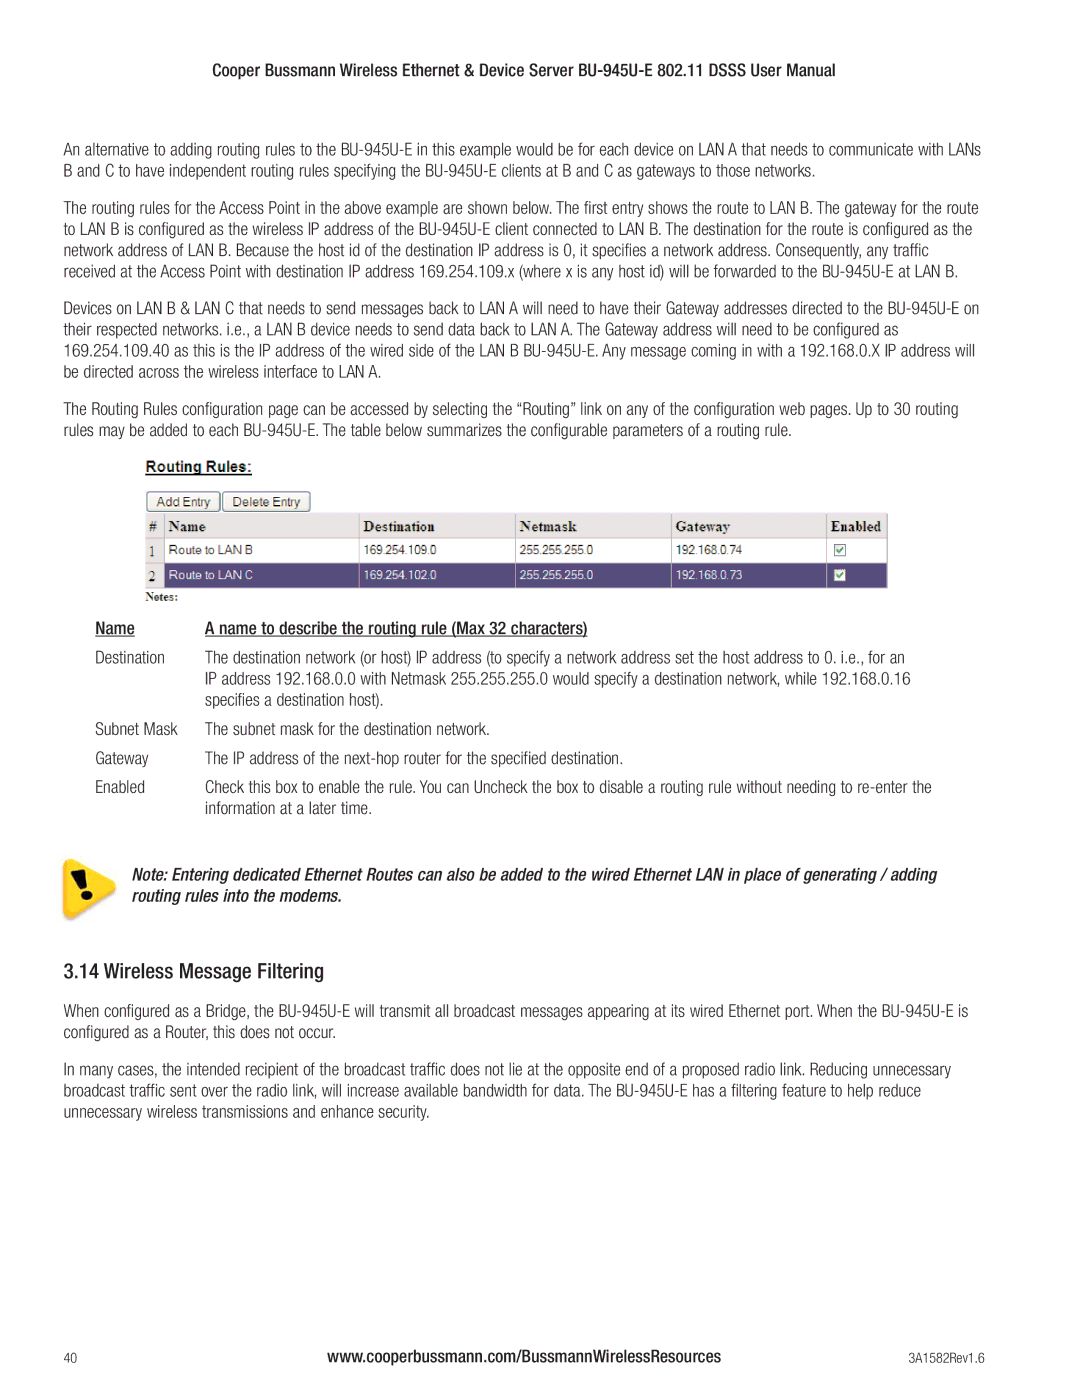
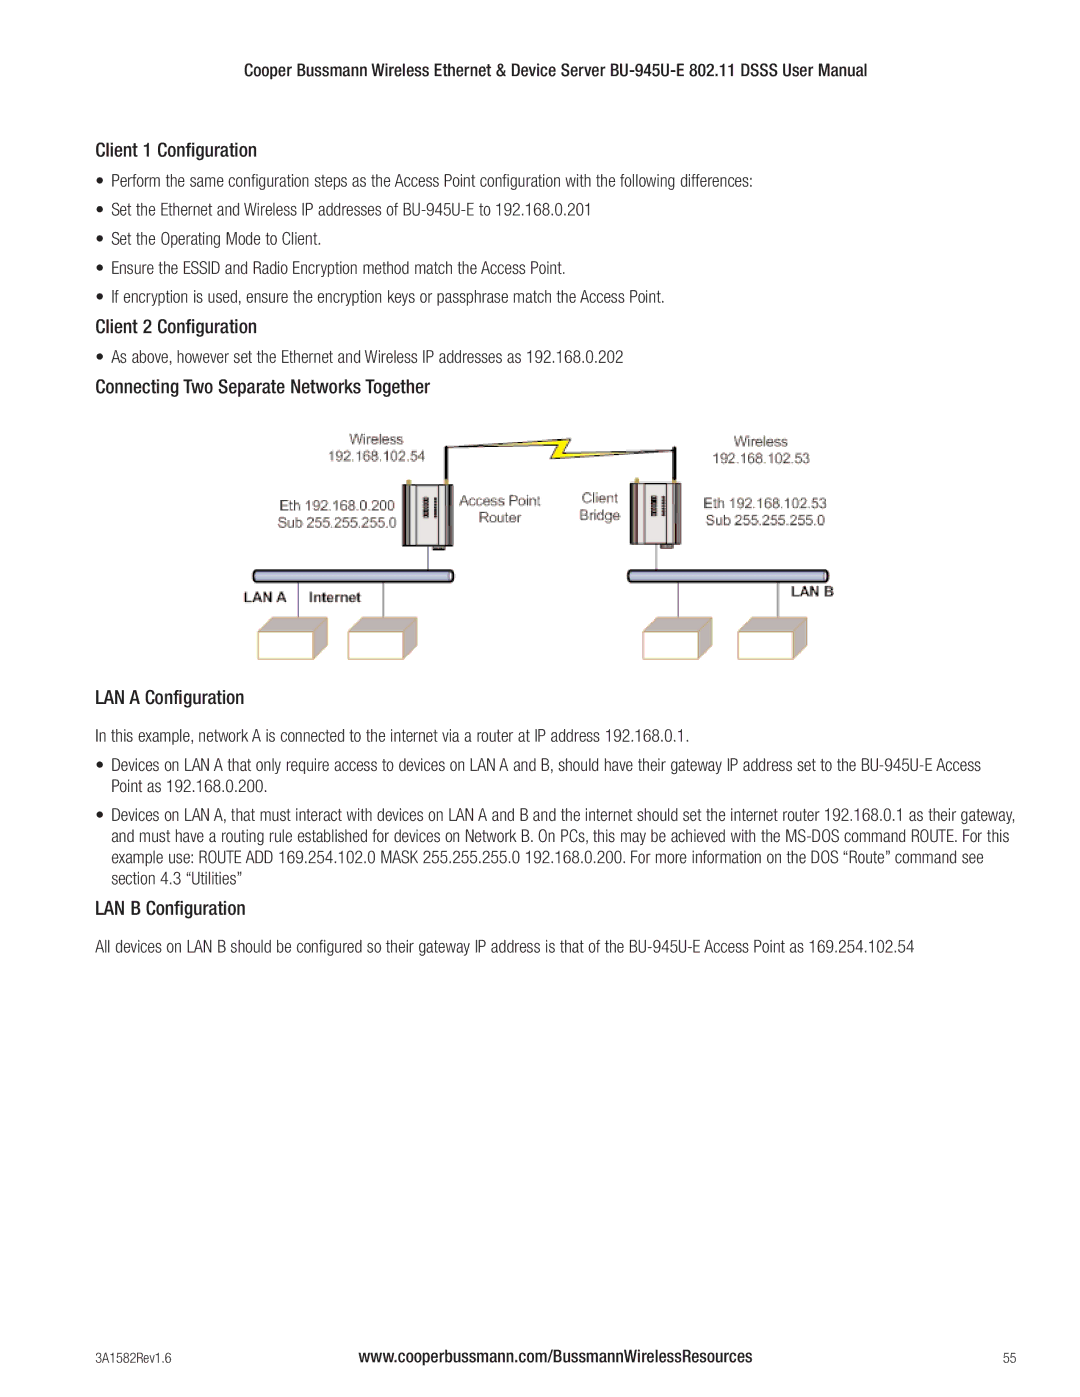
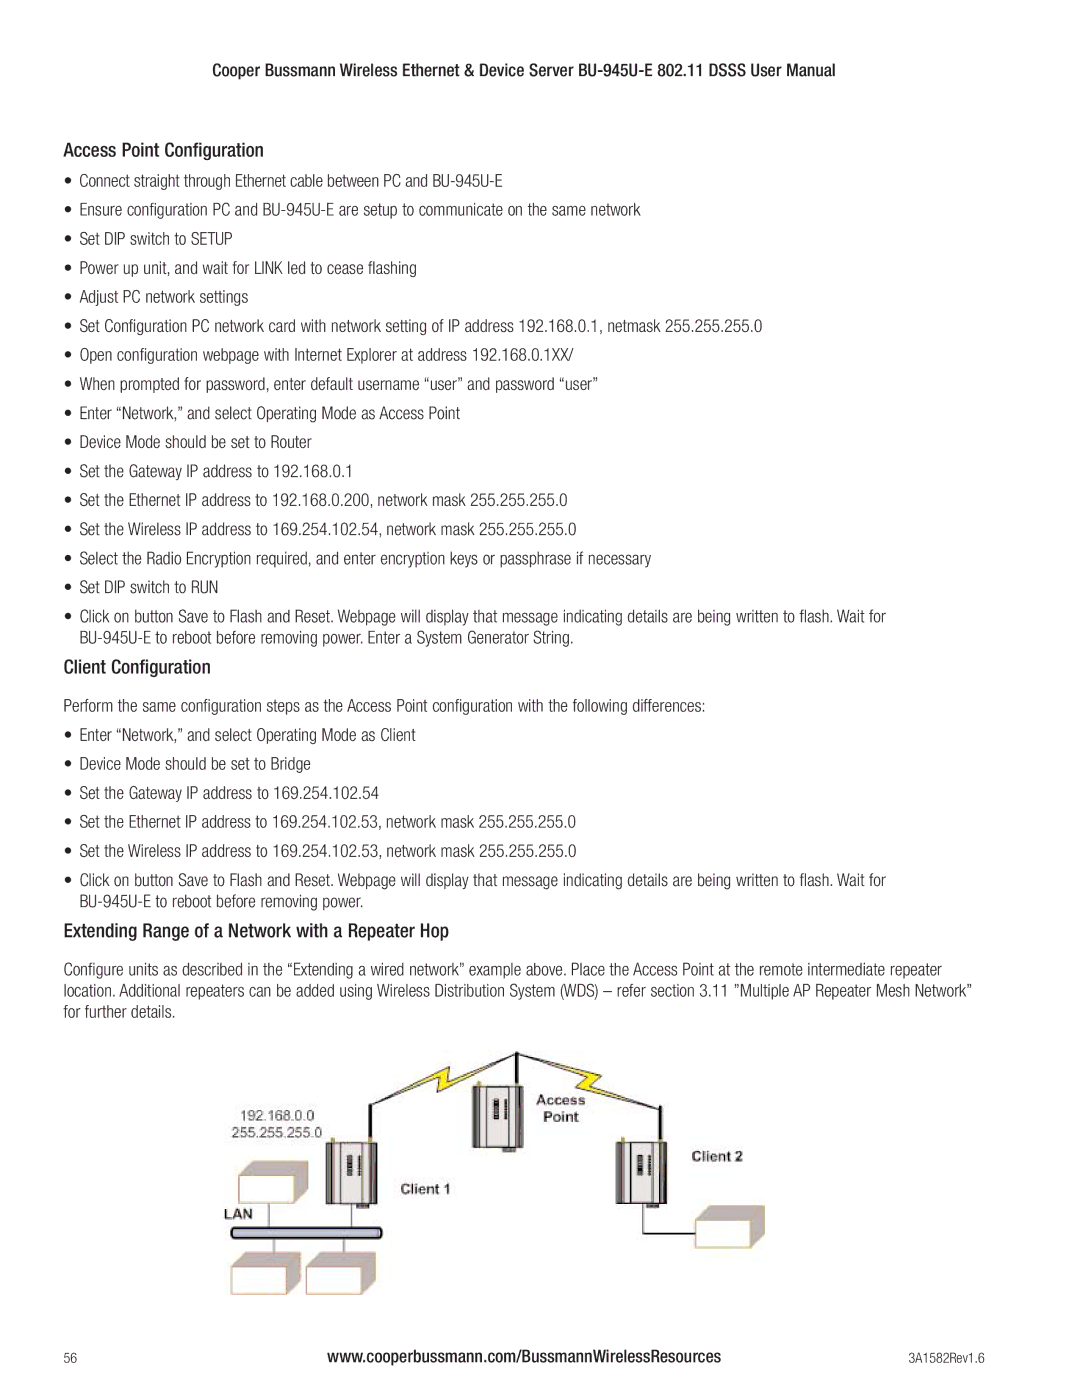
There are many different ways to setup wireless networks; often it depends on the devices you wish to connect and the existing network topology.

The following pages show some examples of how to connect devices into different types of systems.

3A1582Rev1.6

www.cooperbussmann.com/BussmannWirelessResources

33

Image 33
Contents Read Retain Cooper Bussmann Application Engineering FCC NoticePhone 800 a.m 500 p.m. Central, M-F 636 Fax 636 Important Notice GNU Free Documentation LicenseCooper Bussmann Contents BU-945U-E 802.11 630mW max power Access Point vs ClientNetwork Topology 3A1582Rev1.6 Bridge vs. Router Getting Started Quickly General Antenna InstallationPlant and Factory Installations Bench test and Demo System SetupLine-of-sight installations AntennasOmni-directional Antennas Installation tipsSerial Connections Power SupplyDirectional Antennas RS232 Serial PortRS485 Serial Port DB9 Connector Pinouts3A1582Rev1.6 Discrete Digital Input/Output Start-up Selecting a Channel LED Indication802.11 900 MHz Channels 3A1582Rev1.6 Data Throughput Based on Repeater Hops Radio ThroughputConfiguring the Unit for the First Time Default ConfigurationAccessing Configuration for the First Time Enter the username user and default password user Power up the BU-945U-E moduleMethod 1 Set PC to same network as BU-945U-E For local addresses3A1582Rev1.6 Quick Start Quick Start ConfigurationNetwork Configuration Wireless ports will have the same IP address Dhcp Server Configuration, Default is uncheckedConfigured Essid of the client Save Changes and ResetEncryption keys must not be all zeros, i.e Security Menu3A1582Rev1.6 Normal Operation Radio ConfigurationTransparent Bridge Operation Router OperationSignal quality, etc Bands Default is AutoDrop back to non-bursting mode Access point Radio Mode BU-945U-E Only Supports the 802.11 Standard Dhcp Client Configuration Default distance is 20km Channel SelectionDhcp Server Configuration DNS Server ConfigurationSpanning Tree Algorithm / Redundancy Multiple AP Repeater Mesh Network 3A1582Rev1.6 Site B WDS Configuration Example Extending range using WDSExample Adding Redundancy Example Roaming with WDS Access Points3A1582Rev1.6 Example WDS Routed Network Mouse, to highlight the entire row Routing Rules WDS ConnectionsSTP Wireless Message Filtering Specifies a destination hostInformation at a later time 3A1582Rev1.6 MAC Address Filter Configuration IP Address Filter ConfigurationUtilize the radio link. All other devices are blocked ARP Filter Configuration RS-232 PPP Server Serial Port ConfigurationSerial Gateway Modbus Modbus RTU to TCP Serial Gateway Server/Client/MulticastSerial Menu Modbus TCP to RTU GatewayMulticast Pipe Manager Port on the Client, i.e., Scada, DCS, etc Digital Input/OutputMulticast Group IP Address To be the same on all communicating Multicast devicesModbus I/O Transfer 3A1582Rev1.6 Modbus TCP Configuration on I/O Transfer Menu Module Information Configuration Modbus TCP Client Mappings on I/O Transfer MenuModule Information Webpage Fields System Tools Remote ConfigurationConfiguration Examples Setting a BU-945U-E to Factory Default SettingsExtending a Wired Network Client 1 Configuration Client 2 ConfigurationLAN B Configuration Access Point Configuration Client ConfigurationExtending Range of a Network with a Repeater Hop Boot Status LED Indication during Start-up Diagnostics ChartLED Indicator Condition Meaning RED ContinuouslyConnectivity Diagnostic Information AvailableConnectivity Parameters Site SurveyNetwork Traffic Analysis Statistics9999 Both Reset module enter Ffff to reset module Internal Diagnostic Modbus RegistersConnection Information 5014 STA OnlyStatistic Registers Testing Radio Paths UtilitiesPing 3A1582Rev1.6 Arp IpconfigRoute General Power SupplyRadio Transceiver Serial PortsInput / Output status System ParametersAppendix a Firmware Upgrades Web-Based UpgradeCSMA/CA ACKCSMA/CD DhcpIeee IPX-SPXISN NAT SNRNIC SSLVPN VoIPWAN WEPDBm to mW Conversion Installation MaterialsIperf Applications 3A1582Rev1.6 JPerf Application 3A1582Rev1.6 Terms and Conditions Preamble3A1582Rev1.6 No Warranty 3A1582Rev1.6 Customer Assistance