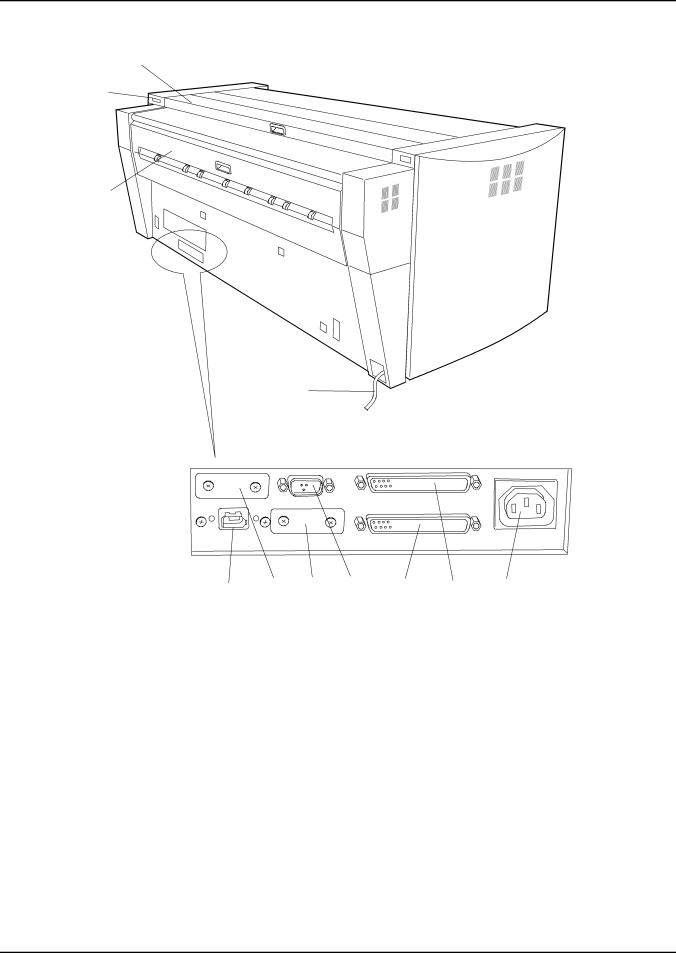
Xerox 721P Rear Side View, Connect the Interface Cable from the AccXES Controller here, Pins

Page 19

PRINTER OVERVIEW

Rear Side View

1

2

3

4

FOLDER

DIAG.

IF-VIII (CH-B)


CONT. (IEEE1394)

COM1

IF-VIII (CH-A)

POWER


11

10

9

8

7

6

5

1.

Top Rear Cover


Pull the handle and open to clear media jams.

2.

I/F Connector for Scanner


Connect the cable from scanner here.


(IEEE1394)


3.

Exit Cover


Open to clear media jams.


4.

Power Cord


Connect to a suitable power outlet.


5.

Power (220 VAC)


Connect the power cable from the controller here.

6.

I/F VIII (CH-B)


Connect the Interface Cable from the AccXES Controller here.


(37 pins) (Not Used)


7.

I/F VIII (CH-A)


Connect the Interface Cable from the AccXES Controller here.


(37 pins)


8.

DIAG


Service use only.


9.

COM1


Not Used


10. FOLDER


Not Used


11.

CONT. (IEEE1394)


Connect the Interface Cable from the AccXES Controller.

XEROX WIDE FORMAT 721P PRINTER OPERATOR MANUAL

11

Image 19
Contents Xerox Wide Format 721P Printer Operator Manual Page Table of contents User Modes Safety Notes Introduction Canada EMC NoticesAustralia/New Zealand European UnionUSA JapanIntroduction IntroductionTerminology Used In This Manual Organization And Content Of This ManualBold Conventions Used In This ManualThis page is intentionally blank Product Specifications SpecificationMedia Specifications Room Air Change Requirements For Ozone Dissipation Room Space RequirementsSerial Number Location Room Space RequirementsThis page is intentionally blank Printer Orientation Printer OverviewMain Components Rear Side View Pins Not UsedPins Service use onlyPrinter Overview Operator Panel & Status Display Ready IndicatorMedia and Toner Status Panel Use IndicatorsRoll Size Displays Displays the size of the roll media Online/Offline Job Cancel Adding Media Rolls MediaLoading The Roll Media Roll 1, 2 Roll 3 only Loading The Roll Media Roll Belt Loading The Roll Media When Printing Dehumidifier Using Manual Bypass Feed Care When The Toner Cartridge Needs ReplacementReplacing The Toner Cartridge Sealed opening Wire-Clean Cleaning The Charge Scorotron WireExp-Clean Cleaning The LED Print HeadCleaning The Printer Surface Ordering supplies Supply order procedureSupply order list This page is intentionally blank Media Jams Problem SolvingClearing Media Jam J-01 & J-02 Problem Solving Clearing Media Jam J-03 Problem Solving Clearing Media Jam J-04 Green Knob Clearing Media Jam J-05 Clearing Media Jam J-11 & J-12 Slit Clearing Media Jam J-13 & J-14 Clearing Media Jam J-22 Printer Errors E-XX Error CodesError Code Cause Treatment Thumping Noise in Standby Door Open Errors U-XXProblem Cause Solution Image Quality Problem SolvingThis page is intentionally blank User Modes User Mode 1 Test Print U1User Modes User Mode 2 Date and Time setting U2 Hour Minute Second User Mode 3 Low Power Saver Mode U3 User Modes User Mode 4 High Power Saver Mode U4 User Modes User Mode 5 Media Cut At Power on U5 User Mode 6 Detack Lamp Control Mode U6 User Mode 7 Attention Beeper Enable Mode U7 User Mode 8 Custom Setting Plain Paper U8 User Mode 9 Custom Setting Vellum/Tracing Paper U9 User Mode a Custom Setting Film UA User Mode b Image Enhancement Ub 701P39415 4/2003 USA