Panasonic WV-NP1004, WV-NP1000 manual Upgrade the firmware Upgrade, How to upgrade the firmware

Page 47

Upgrade the firmware [Upgrade]

Click the [Upgrade] tab of the "Maintenance" page. (page 46)

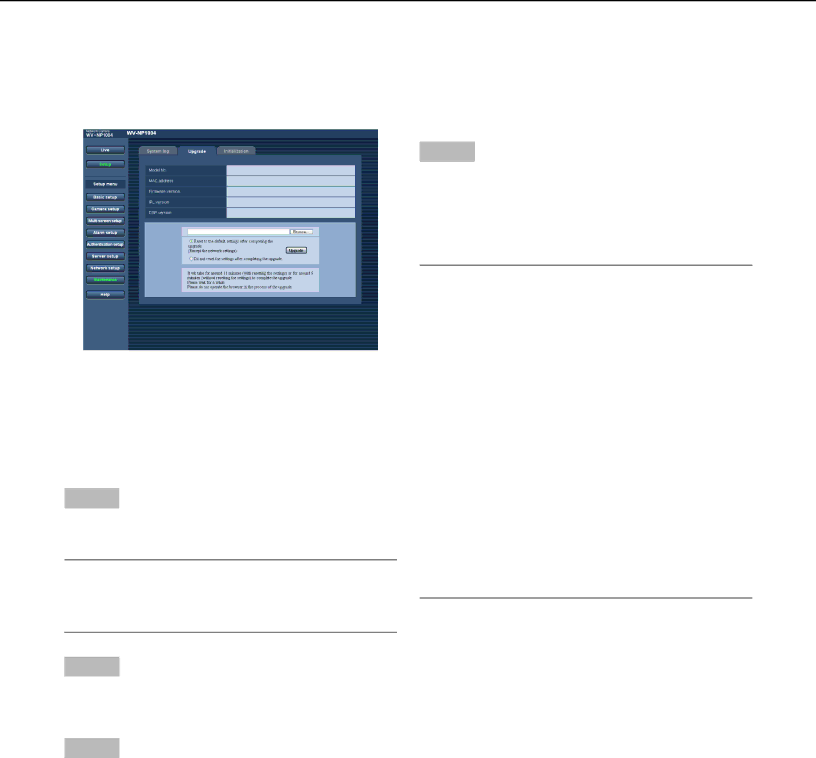
The current firmware can be checked and upgraded to the latest version on this page. Contact the dealer for further information about the firmware upgrade.

[Model No.], [MAC address], [Firmware version], [IPL version], [DSP version]

Information of each item will be displayed.

How to upgrade the firmware

Step 1

Contact the dealer and download the latest firmware onto a PC.

Important:

A blank (space) cannot be used for the name of the directory where the downloaded firmware to be saved.

Step 2

Click the [Browse…] button and designate the down- loaded firmware.

Step 4

Click the [Upgrade] button.

The confirmation window will be displayed. When "Do not reset the settings after completing the upgrade." was selected, the confirmation window will not be displayed.

Important:

Upgrade the firmware using a PC in the same sub- net as of the camera’s.

Follow the instruction of the dealer when upgrading the firmware.

Use the designated file (extension:img) for the firmware upgrade.

The name of the firmware to be used for upgrade should be "firmware.img".

Do not turn the power of the camera off in the process of upgrade.

Do not operate the web browser (including adjusting the window size) in the process of upgrade.

The following network settings will not be initialized when upgrade the firmware after selecting "Reset to the default setting after completing the upgrade. (Except the network settings)".

IP address, net mask, default gateway, HTTP port, ON/OFF for DHCP, SNMP setup

Step 3

Click the radio button respective to the desired option to determine whether or not to initialize the settings after completing the firmware upgrade.

47

Image 47
Contents WV-NP1004 Contents Trademarks and registered trademarks PrefaceAbout these operating instructions Step Monitoring Images on a PCMonitor images from a single camera About the Live 3Main area One shot buttonOperation Description Available operations when live images are displayedImages will be automatically switched between colour and B/W Monitor images from multiple cameras Transmit an image onto a server automatically Action at an Alarm OccurrenceNotify of alarm occurrences by e-mail Transmit Images onto an FTP Server About SD memory card Use Save images on the SD memory cardObtain images on the SD memory card FTP Equipped security functions Access restrictions by changing the Http portAbout the Network Security of the Camera How to display the setup menu How to operate the setup menu About the operation window 1Status display area Network setup buttonMaintenance button Help buttonConfigure the basic settings Basic Configure the basic settings of the camera Basic setupDaylight saving Summertime Default OFF Link/Access LEDConfigure the settings relating to the NTP server NTP Format About SD memory cardInformation about SD memory card Indication DescriptionImage quality Configure the settings relating to Jpeg image JPEG/MPEG-4Image capture size/Scan mode Default 5 fpsConfigure the settings relating to MPEG-4 image JPEG/MPEG-4 About the operation panel Configure the settings relating to audio Audio Number of characters for the camera title 0 Configures the multi-screen settings Multi-screen setupIP Address Number of characters for the IP address 1Configure the settings relating to the alarm action Alarm Configure the alarm settings Alarm setupNumber of characters for the directory name Alarm image FTP transmissionDefault blank Transmission interval DirectoryPulse width Default OFF External terminal output setupDefault Latch Alarm output Default OpenSet the VMD areas VMD area Default Middle StepDefault None Delete the set VMD area Mail body Default OFF AddressMail notification Number of characters for the mail subject 0Available retry times 1 Default IP address Panasonic alarm protocolDefault OFF Destination port Available port number 1 Default Retry timesNumber of characters for the password 4 32 char User authenticationDefault OFF User name Default blank Password Retype passwordHost authentication Configure the settings relating to the mail server Mail Configure the settings of the servers Server setupNumber of characters for the FTP server address Configure the settings relating to the FTP server FTPFTP mode Default Passive FTP server addressDhcp Configuring the network settings Network setupConfigure the network settings Network DNS Number of characters for the host name 1 64 char Configure the settings relating to Ddns DdnsDefault OFF Host name DdnsNumber of characters for the camera location 0 Configure the settings relating to Snmp SnmpAccess interval Camera locationFTP periodic transmission Default OFF DirectoryDefault blank File name Default blank IntervalHow to configure the schedule settings How to delete the set schedule Time & date Maintenance of the camera MaintenanceError message Check the system log System logHow to upgrade the firmware Upgrade the firmware UpgradeInitialize Html data Initialize setup dataInitialize setup data and Html data Initialize/restart the camera InitializationShutter Configure the settings relating to the camera operationsCamera ID ALC/ELCWhite BAL AGCSens UP SyncEL-ZOOM BW ModeDNR Privacy ZoneMANUAL-ADJ Configure the settings relating to the flange-back BackABF ABF Auto SETUP-SW LockConfigure the settings on the Special Setup Gateway Configure the network settings NetworkIP Addr NetmaskAbout character entry Configure the detailed settingsCamera title can be edited and displayed on the screen Compensate backlight Default OFF StepTo cancel the mask setting Adjust white balance finely Default on Configure the B/W mode settingsDefault High Step Default 30 sec StepSet the privacy zone Adjust the electronic zoom Correct image defects blemishes such as scratches Category Cause Description Error indications relating to SmtpError indications relating to FTP About the Displayed System LogOther error Error indications relating to DdnsError indications relating to NTP Symptom Cause/solution TroubleshootingSymptom Symptom Cause/solution Reference Pages Solutions Reference Pages Osaka, Japan N1205-0 3TR004271AAA
Related manuals
Manual 3 pages 60.95 Kb