Invacare 9000 Series Adjusting HEADREST/BACK Upholstery Tension Figure, Adjusting the Seat Depth

Page 47

RECLINER

SECTION 9


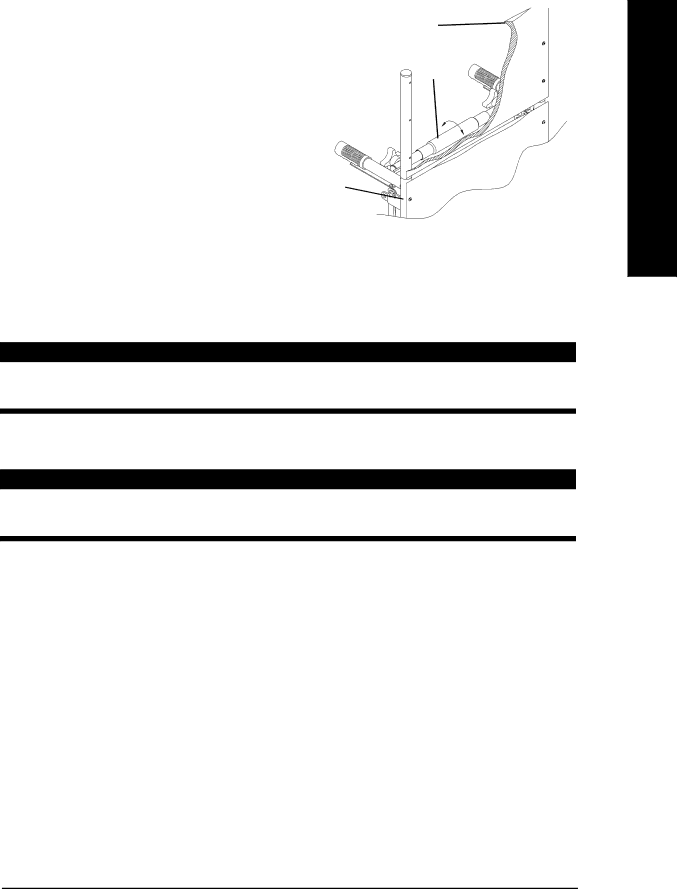
ADJUSTING HEADREST/BACK UPHOLSTERY TENSION (FIGURE 4)

Headrest Upholstery

1.Rotate the spreader bar either:

COUNTERCLOCKWISE (away from back upholstery) to LOOSEN back/headrest upholstery.

OR

CLOCKWISE (towards back uphol- stery) to TIGHTEN back/headrest upholstery.

Spreader

Bar

Back

Upholstery

RECLINER

FIGURE 4 - ADJUSTING

HEADREST/BACK UPHOLSTERY

TENSION

ADJUSTING THE SEAT DEPTH

WARNING

Adjusting the seat depth of the 9000XT Recliner MUST be performed by a qualified technician.

ADJUSTING THE SEAT WIDTH

WARNING

Adjusting the seat depth of the 9000XT Recliner MUST be performed by a qualified technician.

Part No. 1056953

47

9000 Series

Image 47
Contents Series Series Table of Contents ANTI-TIPPERS/WHEEL Locks Special Notes Special NotesXT Recliner Models only LocationslabelLabel Locations XDT onlySpecifications Specifications9000 XDT XT ReclinerGeneral Guidelines Information for Healthcare PROFESSIONALS/ AssistantsGeneral Guidelines Section Section General Guidelines Stability ALL ModelsANTI-TIPPERS Operating Information Stability Recliner Models onlyGeneral Guidelines Tire Pressure Weight TrainingWeight Limitation Coping with Everyday Obstacles SAFETY/HANDLING of WheelchairsStability and Balance Percentage of Weight Distribution Tipping REACHING, Leaning and Bending ForwardREACHING, Leaning Backwards Tipping Curbs Method 1 Wheelchair With Step Tubes ESCALATORS? Sorry StairwaysUnfolding and Folding the Wheelchair Transferring to and from Other SeatsSOLID-SEAT Models Hammock or Sling Seat ModelsSafety Inspection Safety Inspection ChecklistSafety Inspection Section Suggested Maintenance Procedures TroubleshootingMaintenance Maintenance Safety PrecautionsSafety Inspection Front Riggings INSTALLING/REMOVING/USING the FOOTREST/LEGREST FigureUsing RemovingFront Riggings Section Footrest Height Adjustment FigureImpact GUARDS/CALF Strap Figure Replacement Heel Loop Replacement FigureAdjusting the Elevating Legrest Assembly RAISING/LOWERING the Elevating Legrest Assembly FigureSection Arms Adjusting Armrest Height FigureSWING-BACK Arms Figure ArmsRemoving Armrests Removing or Replacing Armrest FigureArmrest PAD Clothing GuardSpace Saver ARM Position Conventional ARM Position Seat and Back Replacing the Seat Upholstery FigureSeat and Back Section Section Seat and Back Replacing the Back UpholsteryScrew on Back Upholstery 9000 SL Figure Slip on Back Upholstery 9000 XT/XDT FigureAdjusting the Seat Width Adjusting the Back HEIGHT, Back Angle or Seat DepthWheelsrear REMOVING/INSTALLING the Rear WheelsPermanent Axles QUICK-RELEASE Axles FigureInside Wheelchair Outside Detail a Locking Pins and Detent PINRear Wheels Section Rear WheelsReplacing Rear Wheel Handrim Figure REPLACING/REPAIRING Rear Wheel TIRE/TUBEAdjusting the QUICK-RELEASE Axle Adjusting the QUICK-RELEASE Axle FigureSection Front Casters CastersfrontFront Casters Section REPLACING/REPAIRING Front Caster TIRE/TUBEFront Caster Mounting Adjustments Section ANTI-TIPPERS/WHEEL Locks INSTALLING/ADJUSTING the ANTI-TIPPERSInstalling ANTI-TIPPERS Figure Anti LOCKSTIPPERS/WHEELANTI-TIPPERS/WHEEL Locks Adjusting FigureANTI-TIPPERS/WHEEL Locks Section Wheel Locks are not Brakes USING/ADJUSTING the Patient Operated Wheel LocksUsing the Patient Operated Wheel Locks Figure Adjusting the Patient Operated Wheel Locks FigureBOLT-ON Wheel Locks CLAMP-ON Wheel Locks To Healthcare PROFESSIONALS/ASSISTANTS Recliner Operation FigureRecliner Section ReclinerReclined Position Recliner SectionUpright Position Back Upholstery Replacing the Headrest Pillow FigureReplacing the HEADREST/BACK Upholstery Figure Headrest UpholsteryAdjusting the Seat Depth Adjusting HEADREST/BACK Upholstery Tension FigureRear View of 9000XT Recliner STORING/REPLACING the Spreader BARStoring Figure Replacing FigureLENGTH, Height KIT Number Installing the ANTI-TIPPERS FigureWith Attendant Operated Wheel Locks Figure With Patient Operated Wheel Locks FigureAdjusting Attendant Operated Wheel Locks Figure USING/ADJUSTING the Wheel LocksUsing Attendant Operated Wheel Locks Figure Step Installing the Telescoping I.V. RODInstalling the Telescoping I.V. ROD Holder Figure Adjusting the Telescoping I.V. ROD Figure Installing the Telescoping I.V. ROD Support Tube FigureSection Options InstallingOptions Options Section Installing the Solid Folding Seat FigureInstalling the Crutch and Cane Carrier Figure CleaningInstalling the Amputee Bracket Super Hemi Models only Figure Rear View Amputee Bracket Installing the Amputee Bracket ALL Models Except Super HemiBracket a Bracket B Bracket a Installing the Amputee Bracket 9000XDTWarranty WarrantyCanada
Related manuals
Manual 30 pages 6.48 Kb Manual 88 pages 25.16 Kb