Schumacher INC-2405A owner manual Instrucciones DE Ensamblaje, Características del producto

Page 23

8.2El uso de cordón de extensión no es recomendado por el fabricante.

Si hay que usar uno, refiérase a lo siguiente:

Entrada de corriente

Medida del cable segun la AWG Longitud del cable,

alterna en apmerios*


pies (m)


De

A no me-

2.5

50

100

150


nos de

(7.6)

(15.2)

(30.5)

(45.6)

0

2

18

18

18

16

2

3

18

18

16

14

3

4

18

18

16

14

4

5

18

18

14

12

5

6

18

16

14

12

6

8

18

16

12

10

8

10

18

14

12

10

10

12

16

14

10

8

12

14

16

12

10

8

14

16

16

12

10

8

16

18

14

12

8

8

18

20

14

12

8

8

*Si la cantidad de entrada de un cargador es dada en vatios en vez de amperios, la medida correspondiente de amperios es determinada si se dividen los vatios por la cantidad de voltaje - Por ejemplo:

1250 watts/125 volts = 10 amperes

9.INSTRUCCIONES DE ENSAMBLAJE

9.1No se requiere ensamblaje

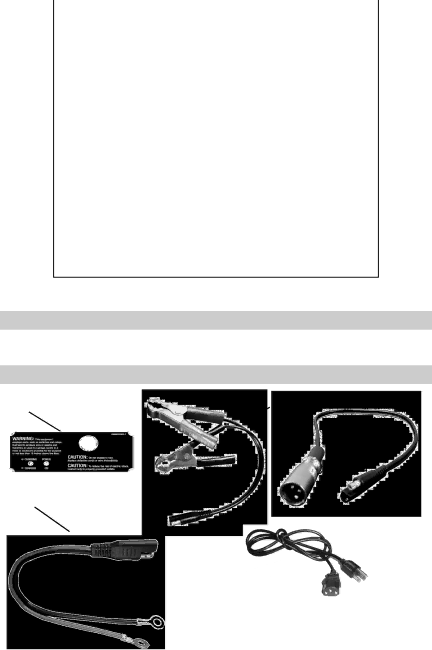
10.características del producto

1

4

2

3

5

1.Charger Status LEDs (located on side of unit)

2.Batería Cable de Sujeción de Salida

3.3 Pin XLR 3-12C Cable de Salida

4.3/8” Dia. Anillo Terminal de Salida del Cordón

5.Cable de CA

18

Image 23
Contents Guide D’UTILISATION Page Table of Contents / Índice / Table DES Matières Bateria Cargando Conexiones AC Instrucciones DE Ensamblaje Page Important Safety Instructions Page Charger Location DC Connection PrecautionsPreparing to Charge Page Assembly instructions No assembly required Battery charging ac connectionsControl panel Product FeaturesCalculating charge time Operating instructionsExample Maintenance instructionsSpecific Gravity Percent of Charge Needed Storage instructions TroubleshootingLED GUIDE/PROBLEM Possible Cause Solution Connections Technical specificationsElectrical Battery Clamp Output Cord 38-99-002111 Replacement partsPage Instrucciones DE Seguridad Importantes Precauciones Personales Ubicación DEL Cargador PREPARación de la cargaPrecauciones DE LA Conexión CC Bateria Cargando Conexiones AC Siga Estos Pasos cuando la batería esté afuera del vehículoCaracterísticas del producto Instrucciones DE EnsamblajeColor del LED /Pauta Explicación Intermitente Montaje DEL Cargador Sobre UNA Superficie PlanaPanel DE Control DEL ‘CHARGING Status amarillo y verde El DEL ChargingEjemplo 14. Cálculo DE Tiempo DE CargaGravedad Específica Porcentaje de Carga Instrucciones DE Almacenaje Instrucciones DE MantenimientoAntes DE Devolver EL Cargador Para Reparación Solución DE ProblemasConexiones Especificaciones TécnicasEléctricas MecánicasPage Page La clientèle au Page Préparation Pour LE Chargement Emplacement DU ChargeurPrécautions SUR LA Connexion C.C Chargement D’UNE Batterie Raccordements C.A Directives DE Montage Aucun montage n’est nécessaire Panneau DE Contrôle Installer LE Chargeur SUR UNE Surface PlaneCaractéristiques Consignes D’UTILISATION Exemple Calcul DU Temps DE ChargementLe densimètre ou la méthode électronique Tableau DE Dépannage Consignes D’ENTRETIENDirectives D’ENTREPOSAGE Données mécaniques Avant DE L’ENVOYER Pour Réparation19. Spécifications Techniques Données d’alimentationConnexions 20. Pièces DE Remplacement