Heat & Glo LifeStyle XLR-N-AU, XLR-PB-AU manual Troubleshooting, IntelliFire Plus Ignition System

Page 55

15 Troubleshooting

With proper installation, operation, and maintenance your gas appliance will provide years of trouble-free service. If you do experience a problem, this troubleshooting guide will assist a qualified service technician in the diagnosis of a problem and the corrective action to be taken. This troubleshooting guide can only be used by a qualified service technician. Contact your dealer to arrange a service call by a qualified service technician.

A. IntelliFire Plus™ Ignition System

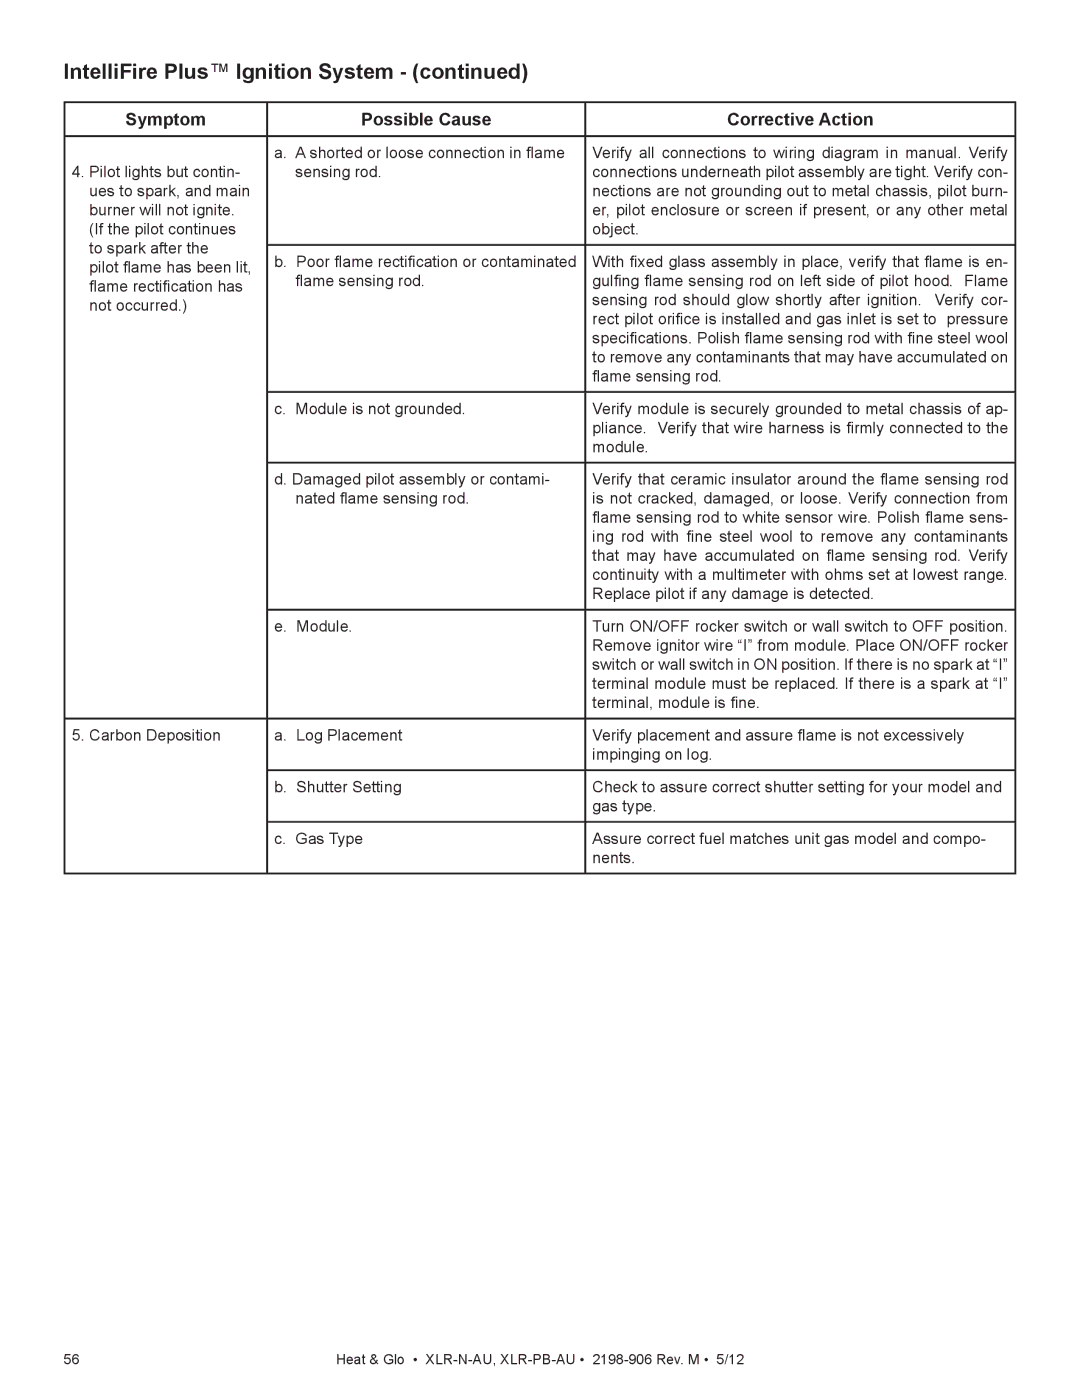
Symptom

Possible Cause

Corrective Action


1. Pilot won’t light.

a. Incorrect wiring.

Verify “S” wire (white) for sensor and “I” wire (orange) for ignitor are

The ignitor/module


connected to correct terminals on module and pilot assembly.

makes noise, but no


b. Loose connections or electrical

Verify no loose connections or electrical shorts in wiring from mod-

spark.


shorts in the wiring.

ule to pilot assembly. Verify connections underneath pilot assem-


bly are tight; also verify connections are not grounding out to metal


chassis, pilot burner, pilot enclosure, mesh screen if present, or any


other metal object.


c. Ignitor gap is too large.

Verify gap of igniter to right side of pilot hood. The gap should be


approximately 1/8 in. (3 mm).


d. Module.

Turn ON/OFF rocker switch or wall switch to OFF position. Remove


ignitor wire “I” from module. Place a grounded wire about 3/16 in. (5


mm) away from “I” terminal on module. Place ON/OFF rocker switch


or wall switch in ON position. If there is no spark at “I” terminal module


must be replaced. If there is a spark at “I” terminal, module is fine.


Inspect pilot assembly for shorted sparker wire or cracked insulator


around electrode. Replace pilot if necessary.


2. Pilot won’t light,

a. No power or transformer installed

Verify that transformer is installed and plugged into module. Check

there is no noise or

incorrectly.

voltage of transformer under load at spade connection on module

spark.


with ON/OFF switch in ON position. Acceptable readings of a good


transformer are between 6.4 and 6.6 volts AC.


b. A shorted or loose connection in wir-

Remove and reinstall the wiring harness that plugs into module.


ing configuration or wiring harness.

Verify there is a tight fit. Verify pilot assembly wiring to module. Re-


move and verify continuity of each wire in wiring harness. Replace


any damaged components.


c. Improper wall switch wiring.

Verify that 220-240 VAC service power is “ON” to appliance.


d. Module not grounded.

Verify black ground wire from module wire harness is grounded to


metal chassis of appliance.


e. Module.

Turn ON/OFF rocker switch or wall switch to OFF position. Remove


ignitor wire “I” from module. Place ON/OFF rocker switch or wall


switch in ON position. If there is no spark at “I” terminal module


must be replaced. If there is a spark at “I” terminal, module is fine.


Inspect pilot assembly for shorted sparker wire or cracked insulator


around electrode.


3. Pilot sparks, but

a. Gas supply.

Verify that incoming gas line ball valve is “open”. Verify that inlet

Pilot will not light.


pressure reading is within acceptable limits, inlet pressure must not


be exceeded.


b. Ignitor gap is incorrect.

Verify that spark gap from ignitor to pilot hood is 1/8 in. (3 mm).


c. Module is not grounded.

Verify module is securely grounded to metal chassis of appliance.


d. Module voltage output / Valve/Pilot

Verify battery voltage is at least 5.7 volts. Replace batteries if volt-


solenoid ohms readings.

age is below 5.7.


Heat & Glo • XLR-N-AU, XLR-PB-AU2198-906 Rev. M • 5/12

55

Image 55
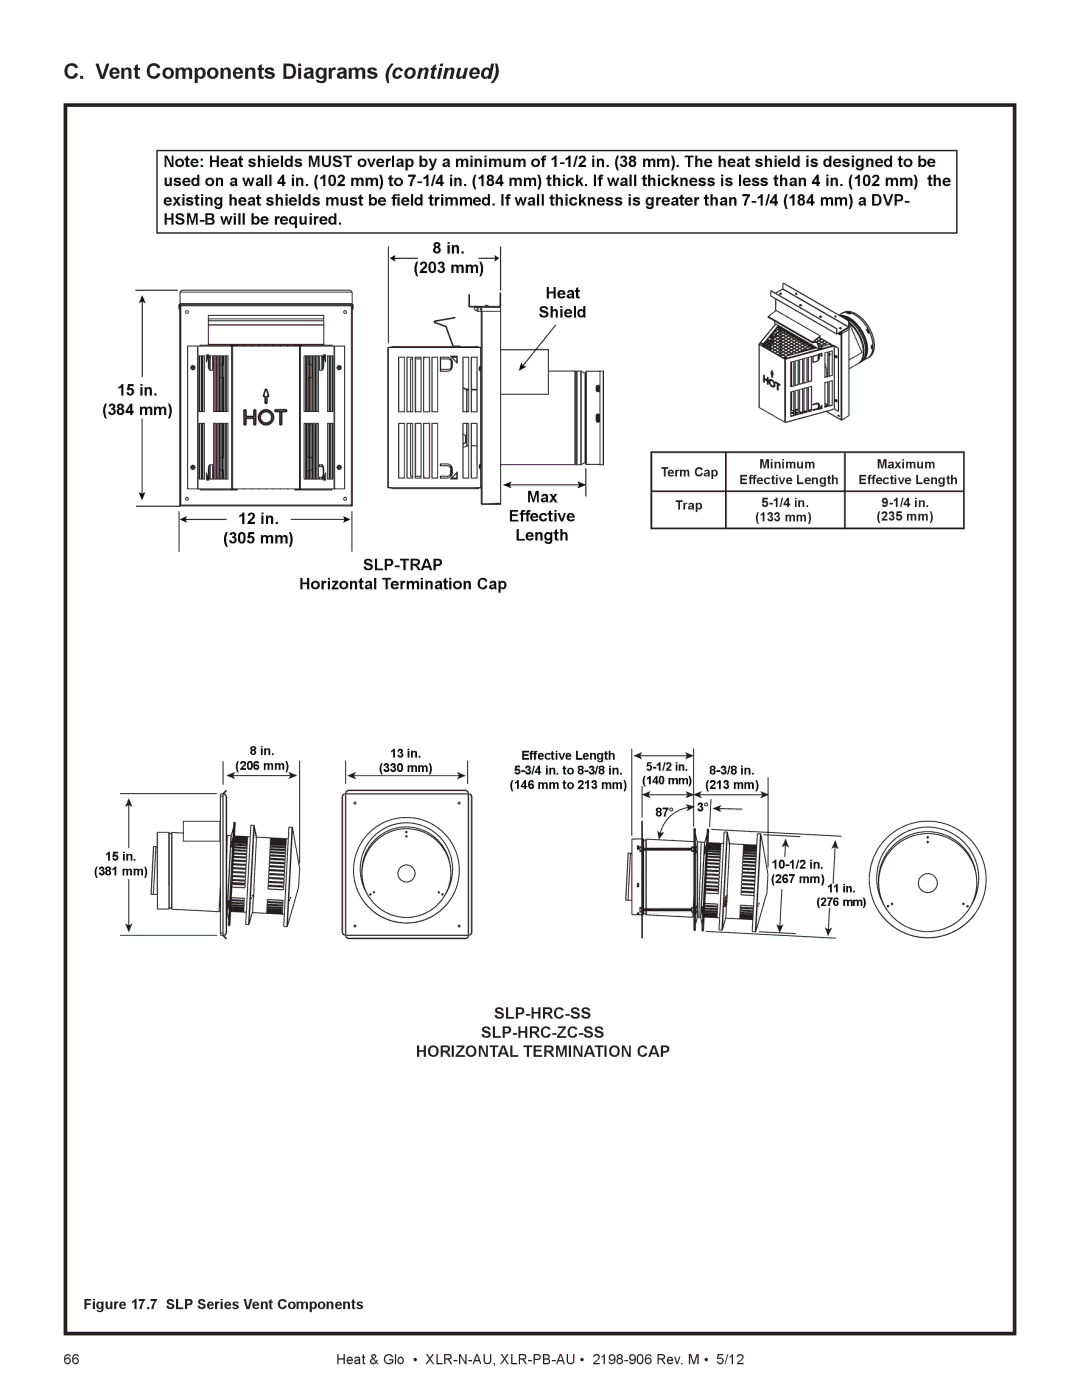
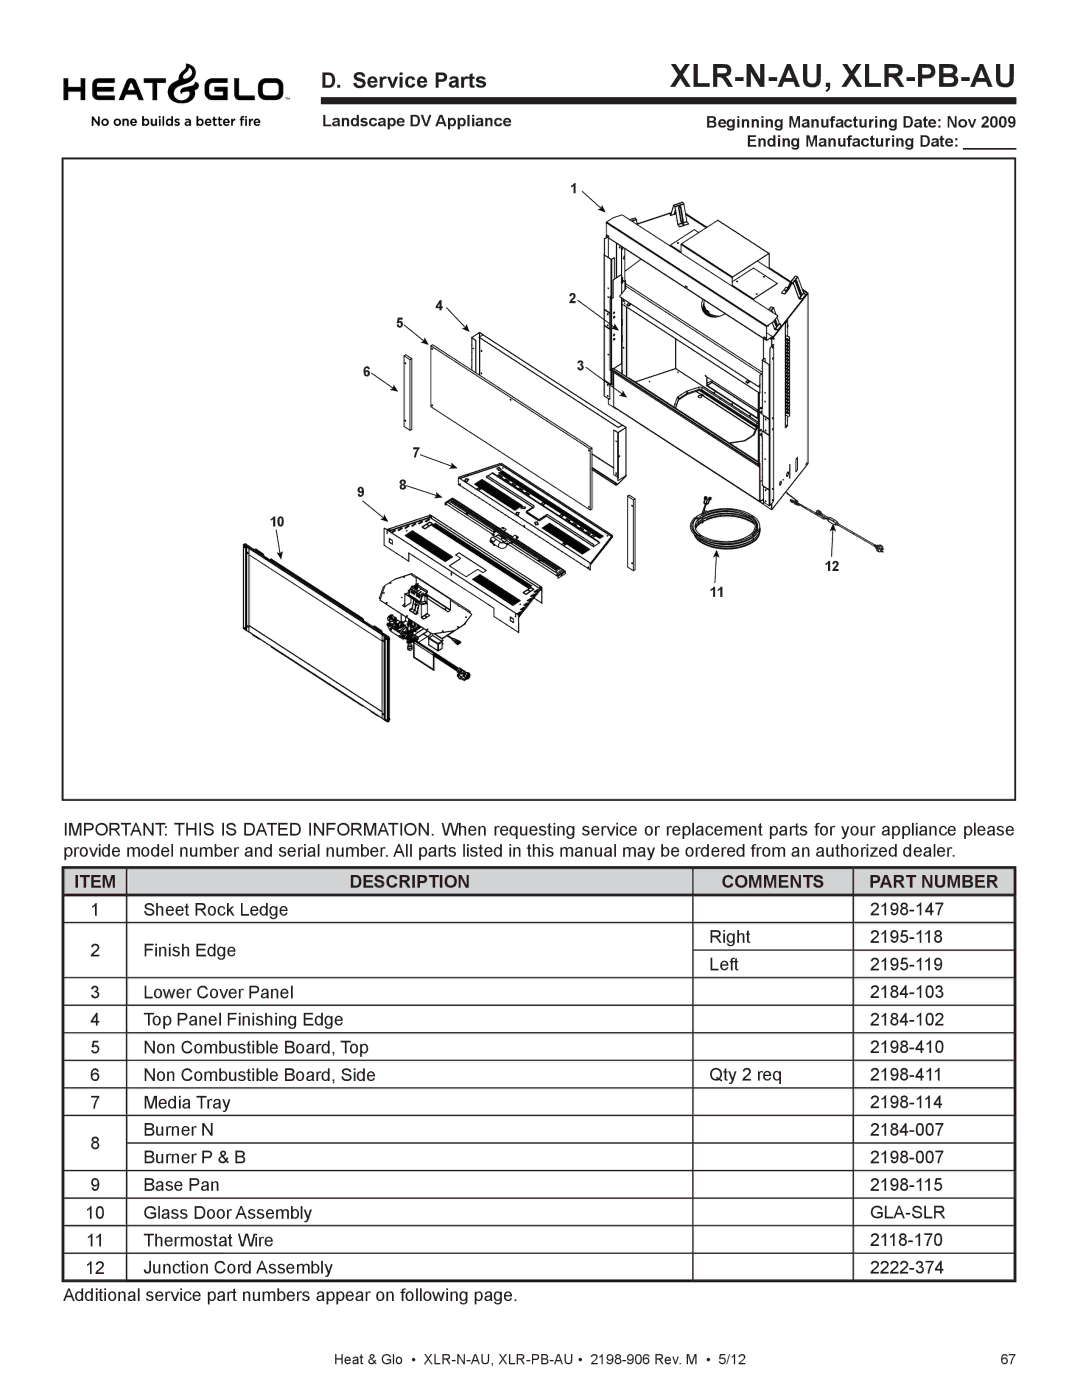
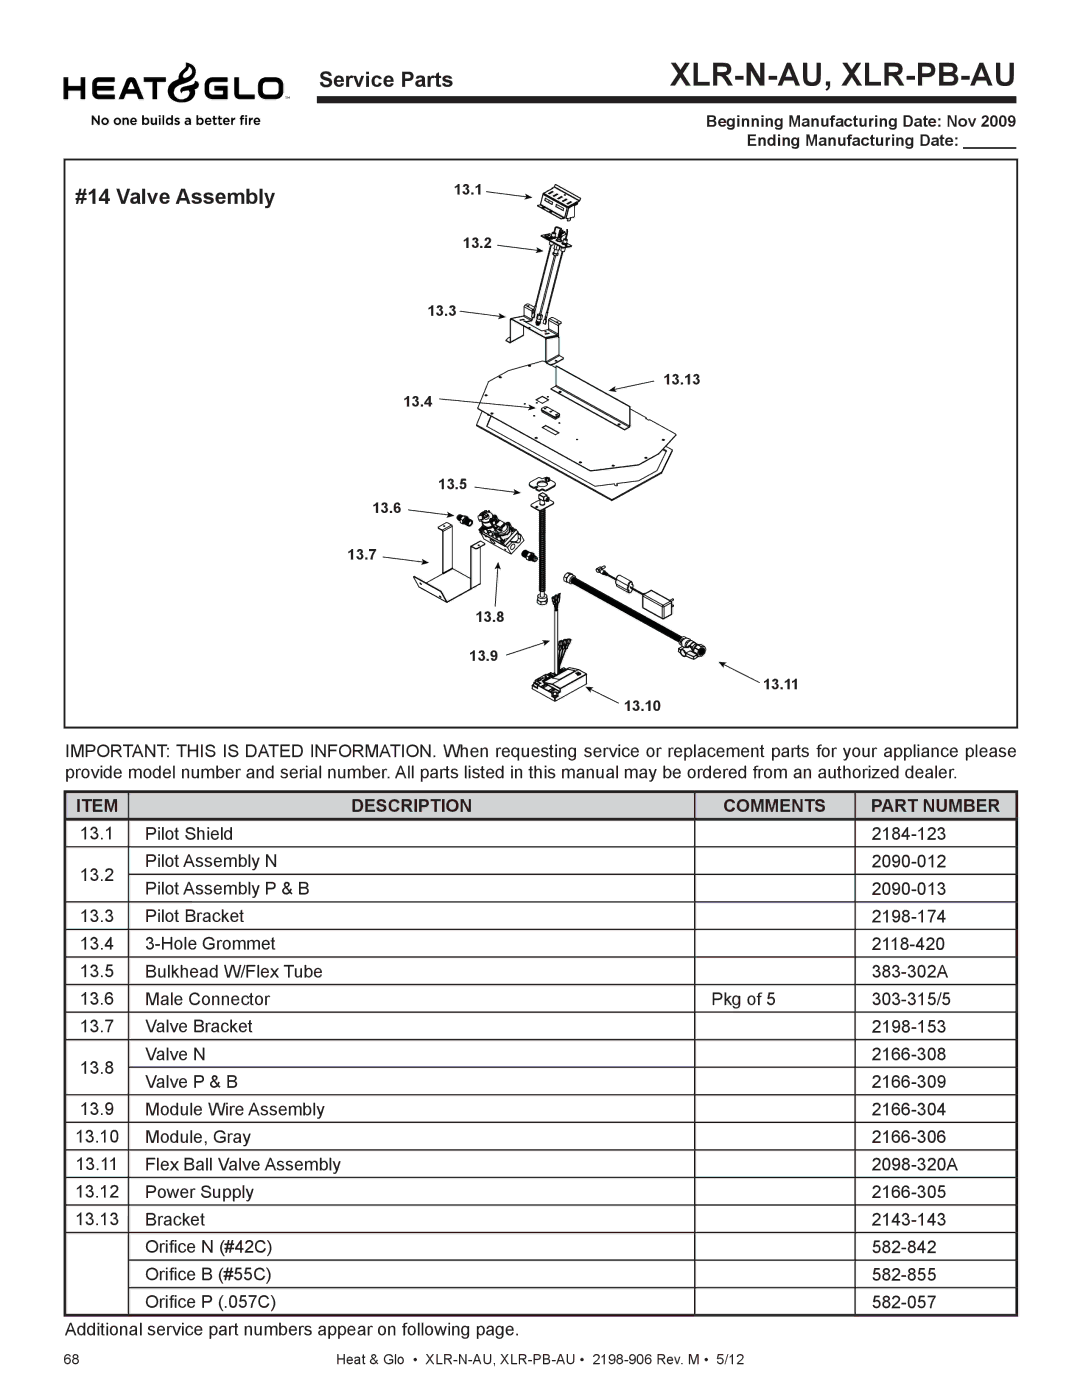
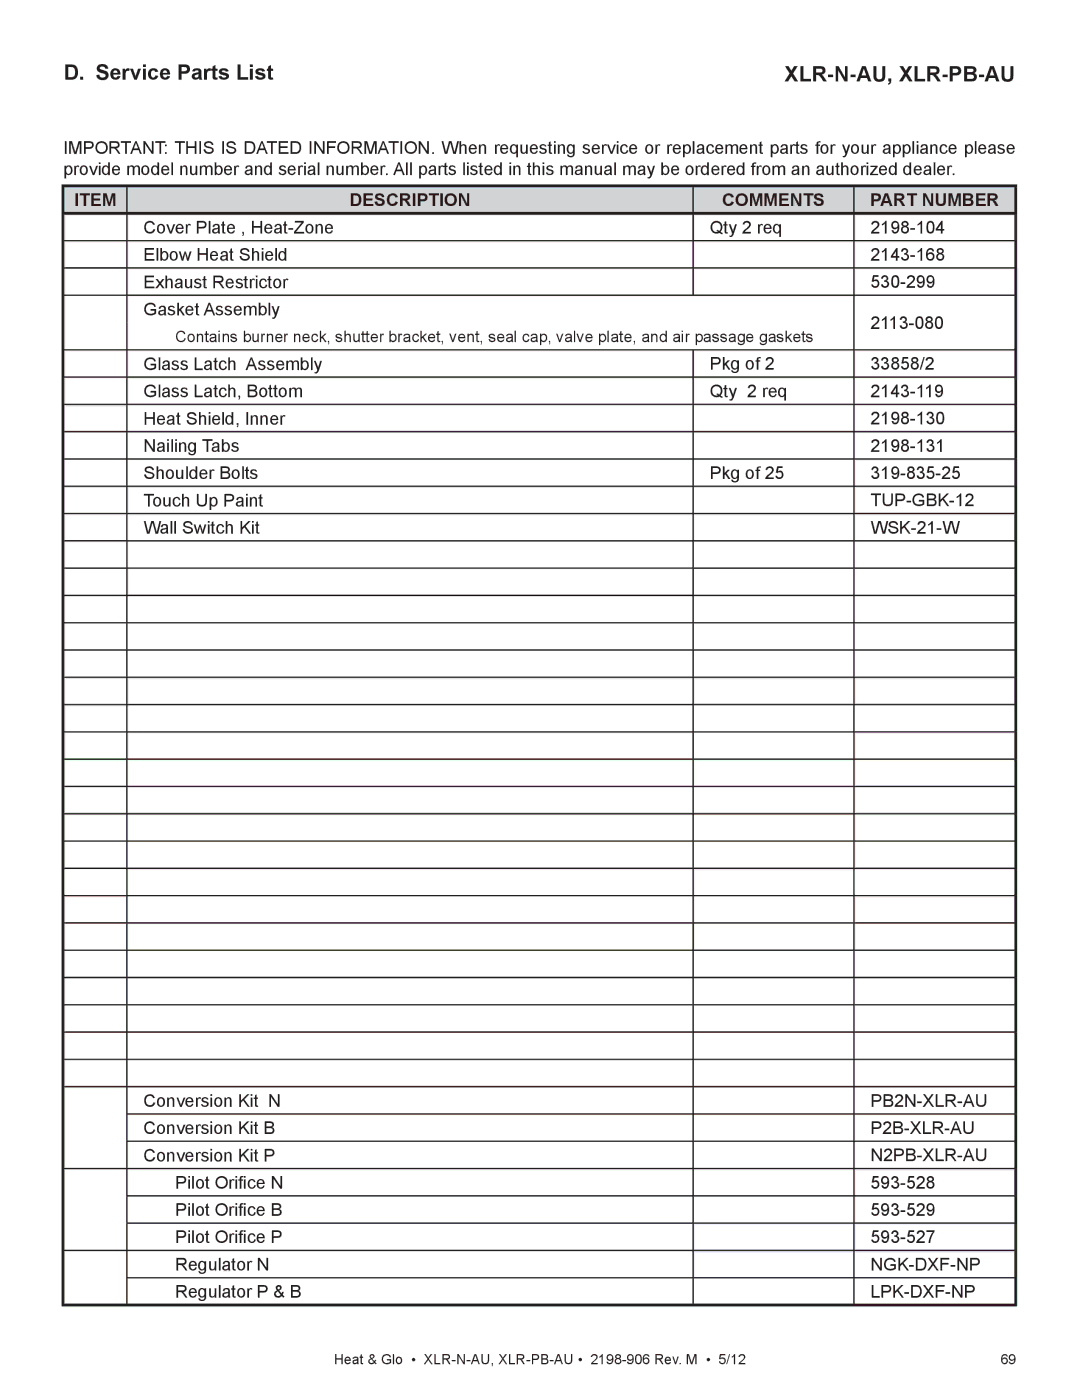
Contents SAI Global Ref No GSCS20139 AS4558What to do if you smell gas Models XLR-N-AU, XLR-PB-AU Homeowner Reference Information CongratulationsUser Guide Table of ContentsFinishing Appliance SetupTroubleshooting Component AccessLimited Lifetime Warranty Australian Warranty InformationOther Rights Perth This warranty is void ifListing and Code Approvals Operating Instructions User Guide Gas Fireplace SafetyYour Fireplace Decorative Doors and Fronts Fixed Glass AssemblyRemote Controls, Wall Controls and Wall Switches Clear SpaceControl Module Operation Nine Hour Safety Shutdown FeatureFinal inspection by Lighting Instructions IPIAGE 110/120 VAC or 220/240 Initial Break-in Procedure Frequently Asked QuestionsAfter Fireplace is Lit Decorative Doors Maintenance and ServiceMaintenance Tasks-Homeowner Glass CleaningControl Compartment and Firebox Top Maintenance Tasks-Qualified Service TechnicianGasket Seal and Glass Assembly Inspection FireboxTypical Appliance System Getting StartedTools and Supplies Needed Design and Installation ConsiderationsInspect Appliance and Components Selecting Appliance Location Framing and ClearancesClearances Constructing the Appliance ChaseFront Side Finishing Detail Mantel and Wall ProjectionsMantels Combustible/Non-Combustible Mantel Leg Combustible/Non-CombustibleVent Termination Minimum Clearances Termination LocationsMIN. Clearance in. mm Vent Information and Diagrams Minimum Maximum Top Vent Horizontal Termination Venting with 1 elbowVenting with 2 elbows Top Vent Horizontal TerminationExhaust restrictor Instructions Top Vent Vertical Termination No Elbows V1 Max= 44 ft .4 mV1 Minimum Maximum V1 + V2 Minimum Top Vent Vertical Termination Venting with 2 elbowsV1 Minimum H1 + H2 Maximum V1 + V2 Minimum Top Vent Vertical Termination Venting with 3 elbowsTop Vent Vertical Termination Venting with 4 elbows Combustible Wall Penetration Vent Clearances and FramingPipe Clearances to Combustibles Wall Penetration FramingPipe SLP Install the Ceiling FirestopFlat Ceiling Installation Install Attic Insulation ShieldVaulted Ceiling Installation Top Vent Appliance PreparationSecuring and Leveling the Appliance Installing the Optional Heat-Zone-240V KitAssemble Vent Sections Installing Vent Pipe SLP PipeSecure The Vent Sections Assemble Slip SectionsDisassemble Vent Sections Install Decorative Ceiling ComponentsAssemble and Install Storm Collar Install Metal Roof FlashingInstall Decorative Wall Components Install Vertical Termination CapHeat Shield Requirements for Horizontal Termination 17 Venting through the Wall Install Horizontal Termination CapGas Connection Gas InformationValve Pressure Taps Access Through the Valve AssemblyOptional Remote Control Receiver Location Wiring RequirementsIntelliFire Plus Ignition System Wiring Optional Accessories RequirementsJunction Cord Information Electrical Service and Repair Junction Cord InformationFinishing Instructions Non-Combustible Materials SpecificationFinishing Framing and Finishing InstructionsFinishing Details Required Fireplace Opening Height Sealing JointsTOP View Unlimited 11 Overlap Fit Method Tonic or Martini Decorative Front Facing Material13 Inside Fit Method Tonic Decorative Front Only Decorative Fronts Dimensions of Tonic Decorative FrontAppliance Setup Media Options Air Shutter SettingVerify Performance of Appliance Symptom Possible Cause Corrective Action TroubleshootingIntelliFire Plus Ignition System Ues to spark, and main Symptom Possible Cause Corrective Action Frequently Asked Questions/TroubleshootingComponent Access Access Through the Valve Assembly Pilot Assembly Replacement Gas Valve ReplacementReference Materials Appliance Dimension DiagramInspect Maintenance Tasks Maintenance TasksVent Components Diagrams SLP90- 90 Elbow 165 mm152 mm SLP-45 45 Elbow 168 mm 10-1/4Ceiling Firestop Wall Thimble-Black Adapter Snorkel Support Box-Black15-1/2 394 mm SLP-HRC-SS SLP-HRC-ZC-SS Horizontal Termination CAP XLR-N-AU, XLR-PB-AU Service Parts#14 Valve Assembly XLR-N-AU, XLR-PB-AU Service Parts ListContact Information