KitchenAid Bottom-Mount Built-In Refrigerator Refrigerator Features, Ice Maker and Storage Bin

Page 9

Ice Maker and Storage Bin

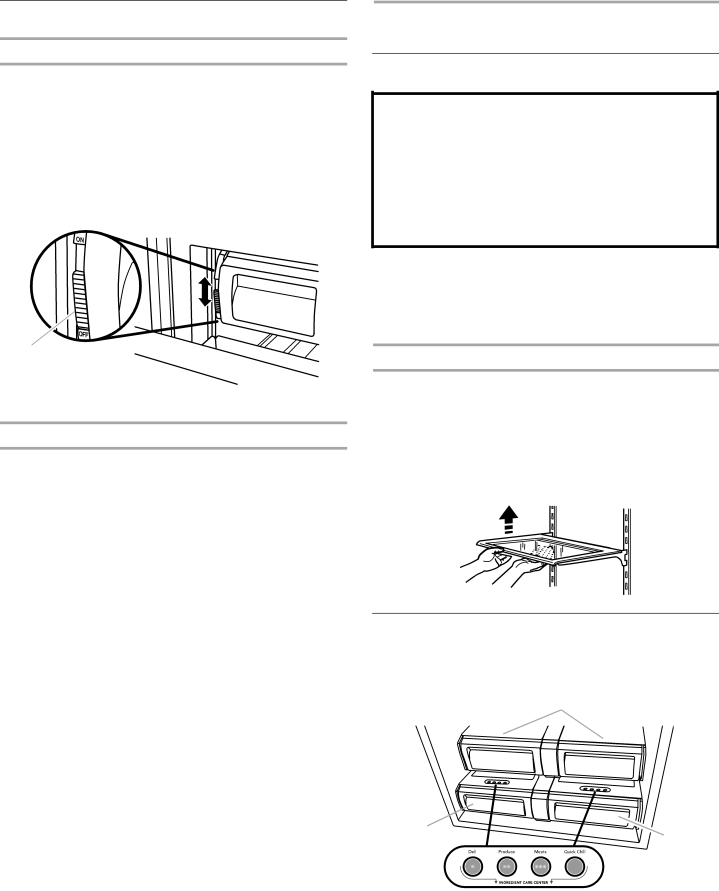
Turn the Ice Maker ON/OFF

The ice maker ON/OFF control is located on the left-hand side of the ice bin.

1.To turn on the ice maker, slide the ice maker ON/OFF control to the ON (up) position.

NOTE: Your ice maker has an automatic shutoff. As ice is made, the ice cubes will fill the ice storage bin. The ice maker sensors will automatically stop ice production, but the ice maker control will remain in the ON (up) position.

2.To manually turn off the ice maker, slide the ice maker ON/ OFF control to the OFF (down) position as shown.

A

A. ON/OFF control

Ice Storage Bin Care

1.Remove ice bin. See “Pull-out Freezer and Ice bin.”

2.Empty the ice bin. Use warm water to melt the ice if necessary.

NOTE: Do not use anything sharp to break up the ice in the bin. This can cause damage to the ice container and the dispenser mechanism.

3.Wash ice bin with warm water and a mild detergent, rinse well and dry thoroughly. Do not use harsh or abrasive cleaners or solvents.

REMEMBER:

Allow 24 hours to produce the first batch of ice.

Discard the first three batches of ice produced to avoid impurities that may be flushed out of the system.

It may take 3 to 4 days for the ice bin to completely fill, if no ice is used.

The quality of your ice will be only as good as the quality of the water supplied to your ice maker.

Avoid connecting the ice maker to a softened water supply. Water softener chemicals (such as salt) can damage parts of the ice maker and lead to poor quality ice. If a softened water supply cannot be avoided, make sure the water softener is operating properly and is well maintained.

It is normal for the ice cubes to be attached at the corners. They will break apart easily.

Do not store anything inside the ice bin.

REFRIGERATOR FEATURES

Refrigerator Shelves

Important information to know about glass shelves and covers:

Do not clean glass shelves or covers with warm water when they are cold. Shelves and covers may break if exposed to sudden temperature changes or impact, such as bumping. For your protection, tempered glass is designed to shatter into many small, pebble-size pieces. This is normal. Glass shelves and covers are heavy. Use special care when removing them to avoid impact from dropping.

The shelves in your refrigerator are adjustable to meet your individual storage needs.

Storing similar food items together in your refrigerator and adjusting the shelves to fit different heights of items will make finding the exact item you want easier. It will also reduce the amount of time the refrigerator door is open, and save energy.

Shelves and Shelf Frames

To Remove and replace a Shelf/Frame:

1.Remove the shelf/frame by tilting it up at the front and lifting it out of the shelf supports. Pull shelf straight out.

2.Replace the shelf/frame by guiding the rear shelf hooks into the shelf supports. Tilt the front of the shelf up until the rear shelf hooks drop into the shelf supports.

3.Lower the front of the shelf and check to make sure that the shelf is securely in position.

Deli/CrisperPans

The 42" (106.7 cm) model includes two deli pans and two crisper pans, while the 36" (91.4 cm) model has one deli pan and one crisper pan.

A

B

B

A. Crisper pans

B. Deli pans

9

Image 9 Contents
BOTTOM-MOUNT BUILT-IN Refrigerator Table of Contents ÍndiceTable DES Matières Before You Throw Away Your Old Refrigerator or Freezer Refrigerator SafetyBefore USE PowerOn/Off SwitchRefrigerator USE Water Supply RequirementsWater System Preparation Turn Power On or OffNormal Sounds To Replace Top GrilleViewing the Celsius Temperatures Using ControlsAdjusting Controls To Adjust Set Point Temperatures Ensuring Proper Air CirculationHoliday Mode Water Filter Indicator & ResetEnergy Saver Feature 42 Bottom Mount Only Alarm Functions Master Alarm ResetWater Filtration System WaterFilter IndicatorIce Maker and Storage Bin Refrigerator FeaturesRefrigerator Shelves Deli/CrisperPansWine Rack Freezer FeaturesCovered UtilityBin Pull-out FreezerPan and Ice BinCleaning Door Features Refrigerator CareUtility Compartment Door BinsChanging the Light Bulbs Refrigerator LightsFreezer Lights Troubleshooting PowerInterruptionsVacation Care Motor seems to run too much Temperature is too warmRefrigerator seems to make too much noise Ice maker is not producing ice or not enough iceU.S.A Assistance or ServiceStainless Steel Cleaner & Polish AccessoriesReplacement Water Filter Water Filter CertificationsApplication Guidelines/Water Supply Parameters Product Data SheetsTWO Year Limited Warranty Kitchenaid Refrigerator WarrantyLifetime Limited Warranty on Door Bins Items Kitchenaid will not PAY forAntes de tirar su refrigerador viejo o congelador Seguridad DEL RefrigeradorUSO DE SU Refrigerador Antes DE UsarRequisitosdel suministro de agua Interruptor de Encendido/ApagadoPara volver a colocar la rejilla superior Preparación delsistema de aguaPara encender o apagar Serie Pro Line Para quitar la rejilla superiorSonidosnormales Cómo asegurar la debida circulación del aireUsode los controles Para conectar el refrigerador y ver los puntos de ajuste Holiday Mode Modo de día de fiestaPara ver las temperaturas en centígrados Ajuste de los controlesOver Temperature Temperatura excesiva Funciones de alarma Restablecimiento de la alarma maestraCall Service Solicite servicio Indicador del filtrode aguaFábrica de hieloy depósito Sistema de filtración de aguaCómo cambiar el filtro de agua Uso de la fábrica de hielo sin el filtro de aguaCajonespara carnes frías/verduras Características DEL RefrigeradorEstantes del refrigerador Cuidado del depósito de hieloCompartimiento deusogeneralcon tapa Características DEL CongeladorPortabotellas Cajónremovibledelcongeladorydepósitode HieloCuidado DE SU Refrigerador Características DE LA PuertaCompartimientode uso general Recipientes de la puertaCómo cambiar los focos Luces del refrigeradorLuces del congelador Cortesde corriente Solución DE ProblemasCuidado durantelas vacaciones Si Ud. decide apagar el refrigerador antes de irseParece que el motor funciona excesivamente Hay agua en la bandeja recolectora de aguaEl refrigerador parece hacer mucho ruido El hielo tiene mal sabor, mal olor o un color grisáceoLa temperatura está demasiado caliente El divisor entre los dos compartimientos está calienteHay acumulación de humedad en el interior Las puertas no cierran completamenteEn Canadá Ayuda O Servicio TécnicoEn los EE.UU AccesoriosPautas de aplicación/Parámetros para el suministro de agua Hoja DE Datos DEL ProductoGarantía Limitada DE DOS Años Garantía DEL Refrigerador DE KitchenaidKitchenaid no Pagará POR LOS Siguientes Artículos Exclusión DE Garantías Implícitas Limitación DE RecursosAvant de jeter votre vieux réfrigérateur ou congélateur Sécurité DU RéfrigérateurUtilisation DU Réfrigérateur Avant L’UTILISATIONSpécifications de l’alimentation en eau Commutateur marche/arrêtPréparation du système d’eau Réinstallation de la grille supérieureActivation ou désactivation de l’alimentation électrique Série Pro Line Pour enlever la grille supérieureUtilisation des commandes SonsnormauxPour s’assurer d’une circulation d’air Appropriée Holiday Mode mode vacances Ajustement des commandesPour voir les températures en Celsius État et réinitialisation du filtre à eauOver temperature dépassement de la température Fonctions dalarme Réinitialisation de lalarme principaleCall Service appel de service Door Open porte ouverteTémoin lumineux détat du filtre à eau Système de filtration deauMachineàglaçons et bacd’entreposage Caractéristiques DU Réfrigérateur Tablettesdu réfrigérateurEntretien du bac d’entreposage de glaçons Bac pour spécialitésalimentaires/bacà Légumes Caractéristiques DU CongélateurCasierutilitaire couvert CasieràvinEntretien DU Réfrigérateur Caractéristiques DE LA PorteCompartimentutilitaire Balconnets de porteRemplacement des ampoulesd’éclairage Lampes du réfrigérateurLampes du congélateur Pannes de courant DépannageEntretien avant lesvacances Les ampoules n’éclairent pasLe moteur semble fonctionner excessivement Le plateau de dégivrage contient de l’eauLe réfrigérateur semble faire trop de bruit La machine à glaçons ne produit pas de glaçons ou trop peuLa température est trop tiède La cloison entre les deux sections est tièdeIl y a une accumulation d’humidité à l’intérieur Les portes ne se ferment pas complètementAccessoires Assistance OU ServiceSystème de filtration d’eau à la grille de la base Feuilles DE Données SUR LE ProduitGarantie Limitée DE Deux ANS Garantie DU Réfrigérateur KitchenaidGarantie Limitée À VIE SUR LES Balconnets DE Porte Kitchenaid NE Prendra PAS EN Charge