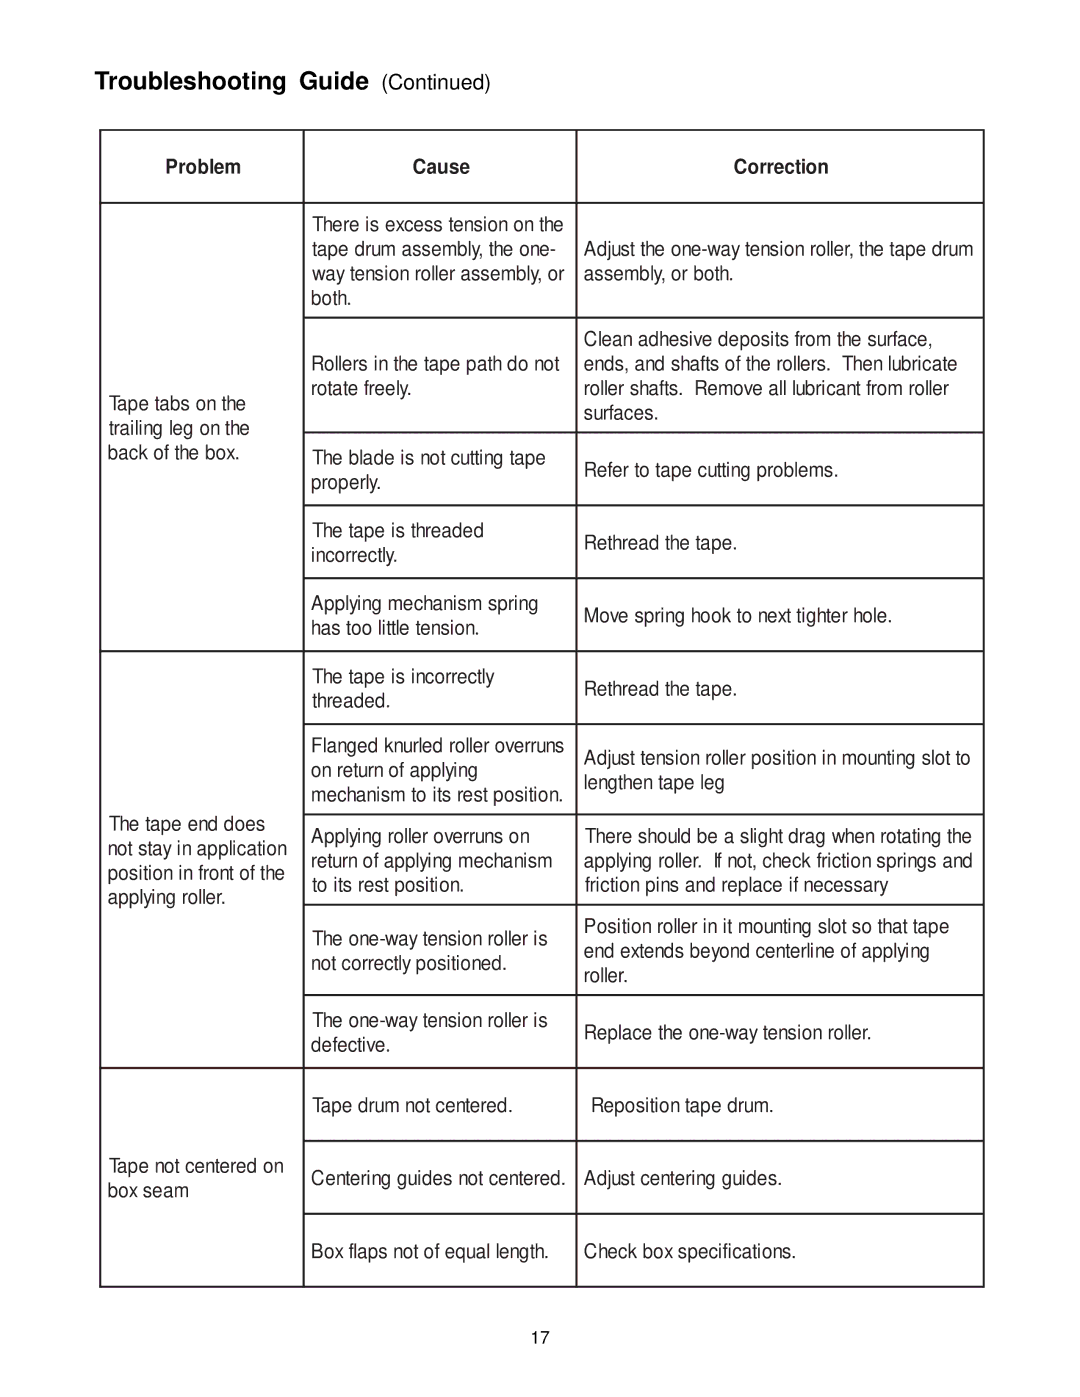
Troubleshooting Guide (Continued)
Problem | Cause | Correction | |
|
|
| |
| There is excess tension on the |
| |
| tape drum assembly, the one- | Adjust the | |
| way tension roller assembly, or | assembly, or both. | |
| both. |
| |
|
|
| |
|
| Clean adhesive deposits from the surface, | |
| Rollers in the tape path do not | ends, and shafts of the rollers. Then lubricate | |
Tape tabs on the | rotate freely. | roller shafts. Remove all lubricant from roller | |
| surfaces. | ||
trailing leg on the |
| ||
|
| ||
|
| ||
back of the box. | The blade is not cutting tape | Refer to tape cutting problems. | |
| properly. | ||
|
| ||
|
|
| |
| The tape is threaded | Rethread the tape. | |
| incorrectly. | ||
|
| ||
|
|
| |
| Applying mechanism spring | Move spring hook to next tighter hole. | |
| has too little tension. | ||
|
| ||
|
|
| |
| The tape is incorrectly | Rethread the tape. | |
| threaded. | ||
|
| ||
|
|
| |
| Flanged knurled roller overruns | Adjust tension roller position in mounting slot to | |
| on return of applying | lengthen tape leg | |
| mechanism to its rest position. | ||
The tape end does |
|
| |
Applying roller overruns on | There should be a slight drag when rotating the | ||
not stay in application | |||
return of applying mechanism | applying roller. If not, check friction springs and | ||
position in front of the | |||
to its rest position. | friction pins and replace if necessary | ||
applying roller. | |||
|
| ||
| The | Position roller in it mounting slot so that tape | |
| end extends beyond centerline of applying | ||
| not correctly positioned. | ||
| roller. | ||
|
| ||
|
|
| |
| The | Replace the | |
| defective. | ||
|
| ||
|
|
| |
| Tape drum not centered. | Reposition tape drum. | |
Tape not centered on |
|
| |
Centering guides not centered. | Adjust centering guides. | ||
box seam | |||
|
| ||
|
|
| |
| Box flaps not of equal length. | Check box specifications. | |
|
|
|
17