Acer s10 handheld
Manual for
Copyright
About this Manual
O u t t h i s M a n u a l
Your guides
Package contents
Performing a soft reset
Resetting your Acer s10
Maintaining your Acer s10
Proper care and usage of your Acer s10
To perform a soft reset
Performing a hard reset
Assigning security options
Battery considerations
Assigning security options
First things first Assigning security options
Contents
Xii
Managing your applications
Working with your basic applications
Xiii
Xiv
Working with your supplementary applications 117
Using the Attention Manager 223
Using expansion features 217
Working with your PC-end utilities 195
Managing your desktop email 229
Beaming information 249
Setting preferences for your Acer s10 269
253
Xvi
Xvii
Frequently Asked Questions 297
Appendix Creating a custom Expense Report 307
Index 315 Xviii
Getting started System requirements
System requirements
Getting started Acer s10 tour
Acer s10 tour
Front panel
To activate the backlight
Using the backlight
Your Acer s10’s rear panel consists of the following
Rear panel
Your Acer s10 interface consists of the following elements
Elements of the Acer s10 interface
To adjust the contrast
Using the onscreen contrast control
Element Description
Command interface
Preparing to use your Acer s10
Connecting the cradle
Getting started Preparing to use your Acer s10
To connect the cradle
To charge your Acer s10
Charging your Acer s10
LED status during charging
Palm Desktop software
Getting started Palm Desktop software
Pre-installation instructions
Installing Palm Desktop software
To install Palm Desktop software
Getting started Palm Desktop software
Getting started Palm Desktop software
To set up your Acer s10
Setting up your Acer s10
Performing the first HotSync operation
Synchronizing data
Getting started Synchronizing data
To perform the first HotSync operation
Getting started Tapping versus clicking
Tapping versus clicking
Calibrating your Acer s10 screen
Opening applications
Getting started Opening applications
To calibrate the Acer s10 screen
To display a menu bar
Using menus and menu commands
To open an application
Getting started Using menus and menu commands
Using Graffiti to execute commands
Graffiti command toolbar
To use the Graffiti command toolbar
To display an online tip
To use a Graffiti command letter
Displaying online tips
Getting started Entering data
Entering data
Getting started Entering data
Entering data in your Acer s10 Entering data using Graffiti
Entering data using Graffiti
Writing Graffiti characters
General guidelines in Graffiti writing
Letter Strokes
Graffiti alphabet
To write Graffiti letters
To write Graffiti numbers
Graffiti numbers
To write capital letters
Number Strokes
Left Paren
Graffiti punctuation marks
Punctuation Stroke Mark Period
Graffiti accented characters
Graffiti symbols and extended characters
Command Stroke
Using Graffiti ShortCuts
Graffiti non-English characters
Graffiti navigation strokes
To use a ShortCut
Predefined Graffiti ShortCuts
To edit a ShortCut
Entry ShortCut
To use the onscreen keyboard
Using the onscreen keyboard
Graffiti tips
Entering data in your Acer s10 Using an external keyboard
Using an external keyboard
Entering data in your Acer s10 Importing data
Importing data
To import data
Entering data in your Acer s10 Beaming data
Beaming data
To open the Applications Launcher
Using the Applications Launcher
Managing your applications Using the Applications Launcher
To open an application
Switching between applications
Categorizing applications
To categorize an application
To display applications by category
Changing the Applications Launcher display
To change the view of applications
To display the last selected category of applications
Installing and removing applications
Setting preferences for applications
To install add-on applications on your Acer s10
Assigning applications to buttons
Page
To remove the Palm Desktop software in Windows
Removing the Palm Desktop software
To remove an add-on application
Managing your applications Security
Security
To mask a private record
To mask all private records
To hide all private records
Assigning and editing passwords
To assign, change, or delete a password
To lock your Acer s10 with a password
Recovering from a forgotten password
To delete a forgotten password
Locking your Acer s10
To display private records
Displaying private records
To unmask individual records
Date Book
Overview of basic applications
You can do the following in Date Book
To launch Date Book
You can do the following in Address Book
Address Book
Working with your basic applications Address Book
Address Book opens to display the list of all your records
To launch Address Book
Working with your basic applications To Do List
To Do List
You can do the following in To Do List
To launch To Do List
Working with your basic applications Memo Pad
Memo Pad
You can do the following in Memo Pad
To launch Memo Pad
Expense
Calculator
Working with your basic applications Mail
Mail
To launch Expense
You can do the following in Mail
Tap the Mail icon Mail list screen appears
To create a record
Creating records
Editing records
To use the Edit menu
Using the Edit menu
Selecting text
To delete a record in any of the basic applications
Deleting records
Keyboard
Graffiti Help
Categorizing records
Purging records
To purge records
System-defined categories
User-defined categories
To move a record into a category
To display a category of records
Tap OK Tap OK to exit the Edit Categories dialog box
To rename a category
Finding Address Book records
Finding records
To use the Find option
Using the Find option
Using Phone Lookup
To add names to an Expense record
Adding names to an Expense record
To use Phone Lookup
To sort records in Memo Pad
Sorting records
To sort records in the To Do List and Expense applications
To sort the Memo List manually
Making records private
To make a record private
To attach a note to a record
Attaching notes
To review or edit a note
To delete a note
Getting information on an application
Choosing fonts
To change the font style
To display the About box
Page
Scheduling events
Using Date Book
Scheduling timed events
To schedule a timed event for the current date
Using Date Book
To schedule an untimed event
Scheduling untimed events
To schedule a timed event for another date
To reschedule an event
Rescheduling events
Making changes to repeating or continuous events
Scheduling repeating or continuous events
To schedule a repeating or continuous event
To delete repeating events
About scheduling repeating or continuous events
Adding Address Book information to an event
To dismiss the alarm using the Snooze option
Setting the alarm for an event
To set an alarm for an event
To set alarm options
Setting alarm options
Working in Week view
Changing the Date Book view
To display the Date Book views
To display the current time
Tips for using Week view
To display the Month view
Spotting event conflicts
Working in Month view
Tips for using Agenda view
Tips for using Month view
Working in Agenda view
To work on the Agenda View
To change the start and end time in the Date Book
Date Book menus
Changing the displayed Start and End Times
Page
Using Date Book
Working with your basic applications Using Date Book
To create a new Address Book entry
Using Address Book
Creating an Address Book entry
To view details of an address entry
Duplicating an entry
Selecting different types of phone numbers and addresses
Editing Address Book entries
To select other types of phone numbers in an entry
To change how lists are sorted
Changing the Address Book display
To edit an Address Book entry
Address Book menus
Dial
Edit menu Options menu
Book
Preferences
Rename Custom Fields
Setting To Do List priorities
Using To Do List
Creating To Do List items
To create a To Do List item
To set the priority of a To Do List item
Checking off a To Do List item
To check off a To Do List item
To remove a completed To Do List item
To change the To Do List item details
Changing To Do List items details
To sort To Do List items
Sorting To Do items
Priority
Category
To display completed and due items in the To Do List
Displaying completed and due items
To Do List menus
Record menu Edit menu Options menu
Working with your basic applications Using To Do List
To create a new memo
Using Memo Pad
Creating memos
Reviewing memos
To set the sorting mode for Memo list
Changing the order in which memos appear in the Memo list
To review a memo
Record menus
Memo Pad menus
Edit menu Options menus
Using the Calculator buttons
Using Calculator
Displaying recent calculations
To display recent calculations
Calculator menus
To create an Expense item
Using Expense
Creating an Expense item
Entering receipt details
Changing the date of an Expense item
To change the date of an Expense item
To enter receipt details in the Receipt Details dialog box
Working with your basic applications Using Expense
Payment
Type
Currency
Vendor
Filling in the expense type automatically
Adding attendees’ names to an Expense item
To add attendees’ names to an Expense item
To fill in the expense type automatically
To change the Expense List display
Changing the currency and symbols display
Changing the Expense List display
To define a custom currency symbol
Customizing currency symbols
To change the default currency symbol for all Expense items
Transferring your data to Microsoft Excel
Displaying the euro symbol on your computer
To create or print an expense report
Printing the euro symbol
Creating and printing an expense report
To view your expense data using a Microsoft Excel template
Using expense report templates
Expense menus
116
You can do the following in Clock
Overview of supplementary applications
Clock
To launch AudioBox
AudioBox
You can do the following in AudioBox
Working with your supplementary applications AudioBox
Working with your supplementary applications Recorder
Recorder
You can do the following in Recorder
To launch Recorder
Working with your supplementary applications eBook Reader
EBook Reader
You can do the following in eBook Reader
To launch eBook Reader
Working with your supplementary applications eBook Reader
Working with your supplementary applications Backup
Backup
You can do the following in Backup
To launch Backup
You can do the following in Service Launcher
Service Launcher
Page
126
Working with your supplementary applications
Using Clock
To switch between Clock modes
City Clock mode
To change the preselected city display
Working with your supplementary applications Using Clock
GMT Offset
To edit details of a current city list entry
DST
DST Setting
To add a new city to the current city list
To delete a city from the current city list
To set an alarm
Alarm setting
Working with your supplementary applications Using Clock
Low Medium High Repeat
Is activated
Big Clock mode
To work in Timer mode
Timer mode
About Clock Shows version information for Clock
Clock menu
140
Using AudioBox functions
Using AudioBox
To select a track to play
Before launching the AudioBox
To play a selected track
To set the LCD off settings
To repeat a section of the active track
Working with your supplementary applications Using AudioBox
To adjust the volume
To display the playlist
AudioBox playlist
To stop playback
Alarm reminder
AudioBox menu
Preferences
148
To start recording using the Recorder icon
Using Recorder
Recorder main screen
Audio recording function
Do one of following to stop recording
To start recording using the Hot Button
Default procedure
Alternative procedure
Working with your supplementary applications Using Recorder
To pause Recording
Storage options for recorded audio
Using the Recorder command buttons
To rename an audio file
To view detailed information
To delete all files in the audio file list
To delete an audio file
To start audio playback
Audio playback function
To adjust volume
Recorder menus
Record
Other
160
To categorize an eBook file
Using eBook Reader
Working on the Book Manager screen
To view detailed information about an eBook file
To edit the eBook category list
To delete an eBook file
To open an eBook
Reading your eBook files
To revert to the Book Manager screen
Working in Read Document mode
To define font type in viewing the eBook
To search for a particular text in the eBook
From top of the document
Case Sensitive
To go to a bookmark location
To move around in Read Document mode
Working with bookmarks
To create a new bookmark
Tap New to display the New Bookmark screen
To delete a bookmark
To delete all bookmarks in a document
To use the Jump To function
Using the Jump To function
Working with hyperlinks
To attached a note to an eBook
Attaching a note to an eBook
Working on Note Manager
To use the Note Manager command buttons
Tap here
EBook Reader menus
Median Line Space
Large Line Space
Small Line Space
Book Manager
Preferences
179
180
Backup function
Using Backup
To perform a complete backup
Working with your supplementary applications Using Backup
To perform a partial backup
Backup errors
Restore function
To perform a complete restore
Working with your supplementary applications Using Backup
To perform a partial restore
Viewing backup error log
Deleting a backup file from the Memory Stick
To delete a backup file from the resident Memory Stick
To view backup error log
About Backup Shows version information for Backup
Backup menu
Using Service Launcher
Using Service Launcher
To define Quick Launcher settings
Using the Quick Launcher function
Page
194
To launch Palm Desktop software
Overview of PC-end utilities
EBook Converter
Voice Converter
Working with your PC-end utilities Voice Converter
To launch Voice Converter
Working with your PC-end utilities
Using Voice Converter
Installing Voice Converter
To add a file to the source file list
Voice Converter toolbar
To select a file in the source file list
To convert listed source files to .mp3 format
To remove a source file from the source file list
To remove all files from the source file list
To convert all listed files to .mp3 format
Voice Converter source file list
File menu
Voice Converter menus
View menu
Action menu
Help Topic Click to display the Voice Converter online guide
Help menu
Installing eBook Converter
Using eBook Converter
To open an existing list file
EBook Converter toolbar
To create a new list file
To save a list file
To use the Save As menu command
To add a file to the source file list
To remove a file from the source file list
To convert a source file to Acer eBook format
Conversion reminders
EBook Converter source file list
To convert all files in the source file list
Conversion successful, eBook file size. Indicates
EBook Converter menus
Status
Check to show toolbar default. To hide toolbar, uncheck
Action menu Options menu
Using eBook Converter
Memory Stick
Help Topic Click to display the eBook Converter online Help
Working with your PC-end utilities Using eBook Converter
To insert a Memory Stick
Inserting and removing a Memory Stick
To switch source category to Memory Stick
Using expansion features
Copying applications to a Memory Stick
To remove a Memory Stick
Displaying information for Memory Stick applications
Deleting applications from a Memory Stick
To delete an application from a Memory Stick
To display information about an application on your Memory
Card Info
Using expansion features Card Info
Formatting a card
Reviewing card information
Renaming a card
Help Provides help text
Card Info menu
Card menu
Using the Attention Manager
Insistent alarms
Using the Reminder command buttons
Setting alarm sound effects
Setting the alarm volume
Using the Attention Manager Insistent alarms
Snooze
Play Every
Using the Reminders list screen
Remind Me
Understanding the blinking alarm indicator
Subtle alarms
Using the Attention Manager Subtle alarms
Done
Subtle alarms
228
Managing your desktop email
Setting up the Mail application on your computer
Managing your desktop email
Setting up the Mail application and HotSync options
To set up Mail on your computer
To open Mail
Synchronizing Mail with your email application
Viewing email items
Viewing, creating, and replying to email
To view email items
To change header information
To create an email item
Creating email items
Sender
To reply to an email item
To look up an email address
Looking up an address
Signature
Adding details to email items
To add details to an email item
To create a signature
Creating a signature for your email item
Confirm Read
Confirm Delivery
Storing and editing unsent email items
Storing and editing email items
Managing your desktop email Storing and editing email items
To store an email item in the Outbox folder
Drafting email
Setting mail preferences
To save an email item as a draft
To edit an email item saved as a draft
To retrieve an email item from the Filed folder
Filing an email item
To file an email item
Deleting email items
To purge the contents of the Deleted folder
Managing your desktop email Deleting email items
To delete and email
To display the Date column in email items
Categorizing and sorting email items
To select an email folder to display
To sort the Message List
Managing your email application with HotSync
To set HotSync Options to control synchronizing email items
Subject
To access the special filter screen
Using filters to control downloading
Send Only
Filter
Ignore Messages
To create the special filter settings
Containing
Retrieve Only Msgs
To define a filter string
Defining filter strings
About Mail Displays version information for Mail
Mail menus
Message menu
248
To select a business card for beaming
Beaming a business card
Beaming information Beaming a business card
Beaming an application
Beaming a record
Beaming information Beaming a record
To beam a record, business card, or category of records
Turning off beaming
Receiving beamed information
Beaming information Receiving beamed information
To receive beamed information
Beaming information Turning off beaming
To create a user profile
Performing a HotSync operation
Creating a user profile
Performing the first HotSync operation
Always Available
Selecting HotSync setup options
To set the HotSync options
Speed
Serial Port
To customize HotSync application settings
Customizing HotSync application settings
Preparing your computer for infrared communication
IR HotSync operations
To check the ports used for infrared communication
Configuring HotSync Manager for infrared communication
To check your computer for IR capability
To perform an IR HotSync operation
Returning to using the cradle for HotSync operations
Performing an IR HotSync operation
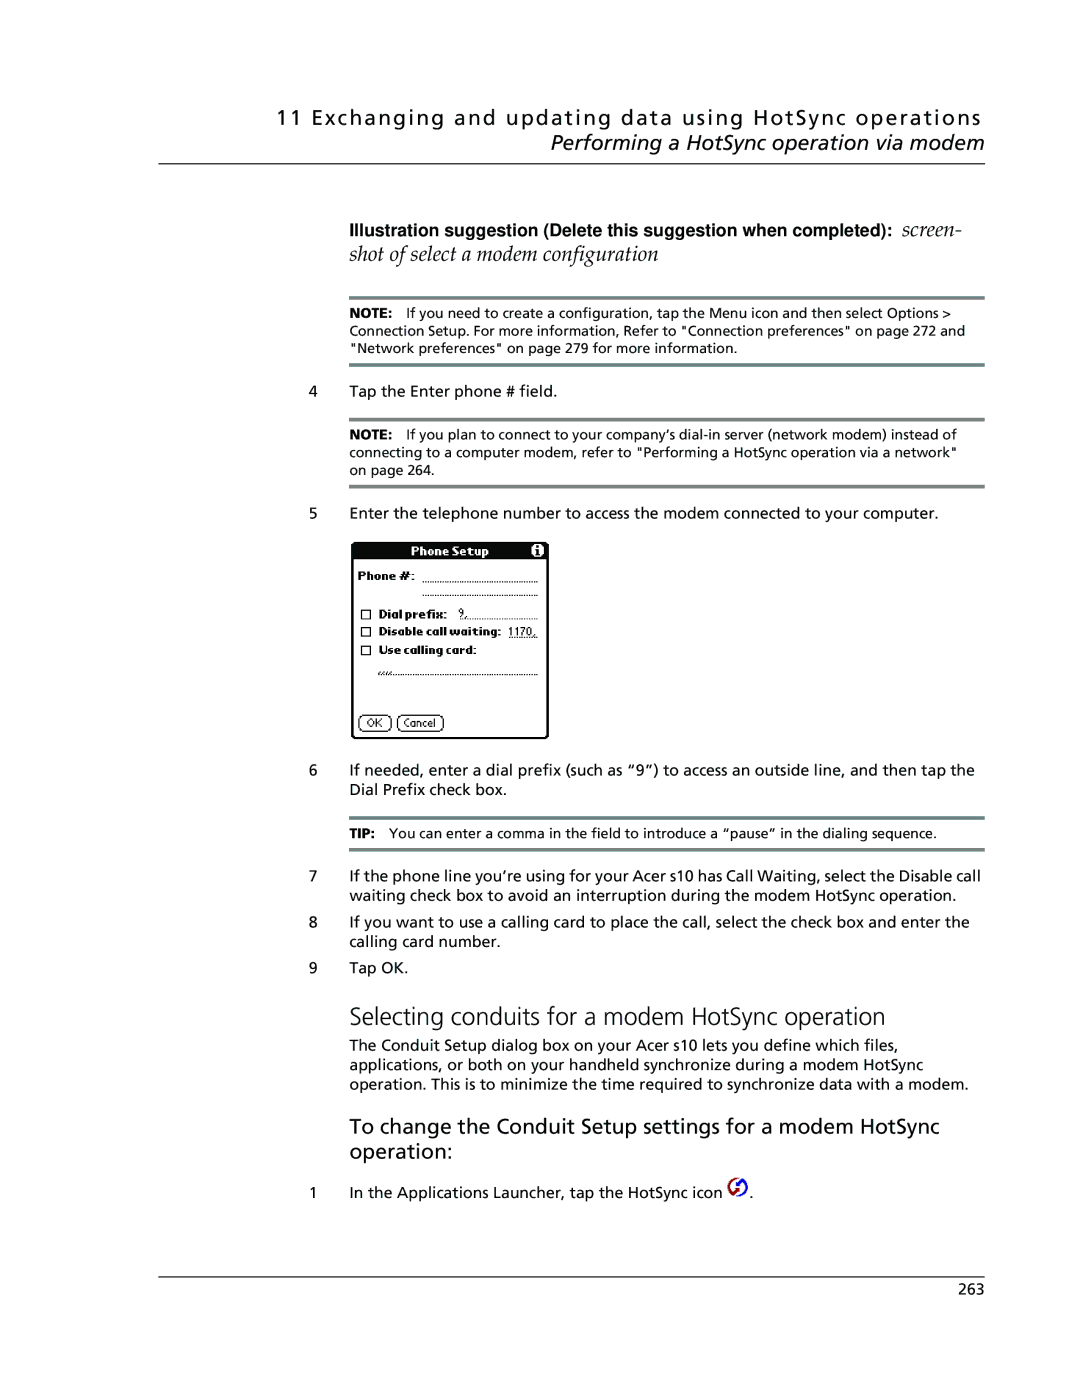
To prepare your computer for a modem HotSync operation
Performing a HotSync operation via modem
Preparing your computer
Preparing your Acer s10
Setup String
To prepare your Acer s10 for a modem HotSync operation
Modem
Selecting conduits for a modem HotSync operation
Shot of select a modem configuration
To perform a modem HotSync operation
Performing a HotSync operation via a network
Performing a HotSync operation via a modem
To prepare your computer for a network HotSync operation
To perform a network HotSync operation
Performing a HotSync operation via a network
Using File Link
268
Selecting the Preferences screen
Buttons preferences
Setting preferences for your Acer s10 Buttons preferences
To change the Buttons preferences
To change the HotSync buttons preferences
Backlight
To change what the full-screen pen stroke activates
Turn Off & Lock
Beam Data
Connection Types
Connection preferences
To set Serial to Modem preferences
Setting modem configurations
To modify Connection preferences
Setting preferences for your Acer s10 Connection preferences
Date & Time preferences
Setting an Infrared to modem connection
To create an Infrared to Modem connection
To set the date
To set the time zone
Digitizer preferences
To set daylight saving time
To calibrate your screen
Setting time, date, week start, and number display formats
Setting default country
Setting preferences for your Acer s10 Formats preferences
To choose a default country
Setting your Acer s10 to stay on while in the cradle
Setting the Auto-off interval time
Setting the sounds and volumes
General preferences
To set the LED settings
Setting the LED settings
To change the Beam Receive feature
Network preferences
To set network preferences
Setting preferences for your Acer s10 Network preferences
Enter password Tap here
Enter your
Customizing service templates
Connecting to your ISP or dial-in service
To establish a connection
To close a connection
Serial Line Internet Protocol
To duplicate an existing service template
To edit a service template
To specify a primary and secondary DNS number
To delete a service template
Entering DNS numbers and IP addresses
To specify the IP address
You can create login script files in two ways
Creating a login script
To create a login script on your Acer s10
Delay
Send Password
Wait For
Wait for Prompt
Plug-in applications
Using non-ASCII characters in login scripts
Caret char
Carriage return and line feed
To expand the display of progress messages during login
Troubleshooting TCP/IP connections
Plug-in applications have the following characteristics
Network Preferences menus
Service menu Edit menu Options menu
To change owner preferences on your Acer s10
Setting preferences for your Acer s10 Owner preferences
Owner preferences
Setting up related Connection Preferences
Setting up related Network preferences
Setting preferences for your Acer s10 Phone preferences
Phone preferences
ShortCuts preferences
Setting up Phone preferences
Setting preferences for your Acer s10 ShortCuts preferences
Page
296
Frequently Asked Questions
Software installation problems
Frequently Asked Questions Operating problems
Operating problems
Application problems
Tapping and writing problems
Frequently Asked Questions HotSync problems
HotSync problems
HotSync problems
Frequently Asked Questions HotSync problems
Beaming problems
Beaming problems
Frequently Asked Questions Recharging problems
Recharging problems
Password problems
Finding version and memory information
Technical support
Frequently Asked Questions Technical support
Appendix Creating a custom Expense Report
About mapping tables
To customize a sample Expense Report template
Customizing existing sample templates
Analyzing your custom Expense Report
Determining the layout of the Expense Report
Labels
Sections
To program a new custom mapping table
Programming the mapping table
Start Column
# of Rows
Start Row
Intervals
Expense file details
Using applications other than Microsoft Excel
Trips
Trip
314
Index
Page
317
Page
319
320