PowerBook User’s Guide
Apple Computer, Inc
Contents
Choose a command
Open an icon
Before you install
Contents
Part
Working with several programs at a time
Power Management
Using Disks
Organizing Your Files
Adapting Your Computer
Printing
184
185
187
188
222 Power conservation
218
223 Virtual memory
228
Quick Reference
Appendix C Map
Radio and television interference
Xiii
Page
How to Use This Book
Welcome to PowerBook Duo
Page
Setting Up Your PowerBook Duo
Setting Up Your PowerBook Duo
Setting up the computer
Plug in the power adapter
Open the display
Slide the latch to the right and lift up the display
Power On key
Turn on the computer
Nothing happened when you pressed the Power On key
Power button
What to do next
You see a blinking question mark icon on the screen
Adjust the screen brightness and contrast controls
Press the Power On key above the keyboard
Learning the basics
Before you begin
Starting the tour
Continues
Now your screen should look like the following illustration
Page
Turning the PowerBook on and off
To turn the PowerBook off
Conserve power when you won’t be using it for several hours
Off
To put the PowerBook to sleep
When the PowerBook is in sleep, it draws enough power
Sleep
Automatic sleep
To turn the PowerBook Duo on
When the PowerBook is on, you can do your work
If the computer is off, press the Power On key
On/off summary
When you turn on your computer
Restarting a computer that’s already on
Restarting a computer that can’t be turned on normally
If you have a floppy disk drive, restart from a floppy disk
± Warning
Do not use the computer in or near water
Do not drop or jar the computer
Do not use the computer in wet or dusty environments
Do not touch the screen with any sharp or pointed objects
Health-related information about computer use
Musculoskeletal discomfort
Chair
Eye fatigue
Arranging your work area and equipment
This
Keyboard and trackball
Change hand positions often to avoid fatigue
Built-in display
Contrast Brightness Setting Up Your PowerBook Duo
Mouse
External monitor
Avoiding fatigue
Page
Working on the Desktop
Use the trackball
Point
Click
Press
Drag
Choose a command
Telling the PowerBook to do something involves two steps
Dots, indicating that it has been opened
Open an icon
Click the startup hard disk icon to select it
Look at the contents of a window
Continues
Size box Working on the Desktop
Make a window larger or smaller
Active window
Zoom box
Click the zoom box near the right end of the title bar
Click the zoom box again
Move the hidden contents of a window into view
Horizontal scroll bar
Scroll arrow
Close a window
Click the close box
Scroll box
Close box
Title bar
Move a window
Point to the title bar of the active Macintosh HD window
What’s on the desktop?
Icons represent containers
Working on the Desktop
Windows let you see what’s inside containers
Menus offer you choices
Windows let you see what’s inside all these containers
Memo
Modifier keys
Modifier keys
Arrow keys
Page
Make sure that your computer is on
How to switch between programs
Why it’s important to save your work, and how to save it
Open a program
Open the TeachText icon
TeachText menus
Creating and Changing a Document
Create a document
Save your work
You will be changing this text later in this chapter
Choose Save from the File menu
Click Save
Switch programs
Type Opening Lines
Here is another way to make a program active
Close a document
Close the Opening Lines window
Because most Macintosh programs work in similar ways
Open a document
Next step describes a different way to open an icon
Change a document
Now you’re ready to change the text
Click the trackball button once
With people selected, type the words human beings
Now you’ll rearrange some text
Save your work so far
Save regularly, and save often
Make more changes
Taking a shortcut
With each other selected, type one another
Quit a program
With togetherness selected, type brotherhood
Make a copy of a document
Click the Opening Lines icon to select it
To use memory
Quitting a program Prompts you to save your work
Change the name of an icon
Choose Duplicate from the File menu
Pressing Return saves the new name
Use the Trash
Press the Return key
Open the Trash icon
Choose Empty Trash from the Special menu
Click OK
Close the Trash window by clicking its close box
Learning More
Open the Battery desk accessory
Open the PowerBook control panel
To open the PowerBook control panel
Learning More About Your PowerBook
Open the PowerBook icon
Use Balloon Help
Turn on Balloon Help
Many Macintosh programs also have Balloon Help
Point to the File menu
Turn off Balloon Help
Click your hard disk icon to select it
Second hole
Using floppy disks
Double-sided 800K disk
Floppy disks and hard disks
Start learning how to use your application programs
Use Part III of this book
Inserting a floppy disk
At this point, you could
Page
Setting Up Your Programs
Before you install
Installing system software
Before you install, reinstall, or update system software
Installer program opens automatically
Restart your PowerBook
Easy Install dialog box appears
Click the Customize button
Installing customized system software
Easy Install dialog box appears
Click Install
Starting up with a floppy disk
There are other ways to copy programs onto your hard disk
Installing your programs
Installing programs without a floppy disk drive
Checking for computer viruses
Switching programs
Finding out what programs are open
Hiding and showing windows on the desktop
Open programs
Close the Info window
Preferred size must always be larger than Minimum size
Using the Scrapbook
Storing items in the Scrapbook
Copying items from the Scrapbook
Deleting items from the Scrapbook
Using a RAM disk
Remember a few precautions if you use a RAM disk
Creating a RAM disk
Click the On button below the words RAM disk
Erasing a RAM disk
Resizing or removing a RAM disk
Choose Restart from the Special menu
Drag the items you want to the RAM disk icon
Create a RAM disk
Install a minimal System Folder on the RAM disk
Making a RAM disk the startup disk
Page
Power Management
Power sources
Monitoring the battery charge level
Using the Battery desk accessory
Power Management
Lightning bolt icon
Responding to low-power messages
What you should do
What you should know
Lever
Recharging the battery
Plug in the power adapter as shown
Recharging in the computer
There are two ways to recharge
Recharging in a recharger
To recharge a battery, follow these steps
Battery + hours Batteries 41⁄2 hours
Lights on the recharger indicate the following
Table shows approximate recharging times for fully
Recharging in both the computer and a recharger
Removing or replacing the battery
Door is physically attached to the battery
Replacement batteries come with a door attached
Save your work, and then choose Sleep from the Special menu
Maximizing battery life and work time
Close the battery door by pushing it back into place
Replacing the backup batteries
Disposing of dead batteries
Reconditioning the battery
To recondition a battery, follow these steps
Click Quit to exit the Battery Reconditioning application
Ways to conserve battery power
Maximizing work time
Adjusting the battery conservation settings
Drag the slider to the setting you want
Close the PowerBook control panel
Easiest approach
System Hard disk
Using the Custom options
More about automatic sleep and screen dimming
To set the time sliders
Battery Conservation settings
Processor cycling
Processor speed
To slow the processor speed, follow these steps
Power Conservation
To turn power conservation back to automatic, click Auto
Click the Custom button
Drag the slider of the times you want to change
105
Preparing a new disk for use
Initializing a hard disk
Hard disk’s Scsi ID number Hard disk’s name
Using Disks
Click Initialize Click Init to initialize the hard disk
Initializing a floppy disk
Click Erase
Third message asks you to name the disk
Type a name for the disk
Click the icon of the disk you want to erase
Erasing a floppy disk
Designating a startup disk
Protecting the information on a disk
Scanning order for startup disks
Locking a floppy disk
Internal hard disk
Locking a file
If you can’t save files on a floppy disk
Backing up your files
Ejecting a disk
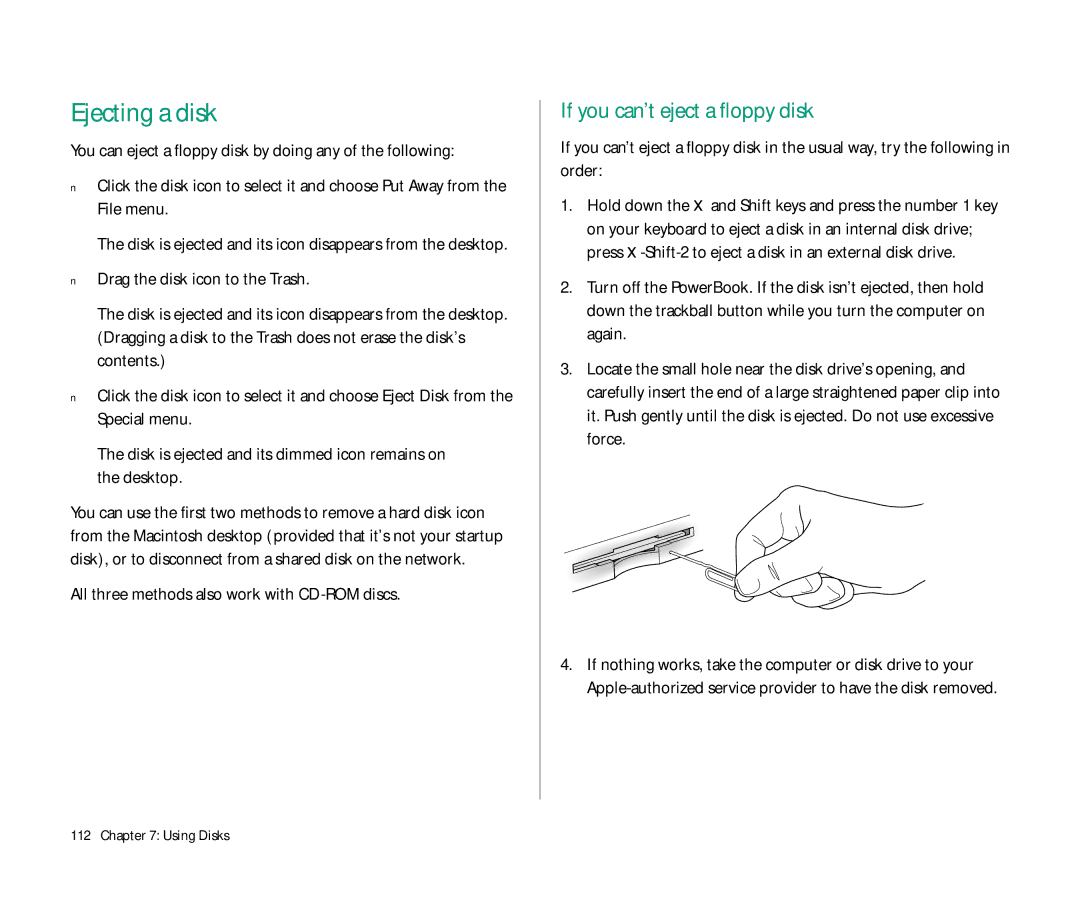
If you can’t eject a floppy disk
All three methods also work with CD-ROM discs
Disk is ejected and its icon disappears from the desktop
Testing and repairing disks
Hard disk precautions
Caring for disks
If a hard disk icon doesn’t appear
Using Disk First Aid
Click Open
For assistance if necessary
Testing a hard disk
Open the Apple HD SC Setup icon
Straightening up your files
Using folders to organize your files
Creating and naming folders
Choose New Folder from the File menu
Type a name for the folder and press Return
Filing documents when you save them
Making items easier to find
Creating an alias
Uses for aliases
Choose Make Alias from the File menu
Installing an item in the Apple menu
Moving an item to the desktop
Locating the original of an alias
Click the Find Original button
Finding an item
Finding an item by name
Choose Find from the File menu
Click the Find button
Finding an item using other criteria
Search Type text or set
Date here One at a time
Pop-up menu
Location for the search
List view
Outline
Folders Organizing Your Files
Items found are shown highlighted in an outline view
Ways to use the Find command
Finding items that meet two criteria
Creating a template or stationery
Using the Info window
Get Info command displays information about a selected item
Getting information about your files
File’s Info window View menu
Type of list displayed is underlined
Using the View menu
Assigning a label to a file
On another hard disk
Tips on transferring files
On floppy disks
Page
Setting the beep sound
131
Installing a sound
Drag the slider up or down to set the volume
Click the beep sound that you want your computer to use
Close the Sound control panel
Click the icon of the sound input device you want to use
Removing a sound
Recording sounds
Click the Add button
Get ready to record, then click the Record button
Displaying colors or grays
Click the Grays or the Colors button
Changing the highlight color or gray
Changing the color of window borders
Changing the background pattern
Assigning a color to an icon
To save the new pattern, double-click the sample pattern
Close the control panel
Sample pattern Color bar for selecting colors or grays
Click the color you want to change. a dialog box appears
To change a color, click it
Using more than one monitor
You make these adjustments in the Monitors control panel
Wheel
Gray you want
Using a second monitor for presentations
Drag the icons to approximate the positions of your monitors
Magnifying the screen image
CloseView control panel
Inverts
Adapting Your Computer to Your Own Use
145
Installing an item in the Apple menu
Installing files in the System Folder
Specifying which items you want opened at startup
To have a program or a document open automatically when
Removing files from the System Folder
Setting the time and date
Labels Colors
Setting a time for the Alarm Clock to go off
Choose Alarm Clock from the Apple K menu
Turning the alarm off
Click the close box to close the Alarm Clock
Icon showing ringing alarm
Changing time and date formats
Click OK to close the control panel
Changing the date format
Dialog box that appears, make the changes you want
Changing the time format
Make the changes you want
Type the currency symbol here
Make the changes that you want Close the control panel
Adjusting the way the trackball or mouse works
Click the double-clicking speed you want
Adjusting the way the keyboard works
Close the Keyboard control panel
Adjusting the keyboard for very slow typing
Making keyboard shortcuts easier to type
Modifier
Sticky Keys Key has been
Adjusting the blinking of a menu item
Click the button for the blinking rate you want
Changing the way the contents of windows appear
Changing an icon
Select the picture you want to use for the icon
Turning off the Empty Trash warning
You can turn off this warning in the Trash’s Info box
Managing memory
Checking memory use
Making the most of your memory
Remember the following tips on memory management
Adjusting the disk cache
Using hard disk space as memory
Turning on 32-bit addressing
165
Before you print
Choosing a printer
If your printer is connected directly to your computer
If your printer is connected over a network
Close the Chooser window
Printing
Choose Chooser from the Apple K menu
Click the icon of the printer you want to use
Close the Chooser
Your computer is connected to a
Selecting Page Setup options
Original’s size To the printed image
Updating printer software on networked computers
Make sure that the hard disk indicated is the correct one
Printing your work
Choose Print from the File menu
Printer software available
Paper-feed
Printing the contents of a window or the desktop
Make sure that the printer is turned on and warmed up
Solutions to common printing problems
Check the cable connections to the printer
Controlling background printing
PrintMonitor window
Working with fonts
Outline fonts and bitmap fonts
Installing fonts
Locate and open the LaserWriter Font Utility icon
Removing fonts
Transferring fonts to a LaserWriter printer
To the printer
Choose Download Fonts from the File menu
Fonts you added are listed in the Font Utility dialog box
Finding out about available fonts
Other ways to use the LaserWriter Font Utility
Initializing a hard disk attached to a printer
Click Initialize
Restarting a LaserWriter printer
Turning the printer’s start page on or off
Transferring a PostScript file to a LaserWriter
Type a name for the log, and then click Save
What networking offers
181
Setting up your computer on a network
Using Your Computer on a Network
Connecting to a network
Turning on AppleTalk
Printer port Icon
AppleTalk must be active before you can use a network
Close the Sharing Setup control panel
Naming your computer and its owner
Connecting to a shared disk
AppleShare icon
Capitalization does not need to match
Click the name of the computer you want to use
Click OK Click Guest or Registered User
Icon of the shared disk appears on your desktop
Disconnecting from a shared disk
Click the name of a shared disk to select it
Connect to a shared disk
Connecting quickly to a shared disk
Connecting automatically when you start up
Close the AutoRemounter control panel
Reconnecting a PowerBook to shared disks
Click OK Close the Chooser
Changing your password
Creating a new folder on another computer
Giving folder ownership to someone else
Bullet appears for each letter you type
Click OK Click OK in the dialog box that appears
User or group that you named assumes ownership immediately
Sharing your own files
How file sharing works
Turning file sharing on
Section labeled File Sharing, click the Start button
Close the window and click Save in the box that appears
Turning on guest access
Open the Guest icon
Selecting a folder or disk to share
Close the window and click Save in the dialog box
Any shared folder or disk can be made private again
Naming a registered user
Taking back a shared folder or disk
Setting a registered user’s password
Type a password in the User Password box, then press Tab
Type the name of a person you want to register
To register more users, repeat steps 2
Naming a group of users
Seeing who’s in a group
You don’t need to include the Guest icon in any group
To see the names of all group members, open the group icon
Selecting a user or group to share a folder or disk
Remove the X marks in this row
To deny access to guests, open the Guest icon
Removing a user from a group
Removing a user or group from your list of registered users
Giving away ownership of a folder or disk on your computer
You cannot throw away the Guest icon or the owner icon
To turn file sharing off immediately, type the number
Turning file sharing off
Click OK to confirm that you want to change ownership
Disconnecting someone who is connected to your computer
Monitoring file-sharing activity
Gaining access to your computer from another computer
Changing your password
Using access privileges
Understanding access privileges
See Files allows people to see, open, and copy files
See Folders allows people to see, open, and copy folders
To prevent the folder from being changed, place an
Select a folder or disk Choose Sharing from the File menu
Choose a registered user or group to share the item with
Access privilege strategies
Working with privileges that others have set
Icon Meaning
Checking your access privileges
Linking programs
Linking to a program on another computer
You can only link to programs that are shared
Select the program you want to link to Click OK
Two programs are now linked
Then you make a program available for linking by sharing it
Disconnecting a program link
Turning program linking on
Selecting a program for linking
Allowing guests to link to your programs
Open the program
Click here to share this program
Naming specific users to link to your programs
Using the PowerBook Duo Dock
215
Duo Dock features
An internal 1.4 MB floppy disk drive
Scsi Video Sound ADB port Power
VGA monitors
Printer
Floppy
Setting up the Duo Dock
Place the dock on a hard, flat surface
Dock can hold a monitor weighing up to 100 lbs kg
Video port
Follow the instructions that came with the equipment
Dock ejects the computer
Inserting the PowerBook Duo into the Duo Dock
Dock won’t accept the computer
Turning on the Powerbook Duo System
Battery recharging
Power conservation
How to take advantage of the Duo Dock’s features
Your preferences
Virtual memory
Hard disks
Scsi devices
Modem
If you have system problems
Network
Using security features
Ejecting the PowerBook Duo from the Duo Dock
Unlock the dock if it is locked
Turn the key to the vertical unlocked position
Press the eject button
Useful shortcut
Dock doesn’t eject the computer
Getting ready
Installing a NuBus card
When the dock is locked, you can’t use the square hole
Installing the card
Power supply case
Pinch clip and then pull up
Lift the subassembly straight up to remove it
NuBus card guide Building a PowerBook Duo System
Hard disk drive Floppy disk drive
Next four steps describe how to insert the card
Don’t press the connectors together yet
Connector
Align connectors
Pin Slot
Hole
Your card is now installed
Gap
Tighten the screws you loosened in step
Using the PowerBook Duo MiniDock
Duo MiniDock features
Power adapter
Printer An external modem LocalTalk network
‚ Security slot
Power adapter comes with your PowerBook Duo
Setting up the Duo MiniDock
Place your equipment where you’ll be using it
MiniDock
Continues
More about modem and printer ports
Follow the instructions that came with the device
Shut down for access to all devices
Sleep for access to everything except Scsi devices
Before you dock
Don’t dock with the computer turned on
Make sure the PowerBook Duo is in sleep or shut down
Computer is not docked until the latch is pushed down
Making your external monitor the main monitor
Turning on the PowerBook Duo System
Power On key is marked with a triangle pointing left
Nothing happened when you tried to turn on the PowerBook Duo
System is on, but the external monitor is dark
Input devices
Working with a PowerBook Duo system
Your preferences
Monitors
Battery recharging
Power adapter
Hard disks
Virtual memory
If you have system problems
Removing the PowerBook Duo from the Duo MiniDock
Gently pull the PowerBook away from the minidock
Modem
Using the PowerBook Duo Floppy Adapter
Building a PowerBook Duo System
Page
Turning on the PowerBook Duo
Press the Power On key on your computer
Press the Power On key on your external keyboard
Trouble?
Floppy disk drive precautions
Other adapters
Remove the attached devices in any order
Eject any disk from the drive before closing the cover
Scsi port Scsi port icon
Using Scsi devices
Installing software
Setting Scsi ID numbers
Small hole gives you access to the ID number switch
ID number indicator ID number switch
Make sure the Scsi device is turned off
Checking that the Scsi chain is properly terminated
If you are attaching one Scsi device
If you are attaching more than one Scsi device
Scsi terminator
Connecting cables
Illustration shows where to add cable terminators
Repeat for each additional device you want to connect
If this Scsi device has an internal
Using your PowerBook Duo as a Scsi disk
Connecting your computer as a Scsi disk
Turn off any other devices in the Scsi chain
Turn on the PowerBook by pressing the Power On key
Simplifying the Scsi disk connection process
Don’t make any other connections yet
Change conflicting Scsi ID numbers if necessary
Disconnect the cables from the desktop Macintosh
Drawing battery power in Scsi disk mode
Quitting Scsi disk mode
Connecting a modem
Connect the modem to a power source and to the phone line
See the documentation that came with the modem
Make sure the modem is turned off
Connecting a printer
Click the External Modem button
External modem is ready to use
Printer port Printer port icon
Connecting sound input and output devices
Adding memory to your computer
Do not check your computer as baggage. Carry it with you
Traveling with the PowerBook
Travel, Storage and Service
Japan, Korea, the Philippines, Taiwan
Storing the PowerBook
Travel, Storage, and Service
Protecting the PowerBook Duo system from theft
Service and support
If the PowerBook malfunctions or is damaged
How to get help
Apple Computer, Inc Apple Canada, Inc Customer Relations
Mariani Avenue
Canada
800 268-7796/7637
For more information about Macintosh computers
Macintosh user groups
Technical information
Apple Technical Library
Assistance for hardware and software developers
International Fax
Double-click
Shift-click
Working with icons
Selecting icons
Working with windows
Opening an icon
Moving, copying, and renaming an icon
Making a window the active window
Scrolling through the contents of a window
Opening higher-level folder windows
Using the outline form in list views
Working with menus
Choosing an item from a menu
Choosing an item from a submenu
To choose an item in a submenu
Drag to the menu item so that the submenu appears
KeyAction Up, Down, Left
Troubleshooting
PowerBook Duo
Computer just stopped
Power
Battery is draining too fast
You started or restarted the computer after connecting it
Screen
There are ghost images or black dots on the screen
Trackball
Memory
Duo Dock
See for more information about the Duo Dock
Duo MiniDock
See for more information about the Duo MiniDock
Computer doesn’t recognize your Scsi devices
See for more information about working with Scsi devices
Disk drives and disks
Hard disk keeps stopping and starting again
Hard disk is full
You can’t delete a file
Printer may be turned off. Turn it on
Modems
Printers
Network printer keeps restarting
Networks
You can’t open a shared disk or folder
Application programs
Program won’t open
Letters only numbers Symbols aren’t affected
Command key Works in combination with
Command or in some programs canceling an
Outlined button
Appendix a Keyboard and Character Sets
Using Caps Lock
To turn Caps Lock on or off, press the Caps Lock key
Diacritical mark Key combination
Option-c
Page
Insert a blank disk into your floppy disk drive
Initializing a disk in MS-DOS format
Locate the Apple File Exchange icon and open it
Type a name for the disk, and then click OK
Appendix B Exchanging Disks and Files With MS-DOS Computers
Disk name
Converting files to and from MS-DOS format
Follow these steps to translate an MS-DOS or ProDOS file
Pull down the translation menu you want
Click Translate
Other file-conversion options
Page
Setting your location
Map
Comparing locations
Click the Set button
Your current location is indicated by a blinking cross
Appendix C Map
Finding a location
Adding or removing a location
Adding a location
Changing or removing a location
Click the Add City button
Accessing your computer from Another 204-205assigning
AC power source for running Computer
Categories of users
ADB port Duo Dock
Tips for 92 Using Battery Conservation slider 67
Turning off to make more memory available
Arrow keys 45, 280
Audio output devices
Battery Reconditioning application 97-98beep sound Setting
Chair, adjusting 22, 23 changing
Blinking question mark icon 6, 73 blink rates
Colors
Keyboard shortcuts and 58 commands
Custom View PowerBook control panel 67, 100
Another 204-205
AutoRemounter
Using Map Date & Time control panel 148-149
Dead batteries, disposal of 96 delays
Battery 66 Key Caps 178 Desktop
Easy Install 75
Ejecting the computer from 226-228, 287 features
Weight limit 218 ports
Double-sided floppy disks 69, 70. See also floppy disks
Fonts
Disconnecting
Video mirroring 248 ports ADB
Scsi 256, 263 sound output 268 video
Duplicate File menu 62
Troubleshooting File server. See shared disks
Accessing your computer from
Format 303-305File menu Close
Find Again 122 Get Info Changing an icon
Find File menu 122-125finding
MS-DOS or ProDOS format 301-302inserting
Folders
Printing font samples
Giving orders to your computer 32 grays Displaying
Grounding plug
Program linking
Duo Dock Giving away ownership of 201-202icon 43
Suitcases font families 175, 176 TeachText
Locking a file
Trash 15, 34, 44, 64 types of 42-44used in views
Initialize Printer’s Disk LaserWriter Font Utility
License agreement for software 78, 195 limited warranty 19
Linking
Duo MiniDock and 238
Disk Drive Macintosh HD icon
Microphone connecting 268 recording sounds
Weight limit Monitors control panel 135, 141-142 Mouse
Between
Memory
Registered users and groups 195-198network administrator
Giving commands NuBus cards
On power state Open File menu 33, 35, 38 opening
Icons
PrintMonitor
Paste Edit menu 56, 82
Personal LaserWriter SC 166 pointing Pop-up menus 279 ports
Floppy disk drive
To the Duo MiniDock 238, 239, 242 troubleshooting
Installer 74-77, 85, 169 installing
ProDOS format
Pulling down a menu 30 Put Away File menu 64, 112
Requirements for using a RAM disk
Using Scsi disk mode 263-264removing Battery
Question mark. See blinking question mark icon
Quit File menu
MiniDock 250 installing software for 256 overview
Repetitive stress injuries RSIs 21 replacing
LaserWriter
Ports 19
Selecting icons 29
Connecting your computer as a Scsi disk 17
Sharing File menu
Setting the beep sound 131-132Special menu
Disconnecting from a shared disk 187 RAM disk and 83
Shutdown state
Slow Keys
Using Scsi disk mode
Available
Television and radio reception, interference with
For computer 20
Chooser
Blinking icons
Duo Dock 220, 221, 224, 227
File sharing
Displaying window contents or list of items
Wall mount plug Warranty information 19, 281 windows
Ray machines at airports and your PowerBook
Waking the computer. See also turning on the computer
Infinite Loop Cupertino, California 408 030-4272-A TLX