38Section 5

Insert or Remove Your Sensor

Steps

Do This

3. End sensor session.

a. Press the RIGHT Option button twice to get to the


08:30A

Main menu.


b. Press the UP/DOWN Arrow button to highlight System.


c. Press the RIGHT Option button to select System.


Did You Remove


The Sensor?


d. Press the UP/DOWN Arrow button to highlight Status.

e.Press the RIGHT Option button to select Status.

No

Yes

f. Press the RIGHT Option button to select Removed Sensor.


g.Press the RIGHT Option button to select Yes. The system now knows you have removed the sensor. If you are going to replace your sensor now, continue to Step 4.

4. Reconnect the receiver to


the transmitter.

a. Place the receiver within 10 feet of the transmitter.


b. Press the RIGHT Option button twice to display the

System Menu

08:30A

Main Menu screen.


Reconnect


c. Use the UP/DOWN Arrow button to highlight System.


Data Upload


d. Press the RIGHT Option button (Select) to display the


Status


Link


System menu with Reconnect highlighted.


Set Date/Time


e. Press the RIGHT Option button (Select).


Main

Select


f. Wait for the receiver to beep. If it beeps:


• Twice – The system is connected.


• Three times – The system is not connected. Make sure


the battery in the transmitter is new and ensure that


the receiver and transmitter are linked (see Section 14).


Note: If the transmitter and receiver are connected


properly, the disconnect icon

will not appear on


the screen.


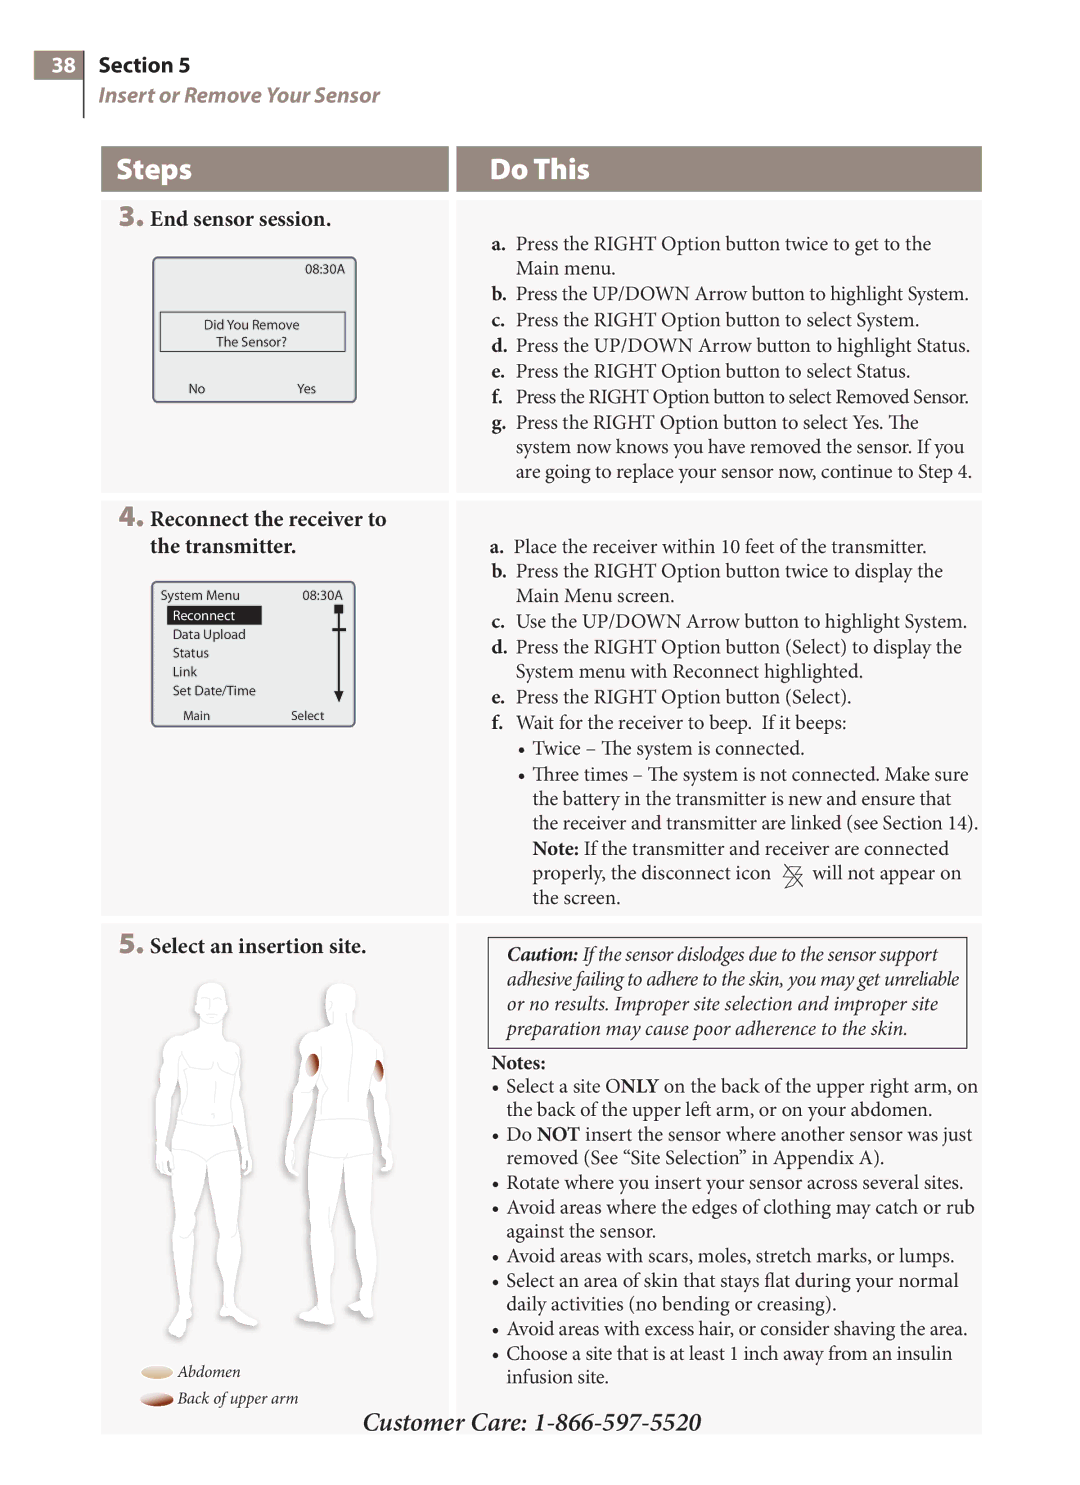
5. Select an insertion site.


Caution: If the sensor dislodges due to the sensor support


adhesive failing to adhere to the skin, you may get unreliable


or no results. Improper site selection and improper site


preparation may cause poor adherence to the skin.


Notes:


• Select a site ONLY on the back of the upper right arm, on


the back of the upper left arm, or on your abdomen.


• Do NOT insert the sensor where another sensor was just


removed (See “Site Selection” in Appendix A).


• Rotate where you insert your sensor across several sites.


• Avoid areas where the edges of clothing may catch or rub


against the sensor.


Avoid areas with scars, moles, stretch marks, or lumps.

Select an area of skin that stays flat during your normal

daily activities (no bending or creasing).

Avoid areas with excess hair, or consider shaving the area.

Choose a site that is at least 1 inch away from an insulin

Abdomen

infusion site.

Back of upper arm

Customer Care: 1-866-597-5520

Page 48
Image 48
Arkon PRT03831-xxx manual End sensor session, Reconnect the receiver to Transmitter, Select an insertion site

PRT03831-xxx specifications

The Arkon PRT03831-xxx is a highly sought-after mount designed for professional and personal use, renowned for its exceptional stability and versatility. This product is particularly favored among mobile professionals, content creators, and everyday consumers, thanks to its innovative design and advanced technologies.

One of the standout features of the Arkon PRT03831-xxx is its adjustable and flexible mounting system, which can securely hold a variety of devices including tablets, smartphones, and GPS units. This adaptability makes it ideal for any situation, whether you're navigating with a GPS, streaming a video on a tablet, or conducting a video conference on your smartphone.

The mount includes a patented locking mechanism that ensures your devices stay in place, even on bumpy roads or during sudden movements. This feature is critical for users who require constant accessibility without the worry of their devices becoming dislodged. Additionally, the mount offers 360-degree rotation capabilities, allowing users to easily switch between portrait and landscape orientations, enhancing usability and convenience.

In terms of build quality, the Arkon PRT03831-xxx is constructed with durable materials that withstand everyday wear and tear. It is designed to be lightweight yet sturdy, making it easy to transport without sacrificing strength. The mount's sleek aesthetic aligns with modern design trends, ensuring it complements the visual appeal of any environment.

Moreover, the Arkon PRT03831-xxx incorporates advanced technologies such as shock absorption and vibration resistance, further enhancing its reliability in various settings. This is especially beneficial for users in transit, ensuring that even in fast-moving vehicles, their devices remain protected and fully operational.

The installation process of the Arkon PRT03831-xxx is straightforward, requiring minimal tools and time. Users appreciate the user-friendly design, which allows for quick setup and adjustments to suit individual preferences.

Overall, the Arkon PRT03831-xxx stands out as an exemplary choice for anyone in need of a robust and adaptable mounting solution. Its blend of usability, durability, and advanced features makes it a reliable companion for work, travel, or leisure activities. Whether in a car, office, or home, this mount is designed to meet the diverse needs of its users with ease and efficiency.