Axis 540+/AXIS
Axis 540+/AXIS Network Print Servers
Regulatory Information
Table of Contents
Section Management and Configuration Using a Web browser
Advanced Installation using Axis NetPilot
Using Telnet Using Snmp Using Novell Utilities Section
Red Hat 7.3 SuSE 8.0
Section
About Axis Support Services
About this Manual
Supported Environments
Introduction
Product Overview
Package Contents
Adobe Acrobat Reader software
Axis Network Product CD
For Windows
For UNIX/Linux Click index.htm Mac OS
Physical Description Axis 540+
Axis
Backside label of print server
Windows-based printers
Configuration
Management
On page 87 for details
Features and Benefits
Quick overview
Basic Installation
Connect the Hardware
Follow these steps to make your printer network ready
Assignment
Assign an IP Address to the Print Server
Automatic IP address assignment
UNIX/Linux performed by editing the file /etc/bootptab
Using ARP Windows 98/NT Me/2000/XP/2003
Using Rarp UNIX/Linux
Open a Command Prompt and enter the following commands
Manual IP address assignment
Using ARP UNIX/Linux and Mac
Open a Terminal and enter the following commands
Using Axis IP JumpStarter
Click OK to save your settings
Making Network Printers available for printing on your PC
Installation Methods
According to your computer environment
Adding Printers in Windows
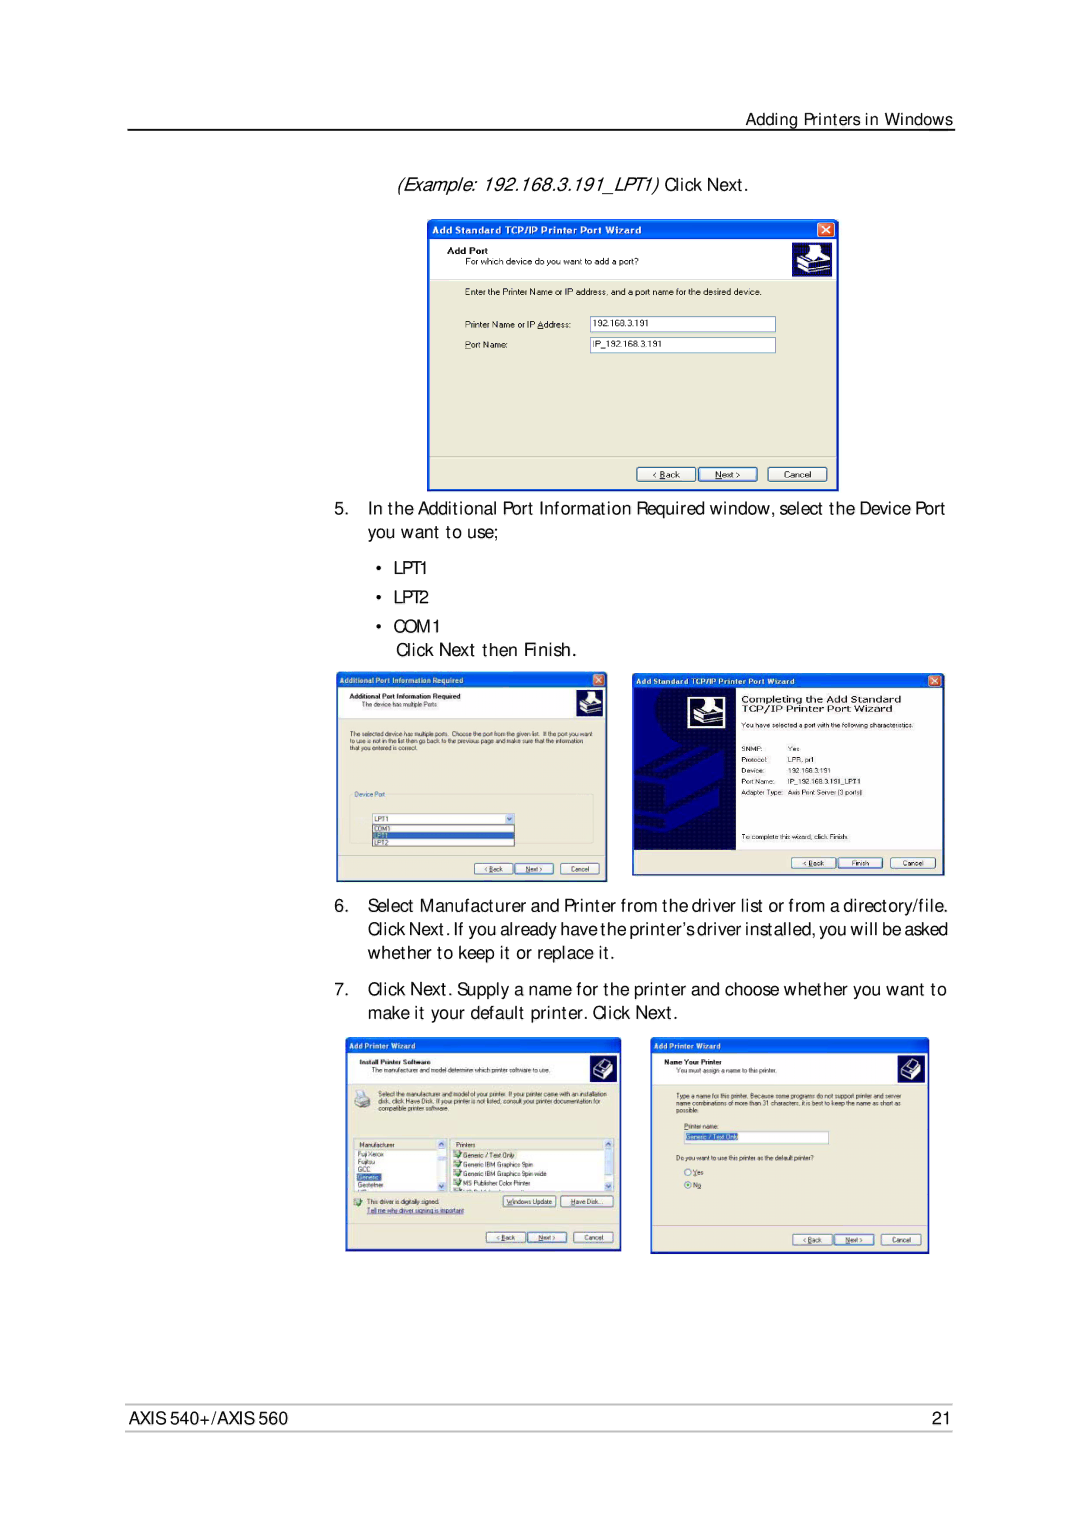
LPT1 LPT2
Windows 2000/Windows XP/Windows Server
Example 192.168.3.191LPT1 Click Next
Adding Printers in Windows
Add Printer Wizard. Click Next
Close Add/Remove Programs and the Control Panel
Select Protocols
Go to Start Settings Printers
Add TCP\IP Protocol
Add Microsoft TCP\IP Printing
Installing a Network
Printer Click Next
List, click Add Port
Overview
Axis Print Monitor Software
Server
Desired printing protocols are running on your client
Axis 540+/AXIS
Ports available
Parallel port Serial port Axis 540+
Axis
Close the Printer Ports window
Ports available Parallel port1 Serial port Axis 540+
Adding Printers in Windows
Example AX100086.LP1
Adding Printers in Windows
Adding Printers in Macintosh
Installation in Mac OS
Installation on MacOS 9.1 or older, using AppleTalk
Choosing a Printer
LaserWriter Printer Driver
Click the LaserWriter 8.0 icon
Bi-directional Support Verifying the Setup
Adding Printers in Macintosh
192.168.3.191
Write a text file containing the parameters you want to set
IPX/SPX
Setting Up NetWare
Setup using Ndps
Click OK
Select TCP/IP default or IPX as network protocol. Click Next
TCP/IP Network protocol
IP Address and Port, e.g 192.168.70.243 and LPT1
IPX Network protocol
400c 401c 402c
D7e1c200408c5ff6a6400c
When done, select your printer and click Finish
AXIS5FF66AIPX1
Log in as Admin
Setting Up NetWare
Ports available Parallel port Serial port Axis 540+
IPX Network protocol
D7e1c200408c5ff6a6 and LPT1
Workstation
Click Add. a list of available printers appears
Select Admin Logical Printers and the PR3 tab
Set the Physical Port parameter to LPT2 Click the OK button
Axis 540+/AXIS 101
102
Axis 540+/AXIS 103
Test Button
Supported Printers
Technical Specification
Supported Systems
Supported Protocols
Secure Management
Wired Network Attachments
Network
Management
Dimensions
Power Consumption
Safety
Environmental
Telnet
Index
Ndps 38
NDS NetWare Advanced installation Basic installation
Restart Setting up NetWare Snap-in for iPrint
Network Printer Parameter List 82, 103 password Ports
Pure IP Queue-based printing
Axis 540+/AXIS 109
Windows, adding printers