OmniView SMB KVM-over-IP Switch
User Manual
Table of Contents
Using the Switch from a Local Console
Table of Contents
Using the Switch from a Remote Console
Frequently Asked Questions
Package Contents
Introduction
section
Remote-Management Features
Overview
Firmware Updates
Other Features
Video Resolution
Overview
Server Interface Modules
Overview
Equipment Requirements
F1DP101A-AP
Overview
section
Cables
OmniView Daisy-Chain Cable
Keyboards
System Requirements
Operating-System OS Platforms
Mice
Back View
Unit Display Diagrams
Front View
Overview
Specifications
Overview
section
SMB Server Interface Module, PS/2
Overview
1.8 x 3.5 x 0.9 in. 46 x 89 x 23mm
SMB Server Interface Module, USB
SMB Server Interface Module, Legacy Sun
Overview
Where to place the Switch
Local Installation
Pre-Configuration
section
Local Installation
Cable-Distance Requirements for PS/2, USB, and Sun Servers
section
Step 1 Mounting the Switch
Local Installation
MAC Address Device Number
Step 2 Connecting the Console to the Switch
Local Installation
fCfZXc
Local Installation
2.3 Locate and connect a cable from your local area network to the RJ45 Ethernet port on the back of the Switch. Refer to diagram below
section
Step 3 Connecting Servers to the Switch PS/2 Connection
Local Installation
Local Installation
3.5 Power up your server
section
Step 3 Connecting Servers to the Switch USB Connection
Local Installation
Local Installation
3.4 Connect the Switch to the Server Interface Module using the included Belkin CAT5e Patch Cable or other CAT5 cable. Refer to diagram below. Your server should recognize your Server Interface Module and automatically install the HID USB driver if necessary
section
Step 3 Connecting Servers to the Switch Sun MiniDIN8 Connection
Local Installation
Local Installation
section
Step 4 Powering Up the Systems
Local Installation
Local Installation
Daisy-Chaining Multiple KVM Switches Optional
How to Assign a BANK Address
section
DIP SWITCH# SMB CAT5
BANK-DIP-Switch-Configuration Chart SMB CAT5 KVM Switches
Local Installation
BANK ADDRESS
section
Example of Daisy-Chain Configuration
Local Installation
X`jpX`e
Connecting the Primary and Secondary KVM Switches
Getting Started
Local Installation
Connecting the servers
Local Installation
section
Remote Installation
Step 1 Identifying the IP Address
Fig. 1 Login Page
Step 2 Logging into the Web Interface
Remote Installation
Password
Remote Installation
Fig. 2 Network-Configuration Page
Required TCP Ports
Step 3 Network Configuration
Device Name
Remote Installation
SNMP Settings
Remote Installation
Enable DHCP
Set a Static IP
Administrator
Step 4 User Settings
Remote Installation
section
View Only
Remote Installation
To add a new user
To edit a user
Remote Installation
section
To delete a user
Step 5 Switch Configuration
Remote Installation
Fig. 4 Switch-Configuration Page
Remote Installation
Installing new Switch-Definition Files SDFs
To specify and name servers
To install the SDF
To configure your serial device
Step 6 Serial Settings
Remote Installation
Fig. 5 Serial-Settings Page
Fig. 6 Security-Settings Page
Step 7 Security Settings
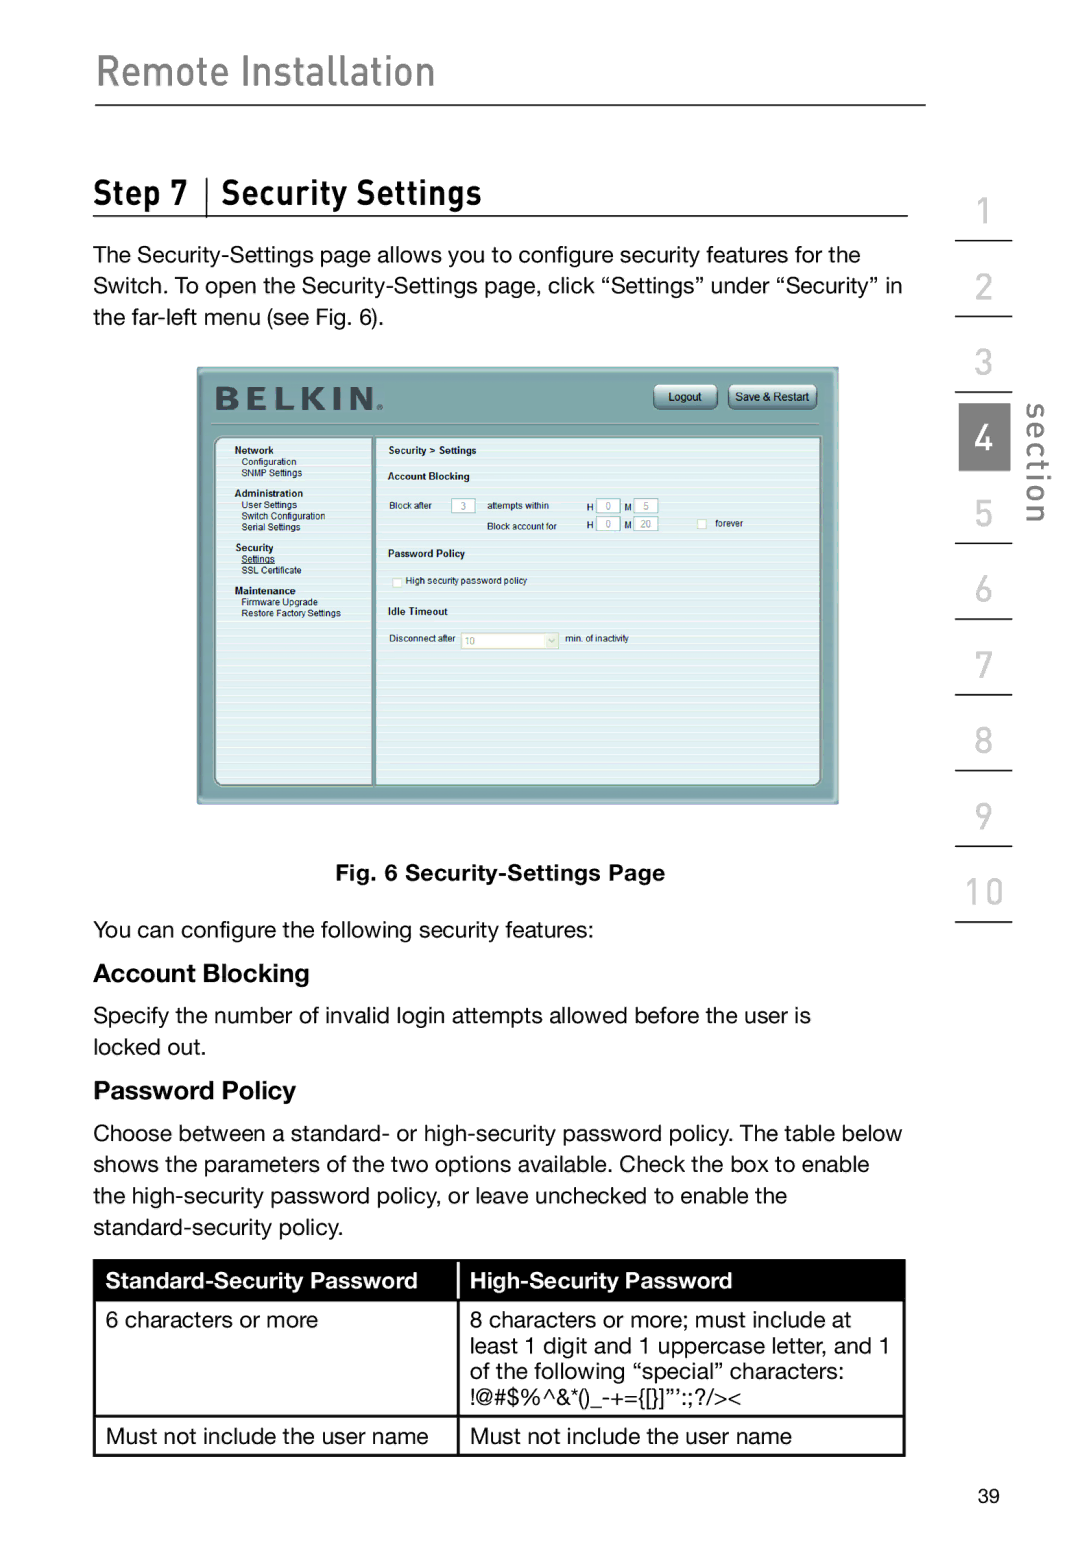
Remote Installation
Standard-Security Password
Remote Installation
Idle Timeout
SSL Certificate
To install an SSL certificate
To upgrade firmware
Maintenance
Firmware Upgrade
Remote Installation
To restore factory settings
Restore Factory Settings
Remote Installation
WARNING! Once data has been reset, it cannot be retrieved
To start a remote session
Using the Switch from a Remote Console
Starting a Remote Session
Fig. 10 Server-Access Dialog Box
To work in full-screen mode
Using the Switch from a Remote Console
Full-Screen Mode
Fig. 11 Example of Full-Screen Mode
section
Using the Drop-Down Bar
Using the Switch from a Remote Console
Fig. 12 Drop-Down Bar
To align mouse pointers
Mouse Configuration and Settings
Mouse-Pointer Alignment
Mouse-Pointer Calibration
Fig. 13 Mouse-Settings Box
Manual Settings
Using the Switch from a Remote Console
section
Using the Switch from a Remote Console
USB Option
Fig. 14 Mouse-Pointer Options Windows XP
To change the mouse-emulation settings
Advanced-Mouse Emulation
Using the Switch from a Remote Console
section
To add a keyboard sequence
Keyboard Configuration and Settings
To transmit a keyboard sequence
Using the Switch from a Remote Console
section
To record a keyboard sequence
Using the Switch from a Remote Console
Fig. 17 Add-Special-Key Box
Refresh
Video Configuration and Settings
Manual Video Adjust
Using the Switch from a Remote Console
To adjust the video automatically
Auto Video Adjust
Using the Switch from a Remote Console
Fig. 18 Manual Video-Adjust Bar
Using the Switch from a Remote Console
Performance Settings Bandwidth
To change the bandwidth settings
Fig. 19 Performance-Settings Box
Using the Switch from a Remote Console
Selecting a Server
To connect to a different server
section
Additional Features
Session Profile
Using the Switch from a Remote Console
Restoring Factory Defaults
To restore factory defaults
Safe-Mode Password
Using the Switch from a Local Console
Selecting a Server or BANK Using Hot Keys
Selecting a Server or BANK
Using the Switch from a Local Console
With a daisy-chain switch configuration, you can switch between BANKs KVM switches by pressing “Scroll Lock”, “Scroll Lock”, “Page Up”, to switch to the previous BANK. Press “Scroll Lock”, “Scroll Lock”, “Page Down”, to switch to the next BANK
section
Selecting a Server Using Port Selectors
Selecting a BANK Using Scroll Buttons
Using the Switch from a Remote Console
AutoScan Mode
Using the Switch from a Remote Console
section
On-Screen Display OSD
Main OSD-Menu Page
Using the Switch from a Remote Console
Command
Function/Help Page
Using the Switch from a Remote Console
section
Scan
Function/Help-Page Keyboard Commands
Admin Password
Scan Time
Hot Key
Timeout
Monitor-DDC2 Feature
Using the Switch from a Remote Console
Command
Hot-Key-Command Shortcuts
Using the Switch from a Remote Console
Function
Volume Up
Sun Combo Keys
Using the Switch from a Remote Console
Volume Down
Updating Firmware
Using the Switch from a Remote Console
Does the Switch support Microsoft IntelliMouse?
Frequently Asked Questions
What operating systems does the Switch support?
How does the Switch allow the user to switch between ports?
What are the supported video resolutions and refresh rates?
Frequently Asked Questions
Does the Switch support Linux?
Hz 
General
Troubleshooting
Local Console
Video
Mouse
Troubleshooting
Keyboard
The mouse is lost when I switch to a different port
Troubleshooting
section
Remote Console
Troubleshooting
The Remote console login page will not display on my browser
section
Troubleshooting
I forgot my password. How can I reset the RIPM to factory defaults?
The video quality is bad and/or grainy
Glossary
KVM Literally “Keyboard Video Mouse”, this term refers to technology that allows two or more computers to be controlled by one keyboard, video monitor, and mouse some switches that use KVM technology enable sharing of other peripherals such as audio speakers, microphones, and printers
Glossary
section
Declaration of Conformity with FCC Rules
Information
FCC Statement
for Electromagnetic Compatibility
Information
How to get service
How state law relates to the warranty
section
Information
section
Belkin B.V
OmniView SMB KVM-over-IP Switch
Belkin Tech Support
Belkin International, Inc