Bowflex Ultimate Home Gym
Table of Contents
Important Safety Precautions
This machine is meant for individual consumer use
Ellington Darden
Getting to Know Your Machine
Bowflex Ultimate Home Gym Parts Reference Guide
With all of the fitness choices available today, we
Using Your Machine
Power Rod Resistance
Workout Bench
Using Your Machine
How to Mount the Bowflex Ultimate Home Gym Incline Bench
Free Sliding
Or any exercise where your palm is facing down
Using the Bowflex Ultimate Home Gym Hand Grips
Using the Bowflex Ultimate Home Gym Leg Press Belt
Specifications subject to change
Squat Harness Adjustment Buckle Squat Cables Rod Cables
Position
Build back and shoulder muscles quickly with this
Remove the knobs from
Maintenance & Care of Your Bowflex Ultimate Home Gym
Folding & Moving Your Bowflex Ultimate Home Gym
Bowflex Ultimate Home Gym Lat Pulldown
Adjustable Pulley System
Bowflex Ultimate Home Gym Leg Extension/Leg Curl Attachment
Low Pulley/Squat Station
Defining Your Goals
Designing Your Own Program
Defining Your Goals
Reaching Your Goals
Exercising Properly
Advanced General Conditioning
Workouts
Minute Better Body Workout
Frequency 3 Days Per Week M-W-F Time About 20 Minutes
Frequency 4 Days Per Week M-T-TH-F Time About 20 Minutes
Workouts
Minute Upper/lower Body
Body Building
Frequency 3 Days On, 1 Day Off Time About 45-60 Minutes
Circuit Training Anaerobic/Cardiovascular
Frequency 2-3 Times Per Week Time About 20-45 Minutes
True Aerobic Circuit Training
Frequency 2-3 Times Per Week Time About 20-60 Minutes
Strength Training
Frequency 3 Days Per Week M-W-F Time About 45-60 Minutes
Motion
Chest Exercises
Starting Position
Optional motions
Chest Exercises
If at all
Pulley position Narrow only Starting position
Pulley position Wide only
Flat Barbell Bench Press
Near extension
Starting position Key points
Shoulder Exercises
Starting position
Shoulder Exercises
Pulley position Narrow
Sit up straight and maintain erect posture
Scapular Protraction elbow stabilized
Pulley position Narrow Starting position
Pulley position Wide or narrow Starting position
Pulley position Wide or narrow
Scapular Depression
Shoulder Rotator Cuff Internal Rotation
Control the motion during the entire exercise
Shoulder Rotator Cuff External Rotation
Shoulder Extension Elbows Stabilized
Barbell Shoulder Shrug Scapular Elevation
Pulley position Narrow or wide
Lying Front Shoulder Raise Shoulder Flexion elbow stabilized
Slowly return to the starting position, arms by your sides
Pulley position Low pulleys only Key points
Military Press
Back of the upper arms Undue stress on the joint capsule
Rods, directly over the low pulleys, knees bent
Wide Pulldowns Shoulder Adduction with elbow flexion
Back Exercises
Lying Shoulder Pullover Shoulder Extension elbow stabilized
Pulley position Lat tower Starting position
Narrow Pulldowns Shoulder Extension with elbow flexion
Back Exercises
Lying Lat Pulldowns
Pulley position Wide
Low Back Extension Seated with hip extension
Alternate motion
Seated Lat Rows Shoulder Extension with elbow flexion
Scapular Retraction
Reverse Grip Pulldowns Shoulder Extension with elbow flexion
Pulley position Low pulley
Barbell Bent Over Row
Pulley position Lat tower
French Press Elbow Extension Overhead
Arm Exercises
Lying Triceps Extension Elbow Extension
Triceps Pushdown Elbow Extension
Arm Exercises
Lying 45 Degree Triceps Extension Elbow Extension
Rope Pushdowns Elbow Extension
Single-Arm Pushdown Elbow Extension
Cross Triceps Extension
Triceps Kickback
Keep elbows at your sides Keep wrists straight
Seated Triceps Extension Elbow Extension
Standing Biceps Curl Elbow Flexion in supination
Seated position
Seated Wrist Extension
Seated Biceps Curl Elbow Flexion in supination
Standing Wrist Extension
Seated Wrist Curl
Standing Wrist Curl
Reverse Curl Elbow Flexion in pronation
Position
Lying Biceps Curl Elbow Flexion in supination
Reverse Grip Barbell Curls Elbow Flexion in pronation
Pulley position Low pulley Starting position
Barbell Curls Elbow Flexion in supination
Seated Resisted Oblique Crunch Spinal Flexion with Rotation
Abdominal Exercises
Seated Resisted Abdominal Crunch Spinal Flexion
Diagonals
Resisted Reverse Crunch Spinal Flexion
Abdominal Exercises
Reverse Crunch Spinal Flexion
Pulley position None
Trunk Rotation
Keep both elbows slightly straight
Leg Curl
Leg Exercises
Leg Extension
Leg Press Hip Extension and Knee Extension
Leg Exercises
Squat Knee Extension, Hip Extension, Ankle Plantarflexion
Remove the bench and unlock the rowing seat
Lying Prone Leg Curl Knee flexion
Standing Hip Extension Knee stabilized in flexion
Starting position Remove the bench
Standing Hip Flexion With knee flexion
Seated Leg Curl Knee Flexion with Hip Flexion
Remove the bench, unlock the seat
Lying Leg Extension Knee Flexion with Hip Flexion
Pulley position Narrow Key points
This area do it to strengthen and build these muscles
Standing Leg Kickback Hip extension and knee extension
Kneeling Leg Kickback Hip extension and knee extension
Pulley position Wide Starting position
Standing Hip Abduction
Seated Hip Adduction
Keep your spine straight and your hips level
Seated Hip Abduction
Ankle Inversion
Ankle Eversion
Deadlift
Stiff-Leg Deadlift Hip extension
Page
Bowflex Body Leanness Program
Personal Guarantee From Dr. Ellington Darden
Introduction65
Bowflex Body Leanness Program
Circumference of Body Parts
Body Weight
Measurements
Women Measure
Abdomen
Measurements67
Skinfold Measurements
Women Men
Using Calipers When Measuring Skinfolds
Optional Picture Taking
Suprailium Chest Triceps Abdomen Thigh Total
Percent Body-Fat
To Use The Nomogram
Age in Years Female Male
Calculating Lean Body Mass
Body Weight
Body Fat Weight Lean-Body Weight
For Example
Your Results Summary Sheet
Measurements Before After
Guidelines Week 3&4
Workouts
Guidelines Week 1&2
Guidelines Week 5&6
Avoid Too Much Stress
Follow a Carbohydrate-Rich, Descending-Calorie Eating Plan
Keep Menus Simple and Food Substitutions to a Minimum
Superhydrate Your System
Week 5
Week 1
Week 3
Eating Plan US Measurements
Eating Plan Metric Measurements
Frozen Microwave Dinner Choose one meal
Shopping List
Is it possible to drink too much water?
May I have dinner for lunch and lunch for dinner?
Yes
Is bottled water better than tap water?
Larger muscles will make your body firmer and more shapely
Your partner should be similar to you in age and condition
Eat smaller meals more frequently
Maintenance Routine
Adhere to a carbohydrate-rich, moderate-calorie eating plan
Train on Bowflex at least twice a week
Sets Reps Resistance
Sets
Reps Resistance
Muscle Chart
Rev AA
Page
Page
Assembly Instructions
If so equipped
Cable Leg Extension Adjustable Seat Pulley System
Bowflex Ultimate Parts Reference Guide
Tools You Will Need
Basic Assembly Principles
Before You Start
Before You Assemble
Bowflex Ultimate Parts List
Bowflex Ultimate Hardware List
Assembling Your Bowflex Ultimate
Components for this step Are in Box 3 and Box
Squat Platform & Frame
At this time
Foot Rest
Rear LEG
Components for this Step are in Box
Seat Rail Installation
Seat Installation
Item #44
Rail END CAP INSTALLATION
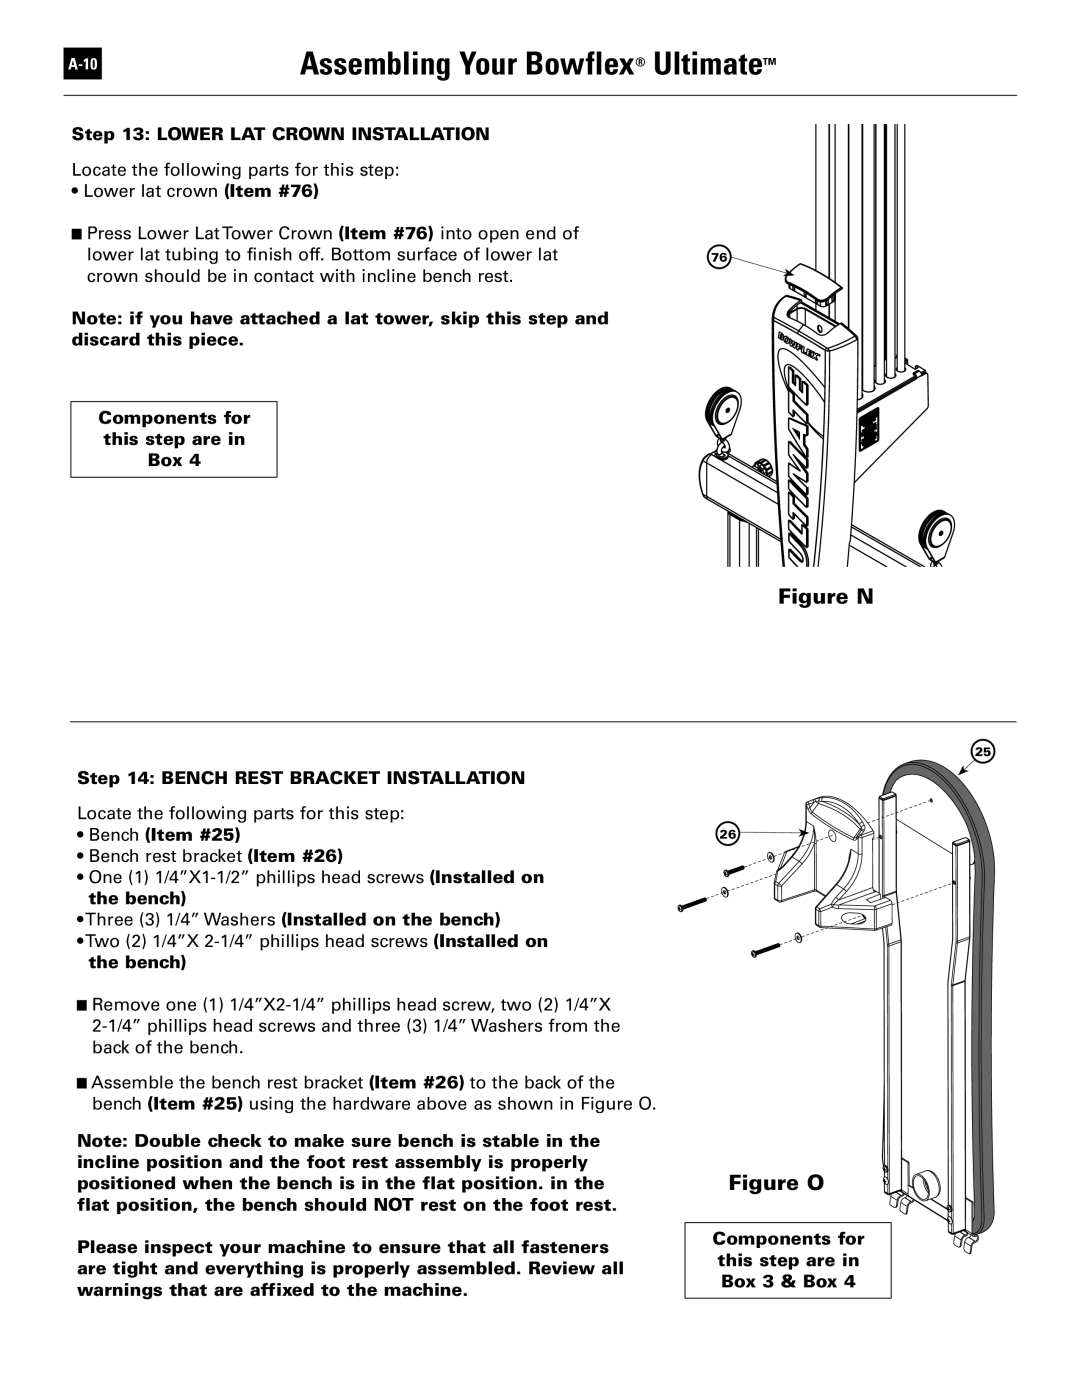
Incline Bench Rest Installation
Figure L
Bench Item #25
Bench Rest Bracket Installation
Three 3 1/4 Washers Installed on the bench
Components for this step are in Box 3 & Box
Bowflex Ultimate Lat Assembly Parts Reference Guide
Lat Assembly
LAT Tower Installation
Assembling Your Bowflex Ultimate Lat Assembly
LAT Tower Assembly
Please go to on To finish assembly
Bowflex Ultimate Leg Assembly Parts Reference Guide
Leg Assembly
LEG Extension Foot Tube
Assembling Your Bowflex Ultimate Leg Assembly
LEG Assembly Extension Tube
Components for this step are Leg Extension Box
This step are in Leg
LEG Extension Seat Installation
Installing the LEG Extension Components for
Locate the following parts Extension Box
Installing the LEG Extension Attachment
Assembling Your Bowflex T-BAR
Call to Order
Week Satisfaction Guarantee
Bowflex Ultimate Warranty Registration Card
Mrs . Ms . Miss Customer ID from Invoice
Please fold over and tape before mailing
Warranty Information
Rev AA