Repair Manuals for other
Briggs & ledooStratton
Quality Starts With A Master Service Technician
Single Cylinder OHV Air-CooledEngines
All rights reserved
FORWARD
Copyright 2009 Briggs & Stratton Corporation
Engine Models
This Engine Repair Manual includes the following
SECTION 2 - Troubleshooting
1 2 3 4 5 6 7 8 9 10 11 12
SECTION 1 - Safety, Maintenance and Adjustments
Page
SECTION 1 - SAFETY, MAINTENANCE, AND ADJUSTMENTS
Hazard Symbols and Meanings
ENGINE SAFETY
Signal Words in Safety Messages
When testing for spark
Before performing adjustments or repairs
Explosion and fire could result
YOUR KEY TO THE WORLD’S FINEST ENGINES
BRIGGS & STRATTON NUMERICAL IDENTIFICATION SYSTEM
BRIGGS & STRATTON MODEL NUMBERING SYSTEM
High Altitude
ENGINE MAINTENANCE
Fuel and Oil Recommendations
Fuel must meet these requirements
Every 50 Hours or Annually
Maintenance Chart First 5 Hours
Every 8 Hours or Daily
Every 25 Hours or Annually
Assemble Flywheel Brake
Inspect Brake and Switches
Air Filter
Combustion Chamber
Figure Figure Figure
Figure Figure Figure
Inspection
Install
Snow Hood
Remove
NOTICE
Oil and Oil Filter
Spark Plug
NOTICE
Cooling System
Horizontal Models 110000, 120000,
ENGINE ADJUSTMENTS
Remote Controls
Remote Control Wire Travel
2.Move throttle lever to fast position
Top No Load Adjustment Vertical Models 97700,
Governor Adjustments
Static Adjustment
2.Place throttle in FAST position
Final Adjustment All Models
Initial Adjustment All Models
Adjust Valve Clearance
Vertical Models 110000, 120000 Early Production
SECTION 2 - TROUBLESHOOTING
OIL GARD SYSTEMS - - - - - - - - - - - - - - - - - - - - - - - - - - - - - - - - - - - - - - - - - - - - - - - - - - - - - - - - - - - - - - - - - - 49 ENGINE WILL NOT START - - - - - - - - - - - - - - - - - - - - - - - - - - - - - - - - - - - - - - - - - - - - - - - - - - - - - - - - - - - - - - 49 ENGINE STARTS AND RUNS WITH LOW OIL
Engine Running
SYSTEMS CHECK
1 Check Ignition
Engine Stopped
Solenoid Plunger Test
Testing Fuel Shut Off Solenoid
Solenoid Wiring Test
2 Check Carburetion
Possible Causes for Poor Compression
3 Check Compression
DC Shunt
ELECTRICAL SYSTEMS
Equipment Used for Testing
Digital Multimeter
Possible Causes
Alternator System Diagnosis
Complaint
Alternator Identification
4.Dual Circuit Figure
1.0.5 Amp DC Only Figure
2.14 Volt AC Only Figure
3.3 Amp DC Only Figure
8.20 Amp DC Figure
6.5/9 Amp DC Figure
7.10/16 Amp DC Figure
3-AmpDC Only Alternator
Testing Alternator Output
Flywheel Identification
5 Amp DC Only Alternator
Test Diode
14-VoltAC Alternator
Test Alternator Output-DC
Dual Circuit Alternator
Test Alternator Output
Test Alternator Output-AC
Test Diode
Tri-CircuitAlternator
Test Diode
Charging Circuit Test RED Wire
Lighting Circuit Test WHITE Wire
Test Alternator Output
Test Regulator-Rectifier
5 & 9 Amp DC Regulated Alternator
Test Alternator Output
Test Regulator - Rectifier
10 & 16 Amp DC Regulated Alternator
Test Alternator Output
receptacle
2.Install shunt to negative -battery terminal
Test Alternator Output
DC Output Charging Wire Test
20 Amp DC Regulated Alternator
NOTICE
5.Rotate selector to DC volts position
Figure
Model Series 97700, 99700, 110000,
ELECTRIC STARTERS
SYSTEM 3, SYSTEM
Test Starter Motor
Test Interlock Switch
Test Starter Motor
Test Interlock Switch Wiring
12 Volt DC Starter Motor
Test Solenoid
120-VoltAC Starter Motor
Model Series 120000, 150000, 200000,
Charging Battery
BATTERIES
Battery and Cable Recommendations
Battery Installation
Testing Battery
Engine Won’t Stop
EQUIPMENT AFFECTING ENGINE OPERATION
OIL GARD SYSTEMS
Hard Starting or Will Not Start
Engine Starts and Runs With Low Oil
On/Off Switch Light Does Not Flash
SECTION 3 - EXHAUST SYSTEMS
Remove Guard and Muffler
MUFFLER SERVICE
Spark Arresters
Horizontal Models 110000, 120000,
Inspect Exhaust System
Never reinstall broken or damaged components
Install Muffler and Guard
3.Remove muffler support screws A, Figure
Horizontal Models 200000,
Shown is a typical muffler application Figure
Remove Guard and Muffler
All exhaust system components must be inspected whenever the exhaust system is disassembled. Check muffler mounting bracket and/or muffler adapters for cracked welds or breakage. Check muffler for split seams, loose internal parts, or cracked welds. Replace any damaged parts with new OEM parts
Never reinstall broken or damaged components
Install Muffler and Guard
Inspect Exhaust System
Inspect Exhaust System
Never reinstall broken or damaged components
Install Muffler and Guard
Vertical Models 97700, 99700, 110000,
components
Never reinstall broken or damaged
Install Muffler and Guard
Inspect Exhaust System
Inspect Exhaust System
Never reinstall broken or damaged components
Remove Muffler
Install Muffler
Remove Muffler
Never reinstall broken or damaged components
Install Muffler
Shown is a typical muffler application Figure
SECTION 4 - FUEL SYSTEMS AND CARBURETION
FUEL SYSTEMS
Inspection
Installation
Fuel Pump
Removal
Removal
Fuel Filter
Fuel Tanks and Shut-offValves
Horizontal Models 110000, 120000, 150000, 200000,
Vertical Model
Installation
Installation
Vertical Models 97700, 99700, 110000,
2.Inspect fuel tank for •Corrosion •Leaks
Installation
Inspection
Carburetor Identification
CARBURETION
Remove Carburetor
Carburetor Service LMS Carburetor
Vertical Models 97700, 99700, 110000,
Disassemble Carburetor
Assemble Carburetor
Inspect and Clean Carburetor Components
Install Carburetor
Remove Carburetor
LMS Carburetor Horizontal Models 110000, 120000,
Assemble Carburetor
Inspect and Clean Carburetor Components
Disassemble Carburetor
•Passages in the fixed main jet bowl nut
edge of the plug with a non-hardeningsealant
Remove Carburetor
Install Carburetor
ReadyStart Carburetor Vertical Model
Assemble Carburetor
Inspect and Clean Carburetor
Disassemble Carburetor
LMT Carburetor
Disassemble Carburetor
Remove Carburetor
3.Move clamp and disconnect hose from carburetor
Assemble Carburetor
Inspect and Clean Carburetor
Page
bracket.4
Install Carburetor
Disassemble Carburetor
Nikki Carburetor Vertical Models 280000, 310000,
Remove Carburetor
11.Remove the main jet and seal
Inspect and Clean Carburetor
Assemble Carburetor
•Choke shaft and choke valve
Install Carburetor
12.Install new o-ringon fuel transfer tube E
Vertical Model 310000 Gaseous Fuel
Nikki LP/NG Mixer
SECTION 5 - GOVERNOR SYSTEMS
Linkage and Spring Orientation
GOVERNOR SYSTEMS
Disassemble
Governor Service
Governed RPM Limits
Horizontal Models 110000, 120000, 150000, 200000,
Assemble
Inspect Governor
Assemble Governor
Disassemble
Inspect Governor
8. Adjust governor system per Section
SECTION 6 - CYLINDER HEAD AND VALVES
Remove Cylinder Head
CYLINDER HEADS AND VALVES
Inspection
Disassemble Cylinder Head
Assemble Cylinder Head
Install Cylinder Head
NOTE: Do not torque each screw in one step as it may result in a warped cylinder head. Step- torque all screws to approximately 1/3 of final torque value, then to 2/3 final torque value, then finish at final torque value
Inspection
Remove Cylinder Head
Models 200000, 210000, 280000, 310000,
Disassemble Cylinder Head
Assemble Cylinder Head
mm or more, replace the entire head. If plug gauge is not available, see Section 12 - Engine Specifications for the valve guide reject dimension
Install Cylinder Head
4.Install push rods through guides and into same positions as removed. Ensure rods are seated in valve tappets. Place valve stem caps if used on valve stems Figure
Page
SECTION 7 - STARTERS
Vertical Models 97700,
REWIND STARTERS
Remove Blower Housing / Rewind Starter
Horizontal Models 110000, 120000, 150000, 200000,
Vertical Models 110000,
Disassemble Rewind Starter
Service Rewind Starter
Vertical Model
Assemble Rewind Starter
Inspect Rewind Starter Parts
Vertical Models 110000,
2.Install the oil fill tube and dipstick C
Vertical Models 97700,
Inspect Clutch Parts
Service Starter Clutch
Vertical Model
Disassemble Starter Clutch
Check Starter Drive and Clutch
ELECTRIC STARTERS
Replace Ring Gear
System 3, System
Check Starter Drive and Clutch
Install Starter Drive and Clutch
12 Volt Starters
Remove Starter Drive and Clutch
Assemble Starter Motor Drive - C-Ring Retainer
Disassemble Starter Drive - Roll Pin Retainer
Assemble Starter Drive - Roll Pin Retainer
120-VoltStarters
SECTION 8 - LUBRICATION SYSTEMS
Horizontal Models 110000, 120000,
EXTENDED OIL FILL AND DIPSTICK
BREATHERS
Install Breather
Remove Breather
3.Inspect oil drain-backholes C, Figure 3 to make sure they are open. Clean as needed
Install Breather
Check Breather
Check Breather
Install Breather
8Current Production
Remove Breather
Oil Slinger Lubrication
LUBRICATION SYSTEMS
Install Breather
Oil Dipper Lubrication
Vertical Models 120000, 210000, 280000, 310000,
Oil Pump Service
Oil Slinger with Pressure Filtration
Pressure Lubrication
Remove Pump Screen
Oil Filter and Adapters Remove
Install Screen and Gerotor Pump
Inspect Oil Pump Parts
Oil Gard Systems
Oil Pressure Switch
Install
Test Oil Pressure Switch
Identification
Lead Wire Colors
Lead Wire Colors
Troubleshooting
SECTION 9 - CYLINDERS, COVERS AND SUMPS
Resizing Bore
CYLINDER
Inspect Cylinder
Reconditioning Bore
Check Plain Bearings
MAIN BEARINGS
Cleaning Cylinder
Check Bearings
PTO Bearing Tools
Replace Bearings
Replace DU Bearings
Magneto Bearing Tools
Replace Ball Bearing Horizontal Models 120000,
Tool/Part
Bearing Installation Tools
Replace Ball Bearing Horizontal Models 200000,
Bearing Removal Tools
Replace Ball Bearing All Vertical Models
Installation
COVERS AND SUMPS
Figure
Figure Figure
Page
SYSTEMS, AND GEAR REDUCTIONS
SECTION 10 - CRANKSHAFTS, CAMSHAFTS, BALANCING
Check Crankshaft
CRANKSHAFTS AND CAMSHAFTS
Remove Crankshaft and Camshaft
Inspect
Install Crankshaft and Camshaft
Install Crankcase Cover or Sump
Check and Adjust Crankshaft End Play
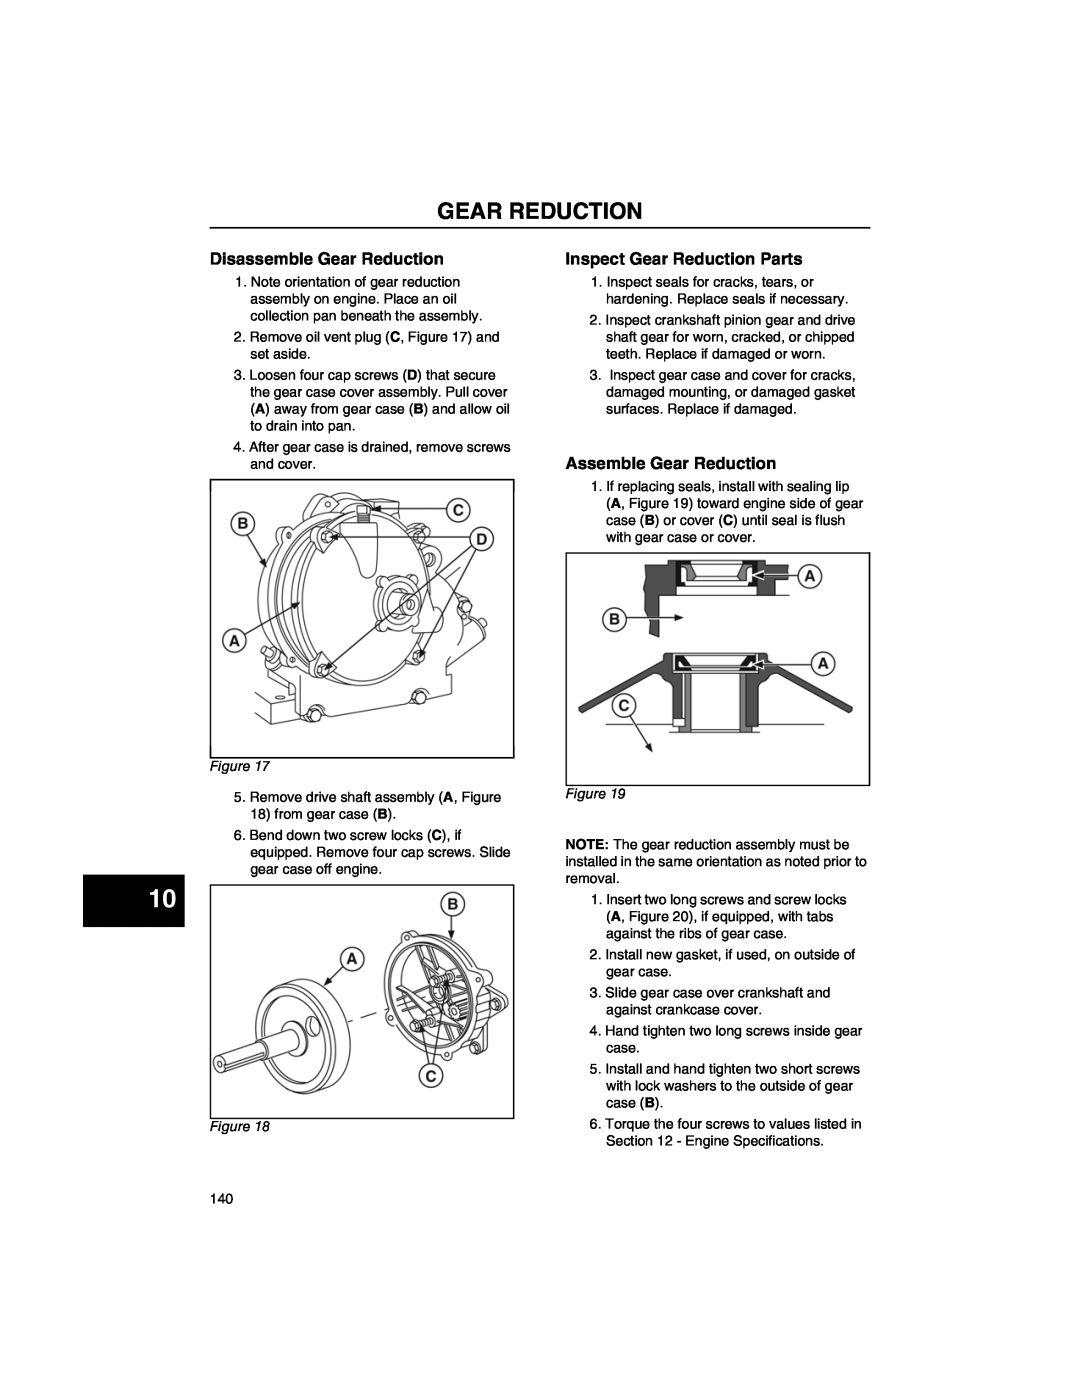
Inspect Gear Reduction Parts
GEAR REDUCTION
Disassemble Gear Reduction
Assemble Gear Reduction
Fill Gear Case with Lubricant
Assemble Auxiliary PTO Drive Shaft
AUXILIARY PTO
Inspection
Remove Auxiliary PTO Drive Shaft
Remove Counterbalance System
COUNTERBALANCE SYSTEMS
Synchro-BalanceSystem
Disassemble
Assemble
Install
Disassemble
Install
AVS Balance System
Remove
Page
SECTION 11 - PISTONS, RINGS AND CONNECTING RODS
Inspect
PISTONS, RINGS, & CONNECTING RODS
Remove Piston and Connecting Rod
Disassemble
Check Ring End Gap
Check Connecting Rod
Assemble
Install Piston and Connecting Rod
SECTION 12 - ENGINE SPECIFICATIONS
TORQUE
MODEL 110000 HORIZONTAL SERIES
ENGINE SPECIFICATIONS
FASTENER TORQUE SPECIFICATIONS
REJECT DIMENSIONS
TORQUE
MODEL 120000 HORIZONTAL SERIES
ENGINE SPECIFICATIONS
FASTENER TORQUE SPECIFICATIONS
Main Bearing
TORQUE
MODEL 150000 HORIZONTAL SERIES
ENGINE SPECIFICATIONS
FASTENER TORQUE SPECIFICATIONS
REJECT DIMENSIONS
TORQUE
MODEL 200000 HORIZONTAL SERIES
ENGINE SPECIFICATIONS
FASTENER TORQUE SPECIFICATIONS
Main Bearing
TORQUE
MODEL 210000 HORIZONTAL SERIES
ENGINE SPECIFICATIONS
FASTENER TORQUE SPECIFICATIONS
Main Bearing
TORQUE
MODELS 97700 & 99700 VERTICAL SERIES
ENGINE SPECIFICATIONS
FASTENER TORQUE SPECIFICATIONS
REJECT DIMENSIONS
TORQUE
MODEL 110000 VERTICAL SERIES
ENGINE SPECIFICATIONS
FASTENER TORQUE SPECIFICATIONS
REJECT DIMENSIONS
TORQUE
MODEL 120000 VERTICAL SERIES
ENGINE SPECIFICATIONS
FASTENER TORQUE SPECIFICATIONS
REJECT DIMENSIONS
TORQUE
MODEL 210000 VERTICAL SERIES
ENGINE SPECIFICATIONS
FASTENER TORQUE SPECIFICATIONS
REJECT DIMENSIONS
TORQUE
MODEL 280000 VERTICAL SERIES
ENGINE SPECIFICATIONS
FASTENER TORQUE SPECIFICATIONS
Main Bearing
TORQUE
MODEL 310000 VERTICAL SERIES
ENGINE SPECIFICATIONS
FASTENER TORQUE SPECIFICATIONS
Main Bearing
TORQUE
MODEL 330000 VERTICAL SERIES
ENGINE SPECIFICATIONS
FASTENER TORQUE SPECIFICATIONS
Main Bearing