Elastic Stitching


Point élastique


Pattern


Modèle


14

(Elastic Stitch)


14

(Point élastique)


The Elastic Stitch can be used in 3 ways: mending, sewing elastic


Le point élastique possède trois fonctions principales: le

or joining fabric. Each is explained below.


raccommodage, la couture d’élastiques ou l’assemblage de tissus.

Set the pattern selection dial to 14.


Chacune de ces trois fonctions se trouve détaillée ci-dessous.

MENDING


Mettre le sélecteur de modèle sur 14.


REPRISAGE

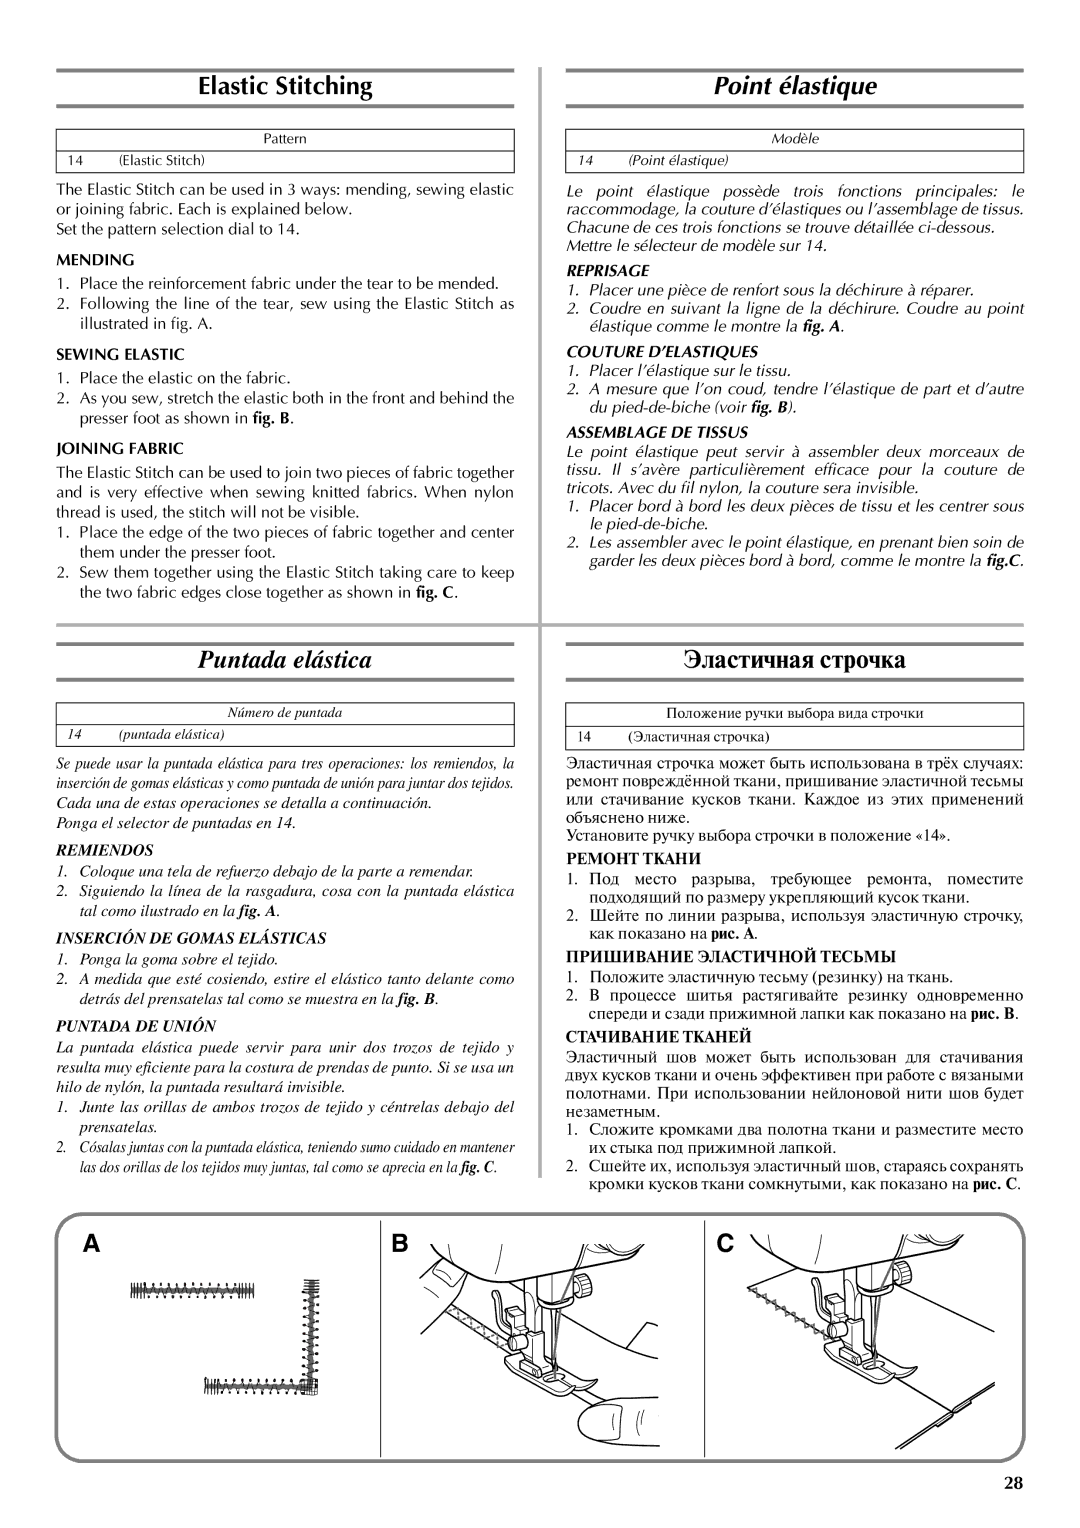
1. Place the reinforcement fabric under the tear to be mended.


1. Placer une pièce de renfort sous la déchirure à réparer.

2. Following the line of the tear, sew using the Elastic Stitch as


2. Coudre en suivant la ligne de la déchirure. Coudre au point

illustrated in fig. A.


élastique comme le montre la fig. A.

SEWING ELASTIC


COUTURE D’ELASTIQUES

1. Place the elastic on the fabric.


1. Placer l’élastique sur le tissu.


2. A mesure que l’on coud, tendre l’élastique de part et d’autre

2. As you sew, stretch the elastic both in the front and behind the


du pied-de-biche (voir fig. B).

presser foot as shown in fig. B.


ASSEMBLAGE DE TISSUS

JOINING FABRIC


Le point élastique peut servir à assembler deux morceaux de

The Elastic Stitch can be used to join two pieces of fabric together


tissu. Il s’avère particulièrement efficace pour la couture de

and is very effective when sewing knitted fabrics. When nylon


tricots. Avec du fil nylon, la couture sera invisible.

thread is used, the stitch will not be visible.


1. Placer bord à bord les deux pièces de tissu et les centrer sous


le pied-de-biche.

1. Place the edge of the two pieces of fabric together and center


2. Les assembler avec le point élastique, en prenant bien soin de

them under the presser foot.


garder les deux pièces bord à bord, comme le montre la fig.C.

2. Sew them together using the Elastic Stitch taking care to keep


the two fabric edges close together as shown in fig. C.


Puntada elástica


Эластичная строчка


Número de puntada


Положение ручки выбора вида строчки


14

(puntada elástica)


14

(Эластичная строчка)


Se puede usar la puntada elástica para tres operaciones: los remiendos, la


Эластичная строчка может быть использована в трёх случаях:

inserción de gomas elásticas y como puntada de unión para juntar dos tejidos.


ремонт повреждённой ткани, пришивание эластичной тесьмы

Cada una de estas operaciones se detalla a continuación.


или стачивание кусков ткани. Каждое из этих применений

Ponga el selector de puntadas en 14.


объяснено ниже.


Установите ручку выбора строчки в положение «14».

REMIENDOS


РЕМОНТ ТКАНИ

1. Coloque una tela de refuerzo debajo de la parte a remendar.


1.

Под место разрыва, требующее ремонта, поместите

2. Siguiendo la línea de la rasgadura, cosa con la puntada elástica


подходящий по размеру укрепляющий кусок ткани.

tal como ilustrado en la fig. A.


2.

Шейте по линии разрыва, используя эластичную строчку,

INSERCIÓN DE GOMAS ELÁSTICAS


как показано на рис. А.

1. Ponga la goma sobre el tejido.


ПРИШИВАНИЕ ЭЛАСТИЧНОЙ ТЕСЬМЫ

2. A medida que esté cosiendo, estire el elástico tanto delante como


1. Положите эластичную тесьму (резинку) на ткань.

detrás del prensatelas tal como se muestra en la fig. B.


2. В

процессе шитья растягивайте резинку одновременно

PUNTADA DE UNIÓN


спереди и сзади прижимной лапки как показано на рис. B.


СТАЧИВАНИЕ ТКАНЕЙ

La puntada elástica puede servir para unir dos trozos de tejido y


Эластичный шов может быть использован для стачивания

resulta muy eficiente para la costura de prendas de punto. Si se usa un


двух кусков ткани и очень эффективен при работе с вязаными

hilo de nylón, la puntada resultará invisible.


полотнами. При использовании нейлоновой нити шов будет

1. Junte las orillas de ambos trozos de tejido y céntrelas debajo del


незаметным.

prensatelas.

1.

Сложите кромками два полотна ткани и разместите место

2. Cósalas juntas con la puntada elástica, teniendo sumo cuidado en mantener


их стыка под прижимной лапкой.

las dos orillas de los tejidos muy juntas, tal como se aprecia en la fig. C.


2. Сшейте их, используя эластичный шов, стараясь сохранять


кромки кусков ткани сомкнутыми, как показано на рис. C.

A

B

C

28

Page 37
Image 37
Brother LS-2220, LS-2720 instruction manual Puntada elástica, Elastic Stitching Point élastique, Эластичная строчка

LS-2720, LS-2220 specifications

The Brother LS-2220 and LS-2720 are versatile sewing machines designed for both beginners and experienced sewists. Both models come equipped with a range of features that simplify the sewing process and enhance creativity, making them popular choices in the market.

The Brother LS-2220 is a mechanical sewing machine that offers 20 built-in stitches, including essential, decorative, and zigzag stitches. This variety allows users to create a wide range of sewing projects, from basic hemming to more complex patterns. The LS-2220 also includes a four-step buttonhole function, making it easier to add buttons to garments with precision. Its adjustable stitch length and width settings provide further customization, allowing sewists to achieve the perfect finish for any project.

On the other hand, the Brother LS-2720 is a step up, featuring 27 built-in stitches, giving users additional options for creativity. This model also boasts a one-step buttonhole feature, which simplifies the process and saves time. Both sewing machines are equipped with a drop-in bobbin system, ensuring quick and easy threading. The transparent cover makes it easy to monitor thread levels, reducing the likelihood of running out mid-project.

Technology-wise, both machines include a free arm design, which is especially beneficial for sewing cylindrical items like sleeves and pant legs. An automatic needle threader is also incorporated into the LS-2720, further streamlining the sewing process and making it incredibly user-friendly.

In terms of characteristics, both models are lightweight and portable, making them great options for those who need to store or transport their machines. The LS-2220 and LS-2720 come with an array of accessories, including presser feet for various tasks, a stitching guide, and a dust cover, ensuring that users have everything they need to get started immediately.

In conclusion, the Brother LS-2220 and LS-2720 are reliable and functional sewing machines catering to a range of sewing needs. Their array of built-in stitches, user-friendly features, and portability make them suitable for any sewing enthusiast looking to bring their creative visions to life.