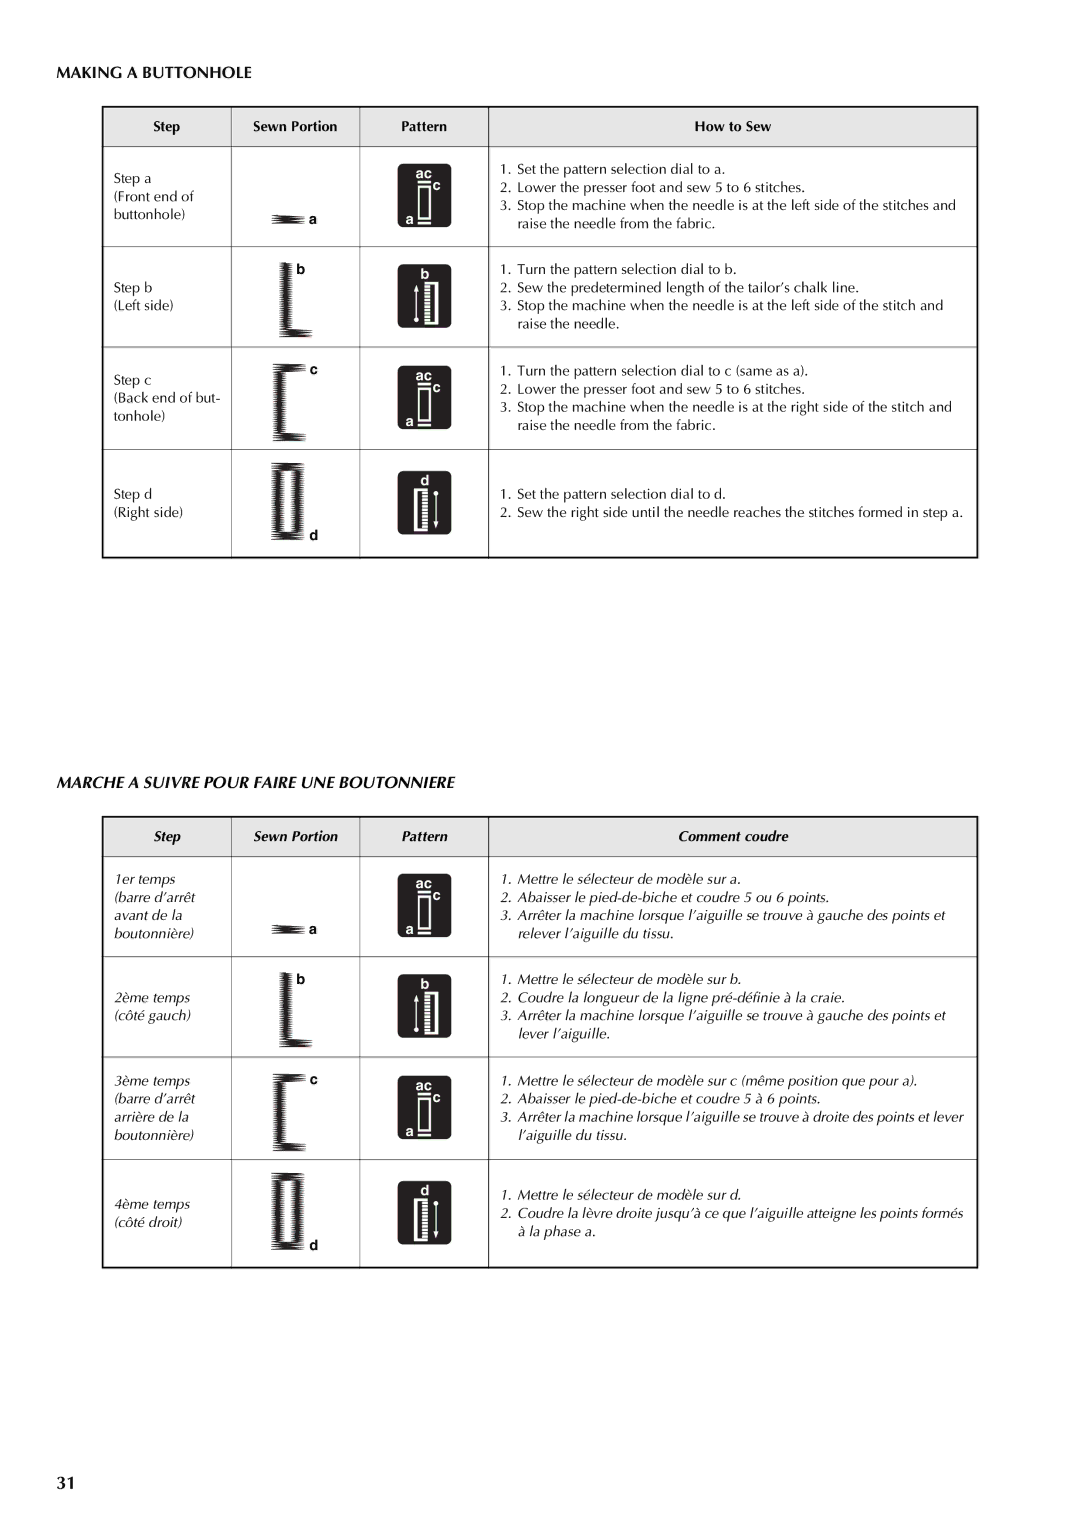
MAKING A BUTTONHOLE

Step

Sewn Portion

Pattern


How to Sew


Step a


ac

1.

Set the pattern selection dial to a.


c

2.

Lower the presser foot and sew 5 to 6 stitches.

(Front end of


3.

Stop the machine when the needle is at the left side of the stitches and

buttonhole)

a

a


raise the needle from the fabric.


b


b

1.

Turn the pattern selection dial to b.

Step b


2.

Sew the predetermined length of the tailor’s chalk line.


(Left side)


3.

Stop the machine when the needle is at the left side of the stitch and


raise the needle.


Step c

c

ac

1.

Turn the pattern selection dial to c (same as a).


c

2.

Lower the presser foot and sew 5 to 6 stitches.

(Back end of but-


3.

Stop the machine when the needle is at the right side of the stitch and

tonhole)


a


raise the needle from the fabric.


Step d


d

1.

Set the pattern selection dial to d.


(Right side)


2.

Sew the right side until the needle reaches the stitches formed in step a.


d

MARCHE A SUIVRE POUR FAIRE UNE BOUTONNIERE

Step

Sewn Portion

Pattern


Comment coudre


1er temps


ac

1. Mettre le sélecteur de modèle sur a.

(barre d’arrêt


c

2. Abaisser le pied-de-biche et coudre 5 ou 6 points.


avant de la

a

a


3.

Arrêter la machine lorsque l’aiguille se trouve à gauche des points et

boutonnière)


relever l’aiguille du tissu.


2ème temps

b


b

1. Mettre le sélecteur de modèle sur b.


2.

Coudre la longueur de la ligne pré-définie à la craie.


(côté gauch)


3.

Arrêter la machine lorsque l’aiguille se trouve à gauche des points et


lever l’aiguille.


3ème temps

c

ac

1.

Mettre le sélecteur de modèle sur c (même position que pour a).

(barre d’arrêt


c

2. Abaisser le pied-de-biche et coudre 5 à 6 points.


arrière de la


a


3.

Arrêter la machine lorsque l’aiguille se trouve à droite des points et lever

boutonnière)


l’aiguille du tissu.


4ème temps


d

1.

Mettre le sélecteur de modèle sur d.


2.

Coudre la lèvre droite jusqu’à ce que l’aiguille atteigne les points formés


(côté droit)


à la phase a.


d

31

Page 40
Image 40
Brother LS-2720, LS-2220 instruction manual Making a Buttonhole, Marche a Suivre Pour Faire UNE Boutonniere

LS-2720, LS-2220 specifications

The Brother LS-2220 and LS-2720 are versatile sewing machines designed for both beginners and experienced sewists. Both models come equipped with a range of features that simplify the sewing process and enhance creativity, making them popular choices in the market.

The Brother LS-2220 is a mechanical sewing machine that offers 20 built-in stitches, including essential, decorative, and zigzag stitches. This variety allows users to create a wide range of sewing projects, from basic hemming to more complex patterns. The LS-2220 also includes a four-step buttonhole function, making it easier to add buttons to garments with precision. Its adjustable stitch length and width settings provide further customization, allowing sewists to achieve the perfect finish for any project.

On the other hand, the Brother LS-2720 is a step up, featuring 27 built-in stitches, giving users additional options for creativity. This model also boasts a one-step buttonhole feature, which simplifies the process and saves time. Both sewing machines are equipped with a drop-in bobbin system, ensuring quick and easy threading. The transparent cover makes it easy to monitor thread levels, reducing the likelihood of running out mid-project.

Technology-wise, both machines include a free arm design, which is especially beneficial for sewing cylindrical items like sleeves and pant legs. An automatic needle threader is also incorporated into the LS-2720, further streamlining the sewing process and making it incredibly user-friendly.

In terms of characteristics, both models are lightweight and portable, making them great options for those who need to store or transport their machines. The LS-2220 and LS-2720 come with an array of accessories, including presser feet for various tasks, a stitching guide, and a dust cover, ensuring that users have everything they need to get started immediately.

In conclusion, the Brother LS-2220 and LS-2720 are reliable and functional sewing machines catering to a range of sewing needs. Their array of built-in stitches, user-friendly features, and portability make them suitable for any sewing enthusiast looking to bring their creative visions to life.