CONNAITRE SACONOZCA SUKNOWING YOUR MACHINEMÁQUINASEWING A COUDREDE COSERMACHINE

A

B

1

2

PLACING THE EXTRA SPOOL PIN

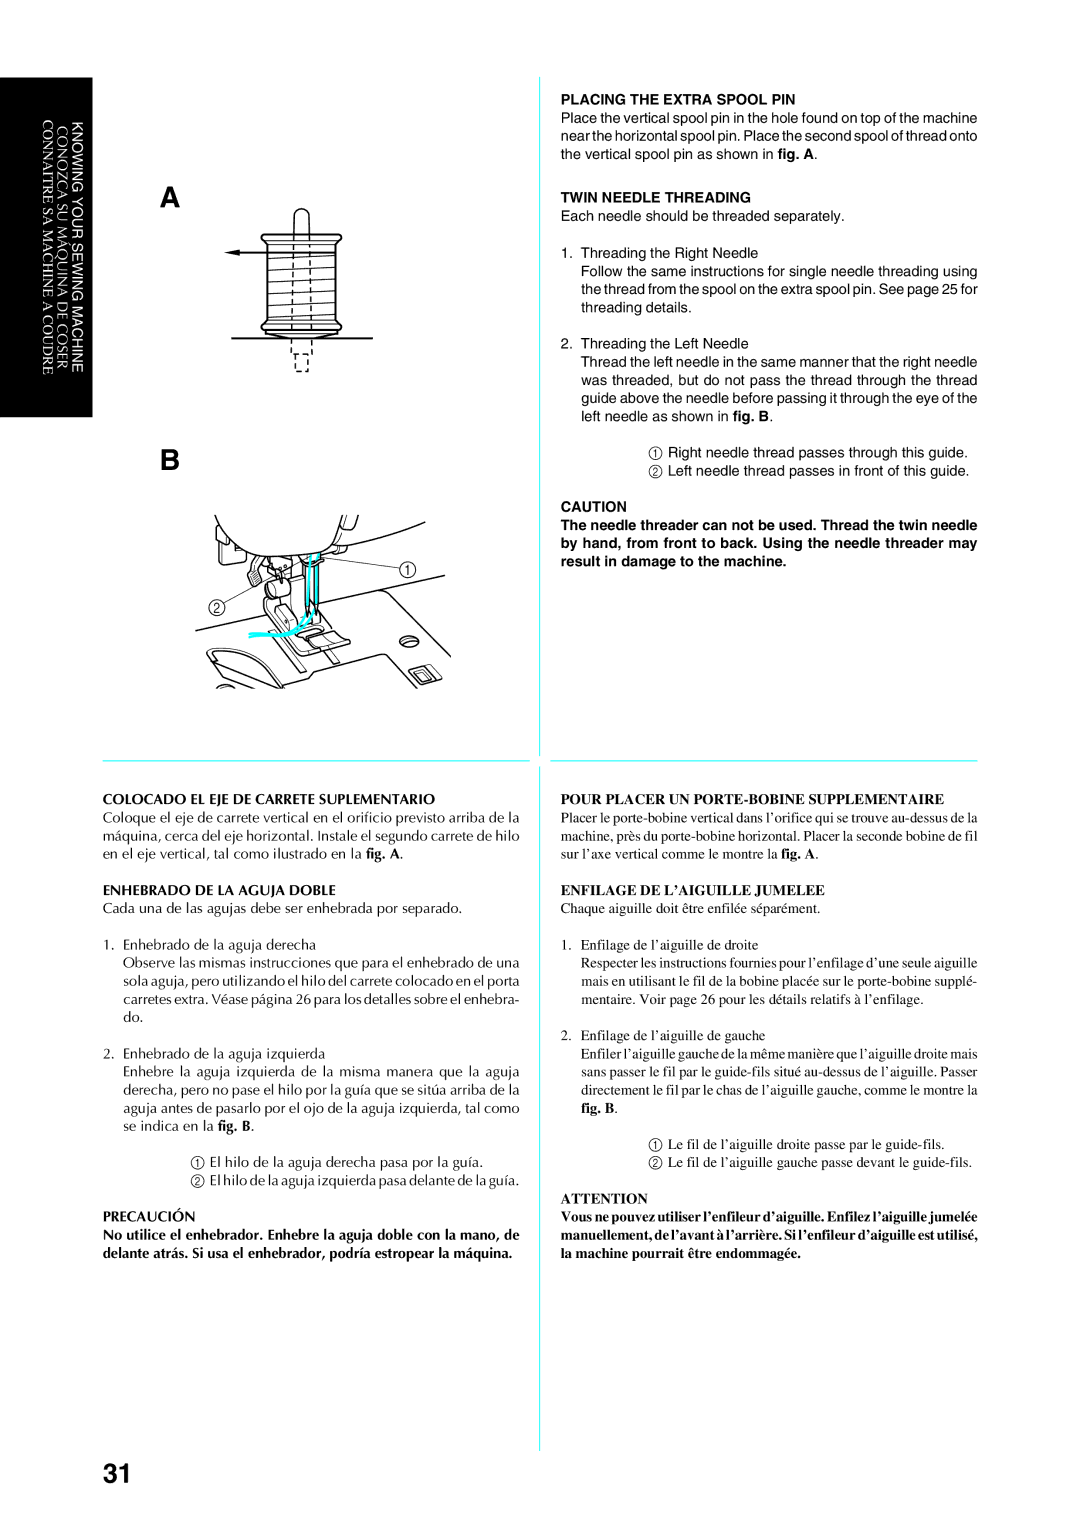
Place the vertical spool pin in the hole found on top of the machine near the horizontal spool pin. Place the second spool of thread onto the vertical spool pin as shown in fig. A.

TWIN NEEDLE THREADING

Each needle should be threaded separately.

1.Threading the Right Needle

Follow the same instructions for single needle threading using the thread from the spool on the extra spool pin. See page 25 for threading details.

2.Threading the Left Needle

Thread the left needle in the same manner that the right needle was threaded, but do not pass the thread through the thread guide above the needle before passing it through the eye of the left needle as shown in fig. B.

1Right needle thread passes through this guide.

2 Left needle thread passes in front of this guide.

CAUTION

The needle threader can not be used. Thread the twin needle by hand, from front to back. Using the needle threader may result in damage to the machine.

COLOCADO EL EJE DE CARRETE SUPLEMENTARIO

Coloque el eje de carrete vertical en el orificio previsto arriba de la máquina, cerca del eje horizontal. Instale el segundo carrete de hilo en el eje vertical, tal como ilustrado en la fig. A.

ENHEBRADO DE LA AGUJA DOBLE

Cada una de las agujas debe ser enhebrada por separado.

1.Enhebrado de la aguja derecha

Observe las mismas instrucciones que para el enhebrado de una sola aguja, pero utilizando el hilo del carrete colocado en el porta carretes extra. Véase página 26 para los detalles sobre el enhebra- do.

2.Enhebrado de la aguja izquierda

Enhebre la aguja izquierda de la misma manera que la aguja derecha, pero no pase el hilo por la guía que se sitúa arriba de la aguja antes de pasarlo por el ojo de la aguja izquierda, tal como se indica en la fig. B.

1El hilo de la aguja derecha pasa por la guía.

2El hilo de la aguja izquierda pasa delante de la guía.

PRECAUCIÓN

No utilice el enhebrador. Enhebre la aguja doble con la mano, de delante atrás. Si usa el enhebrador, podría estropear la máquina.

POUR PLACER UN PORTE-BOBINE SUPPLEMENTAIRE

Placer le porte-bobine vertical dans l’orifice qui se trouve au-dessus de la machine, près du porte-bobine horizontal. Placer la seconde bobine de fil sur l’axe vertical comme le montre la fig. A.

ENFILAGE DE L’AIGUILLE JUMELEE

Chaque aiguille doit être enfilée séparément.

1.Enfilage de l’aiguille de droite

Respecter les instructions fournies pour l’enfilage d’une seule aiguille mais en utilisant le fil de la bobine placée sur le porte-bobine supplé- mentaire. Voir page 26 pour les détails relatifs à l’enfilage.

2.Enfilage de l’aiguille de gauche

Enfiler l’aiguille gauche de la même manière que l’aiguille droite mais sans passer le fil par le guide-fils situé au-dessus de l’aiguille. Passer directement le fil par le chas de l’aiguille gauche, comme le montre la fig. B.

1Le fil de l’aiguille droite passe par le guide-fils.

2 Le fil de l’aiguille gauche passe devant le guide-fils.

ATTENTION

Vous ne pouvez utiliser l’enfileur d’aiguille. Enfilez l’aiguille jumelée manuellement, de l’avant à l’arrière. Si l’enfileur d’aiguille est utilisé, la machine pourrait être endommagée.

31

Page 40
Image 40
Brother Sewing Manching manual Placing the Extra Spool PIN, Twin Needle Threading, Colocado EL EJE DE Carrete Suplementario

Sewing Manching specifications

Brother sewing machines have gained a strong reputation in the sewing community for their reliability, innovation, and versatility. With a variety of models suited for beginners and seasoned professionals, Brother provides affordable and high-quality options for every sewing need.

One of the standout features of Brother sewing machines is the ease of use. Many models incorporate automatic needle threading, which saves time and reduces frustration for users. The drop-in bobbin system is another convenient feature that allows for quick bobbin changes, ensuring a smooth sewing experience.

Brother sewing machines come equipped with multiple built-in stitches, offering a range of options from basic straight and zigzag stitches to more intricate decorative designs. This variety allows sewists to tackle a wide range of projects, whether they are making garments, home decor, or quilted items.

Many Brother machines also offer user-friendly LCD screens, providing easy navigation through stitch selections and settings. Some advanced models feature computer connectivity, allowing users to download and upload patterns directly to the machine. This digital integration represents a significant advancement in sewing technology, making it simpler to access a vast library of designs.

Brother has also embraced embroidery capabilities in many of its sewing machines. Embroidery models come with pre-installed designs and fonts, as well as the ability to import custom designs, giving users the freedom to personalize their projects. The built-in editing functions are intuitive, making it easy to resize, rotate, or mirror images before stitching.

In terms of durability, Brother sewing machines are constructed from high-quality materials that ensure longevity. Their powerful motors are capable of handling various fabrics, from lightweight cotton to heavier materials like denim and canvas.

Along with their functionality, Brother sewing machines are often praised for their ergonomic design. Features such as comfortably positioned controls and LED lighting enhance the user's sewing experience by providing visual clarity and reducing eye strain.

In conclusion, Brother sewing machines are defined by their commitment to quality, innovation, and user-friendly features. With a strong emphasis on technology and versatility, they cater to a wide audience, making sewing accessible and enjoyable for everyone, from hobbyists to professionals.