1


2

3

4

5

6

7

8

9

10


11 12 13 14 15 16 17 18 19

20

21

22

23

24

25

26

27

28


29 30 31 32 33 34 35 36 37

3

1

2

3

·

3

·

2

·

1


F

4


3

SS

VARIOUS CONTROLS

Pattern Selection Dial

CAUTION

When you use the Pattern Selection Dial to select a pattern, turn the handwheel to the front (counter-clockwise) by hand to set the needle in the highest position before selecting the pattern. If the needle is in the down position when the Pattern Selection Dial is turned, the needle, presser foot, or fabric may be damaged.

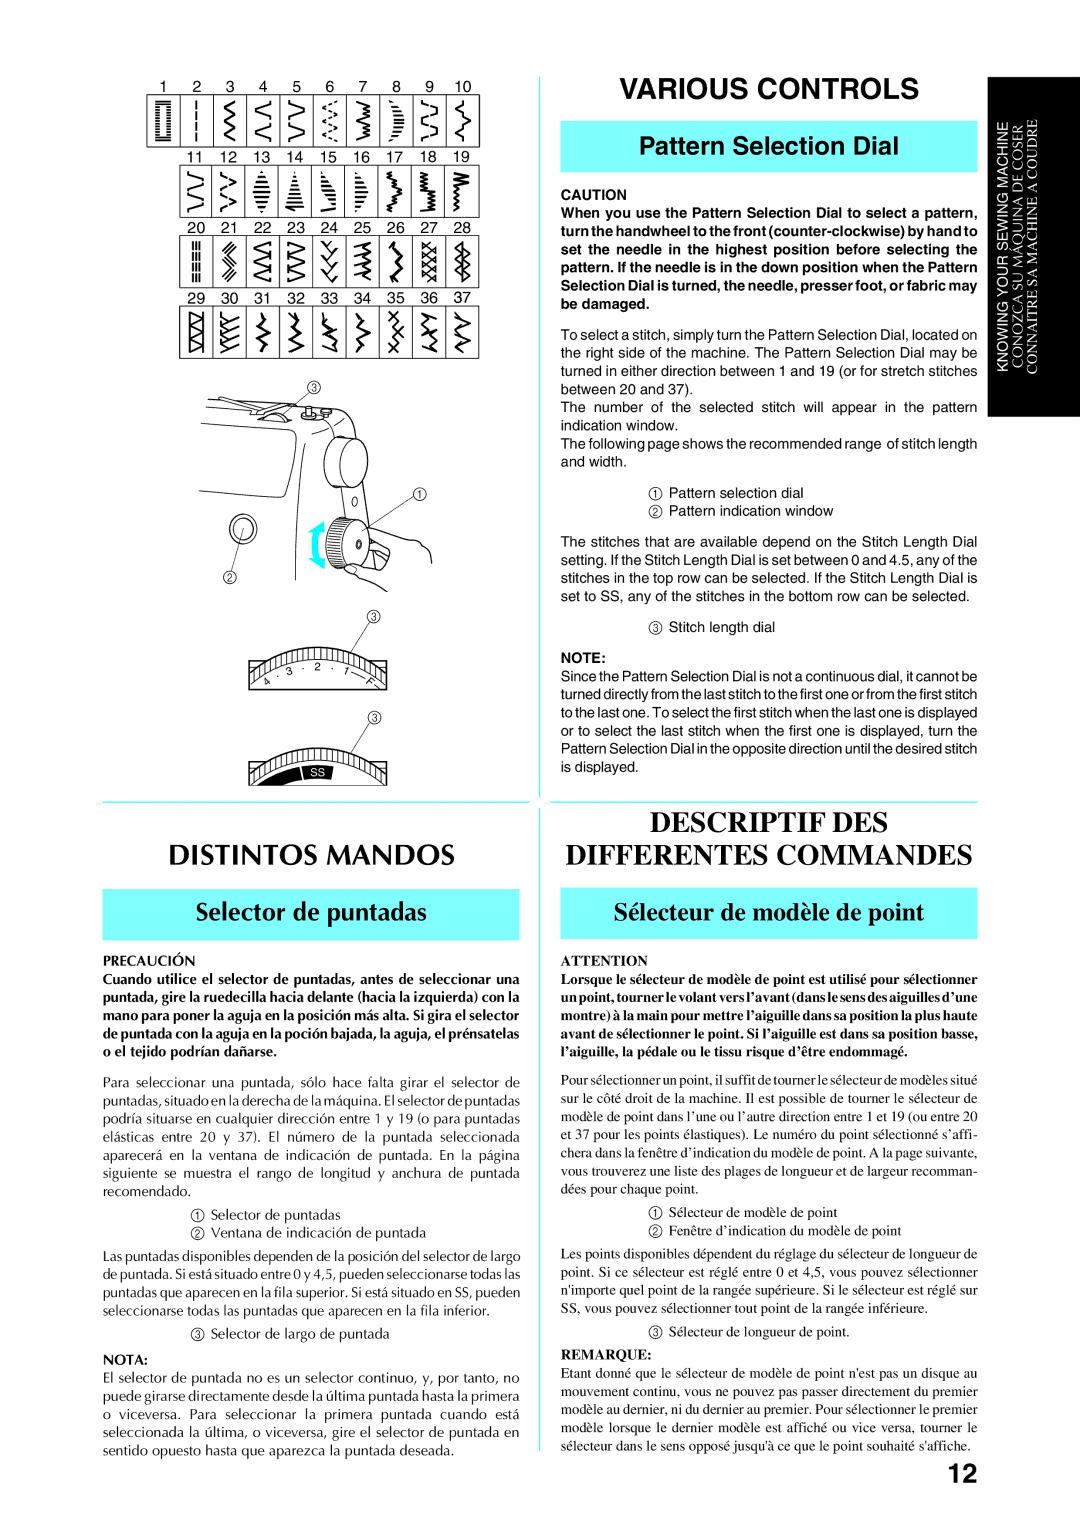
To select a stitch, simply turn the Pattern Selection Dial, located on the right side of the machine. The Pattern Selection Dial may be turned in either direction between 1 and 19 (or for stretch stitches between 20 and 37).

The number of the selected stitch will appear in the pattern indication window.

The following page shows the recommended range of stitch length and width.

1Pattern selection dial

2Pattern indication window

The stitches that are available depend on the Stitch Length Dial setting. If the Stitch Length Dial is set between 0 and 4.5, any of the stitches in the top row can be selected. If the Stitch Length Dial is set to SS, any of the stitches in the bottom row can be selected.

3Stitch length dial

NOTE:

Since the Pattern Selection Dial is not a continuous dial, it cannot be turned directly from the last stitch to the first one or from the first stitch to the last one. To select the first stitch when the last one is displayed or to select the last stitch when the first one is displayed, turn the Pattern Selection Dial in the opposite direction until the desired stitch is displayed.

KNOWING YOUR SEWING MACHINE CONOZCA SU MÁQUINA DE COSER CONNAITRE SA MACHINE A COUDRE

DISTINTOS MANDOS

Selector de puntadas

PRECAUCIÓN

Cuando utilice el selector de puntadas, antes de seleccionar una puntada, gire la ruedecilla hacia delante (hacia la izquierda) con la mano para poner la aguja en la posición más alta. Si gira el selector de puntada con la aguja en la poción bajada, la aguja, el prénsatelas o el tejido podrían dañarse.

Para seleccionar una puntada, sólo hace falta girar el selector de puntadas, situado en la derecha de la máquina. El selector de puntadas podría situarse en cualquier dirección entre 1 y 19 (o para puntadas elásticas entre 20 y 37). El número de la puntada seleccionada aparecerá en la ventana de indicación de puntada. En la página siguiente se muestra el rango de longitud y anchura de puntada recomendado.

1Selector de puntadas

2Ventana de indicación de puntada

Las puntadas disponibles dependen de la posición del selector de largo de puntada. Si está situado entre 0 y 4,5, pueden seleccionarse todas las puntadas que aparecen en la fila superior. Si está situado en SS, pueden seleccionarse todas las puntadas que aparecen en la fila inferior.

3Selector de largo de puntada

NOTA:

El selector de puntada no es un selector continuo, y, por tanto, no puede girarse directamente desde la última puntada hasta la primera o viceversa. Para seleccionar la primera puntada cuando está seleccionada la última, o viceversa, gire el selector de puntada en sentido opuesto hasta que aparezca la puntada deseada.

DESCRIPTIF DES

DIFFERENTES COMMANDES

Sélecteur de modèle de point

ATTENTION

Lorsque le sélecteur de modèle de point est utilisé pour sélectionner un point, tourner le volant vers l’avant (dans le sens des aiguilles d’une montre) à la main pour mettre l’aiguille dans sa position la plus haute avant de sélectionner le point. Si l’aiguille est dans sa position basse, l’aiguille, la pédale ou le tissu risque d’être endommagé.

Pour sélectionner un point, il suffit de tourner le sélecteur de modèles situé sur le côté droit de la machine. Il est possible de tourner le sélecteur de modèle de point dans l’une ou l’autre direction entre 1 et 19 (ou entre 20 et 37 pour les points élastiques). Le numéro du point sélectionné s’affi- chera dans la fenêtre d’indication du modèle de point. A la page suivante, vous trouverez une liste des plages de longueur et de largeur recomman- dées pour chaque point.

1Sélecteur de modèle de point

2Fenêtre d’indication du modèle de point

Les points disponibles dépendent du réglage du sélecteur de longueur de point. Si ce sélecteur est réglé entre 0 et 4,5, vous pouvez sélectionner n'importe quel point de la rangée supérieure. Si le sélecteur est réglé sur SS, vous pouvez sélectionner tout point de la rangée inférieure.

3Sélecteur de longueur de point.

REMARQUE:

Etant donné que le sélecteur de modèle de point n'est pas un disque au mouvement continu, vous ne pouvez pas passer directement du premier modèle au dernier, ni du dernier au premier. Pour sélectionner le premier modèle lorsque le dernier modèle est affiché ou vice versa, tourner le sélecteur dans le sens opposé jusqu'à ce que le point souhaité s'affiche.

12

Page 21
Image 21
Brother Sewing Manching manual Pattern Selection Dial, Selector de puntadas, Sélecteur de modèle de point, Nota, Remarque

Sewing Manching specifications

Brother sewing machines have gained a strong reputation in the sewing community for their reliability, innovation, and versatility. With a variety of models suited for beginners and seasoned professionals, Brother provides affordable and high-quality options for every sewing need.

One of the standout features of Brother sewing machines is the ease of use. Many models incorporate automatic needle threading, which saves time and reduces frustration for users. The drop-in bobbin system is another convenient feature that allows for quick bobbin changes, ensuring a smooth sewing experience.

Brother sewing machines come equipped with multiple built-in stitches, offering a range of options from basic straight and zigzag stitches to more intricate decorative designs. This variety allows sewists to tackle a wide range of projects, whether they are making garments, home decor, or quilted items.

Many Brother machines also offer user-friendly LCD screens, providing easy navigation through stitch selections and settings. Some advanced models feature computer connectivity, allowing users to download and upload patterns directly to the machine. This digital integration represents a significant advancement in sewing technology, making it simpler to access a vast library of designs.

Brother has also embraced embroidery capabilities in many of its sewing machines. Embroidery models come with pre-installed designs and fonts, as well as the ability to import custom designs, giving users the freedom to personalize their projects. The built-in editing functions are intuitive, making it easy to resize, rotate, or mirror images before stitching.

In terms of durability, Brother sewing machines are constructed from high-quality materials that ensure longevity. Their powerful motors are capable of handling various fabrics, from lightweight cotton to heavier materials like denim and canvas.

Along with their functionality, Brother sewing machines are often praised for their ergonomic design. Features such as comfortably positioned controls and LED lighting enhance the user's sewing experience by providing visual clarity and reducing eye strain.

In conclusion, Brother sewing machines are defined by their commitment to quality, innovation, and user-friendly features. With a strong emphasis on technology and versatility, they cater to a wide audience, making sewing accessible and enjoyable for everyone, from hobbyists to professionals.