Battery Pack
Your notebook is equipped with a
The battery meter LEDs on the battery pack indicates the charge level of the battery. When you press the battery meter once, the charge level LEDs illuminate. Each of 5 LED represents approximately 20% of the total battery charge. For example, if 4 LEDs light up, there is 80% of battery charge remaining and if no LEDs light up, there is no charge remaining in the battery.
CHAPTER 2: GETTING TO KNOW YOUR NOTEBOOK
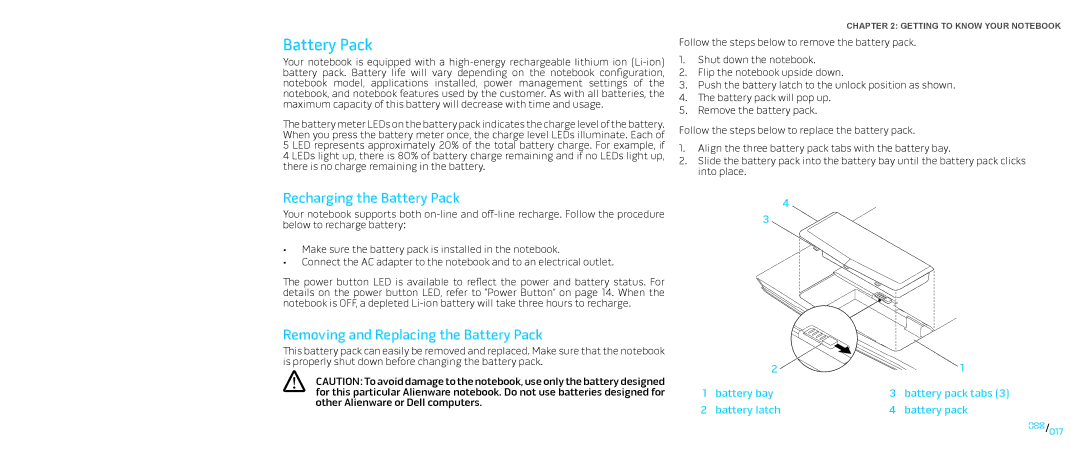
Follow the steps below to remove the battery pack.
1.Shut down the notebook.
2.Flip the notebook upside down.
3.Push the battery latch to the unlock position as shown.
4.The battery pack will pop up.
5.Remove the battery pack.
Follow the steps below to replace the battery pack.
1.Align the three battery pack tabs with the battery bay.
2.Slide the battery pack into the battery bay until the battery pack clicks into place.
Recharging the Battery Pack
Your notebook supports both
•Make sure the battery pack is installed in the notebook.
•Connect the AC adapter to the notebook and to an electrical outlet.
The power button LED is available to reflect the power and battery status. For details on the power button LED, refer to “Power Button” on page 14. When the notebook is OFF, a depleted
Removing and Replacing the Battery Pack
This battery pack can easily be removed and replaced. Make sure that the notebook is properly shut down before changing the battery pack.
CAUTION: To avoid damage to the notebook, use only the battery designed for this particular Alienware notebook. Do not use batteries designed for other Alienware or Dell computers.
| 4 |
3 |
|
2 | 1 |
1 | battery bay | 3 | battery pack tabs (3) |
2 | battery latch | 4 | battery pack |
017/017
