guardaest6,dise_adaparautilizarsecondiscosdealetaparalijary cepillosy ruedasdealambreEsmerilarycortarcondiscosqueno. seandelTipo27,28y29requieredistintasguardasdeaccesoriosno incluidasconlaherramientaLasinstruccionesdemontajeparaestas. guardasdeaccesoriosest6,nincluidasenelpaquetedeaccesorios.

i_,ADVERTENCIA:AI utilizar un disco de esmerilar con una guarda de tipo 27, 28, o 29, compruebe que la superficie de abajo del disco de esmerilar este dentro del borde de la guarda

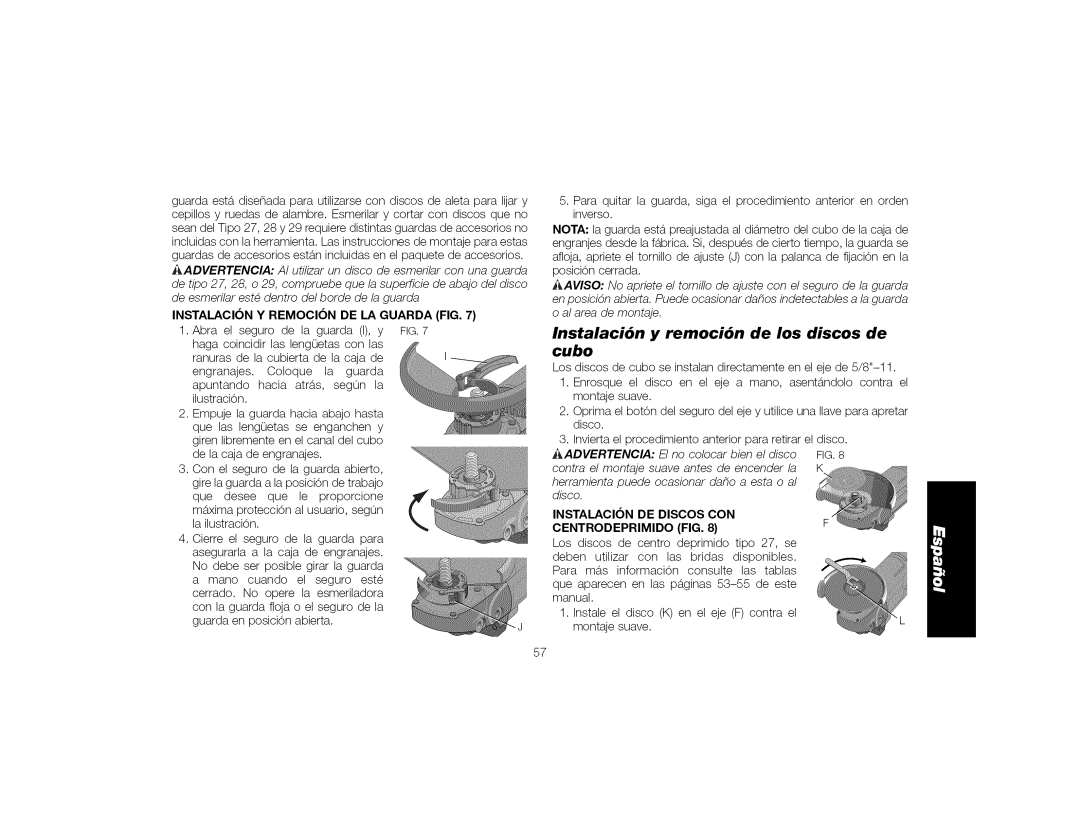
INSTALACION Y REMOCION DE LA GUARDA (FIG. 7)

1. Abra el seguro de la guarda (I), y FIG.7 haga coincidir las leng0etas con las ranuras de la cubierta de la caja de engranajes. Coloque la guarda apuntando hacia atr6,s, seg0n la ilustraciOn.

2.Empuje la guarda hacia abajo hasta que las leng0etas se enganchen y giren libremente en el canal del cubo de la caja de engranajes.

3.Con el seguro de la guarda abierto, gire la guarda a la posiciOn de trabajo que desee que le proporcione m6,xima protecciOn al usuario, seg0n la ilustraciOn.

4.Cierre el seguro de la guarda para asegurarla a la caja de engranajes. No debe ser posible girar la guarda a mano cuando el seguro este cerrado. No opere la esmeriladora con la guarda floja o el seguro de la guarda en posiciOn abierta.

57

5.Para quitar la guarda, siga el procedimiento anterior en orden inverso.

NOTA" la guarda est6, preajustada al dib,metro del cubo de la caja de engranjes desde la f6,brica. Si, despues de cierto tiempo, la guarda se afloja, apriete el tornillo de ajuste (J) con la palanca de fijaciOn en la posiciOn cerrada.

_AVISO: No apriete el tomillo de ajuste con el seguro de la guarda en posicidn abierta, Puede ocasionar dahos indetectables a la guarda o al area de montaje,

Instalaci6n y remoci6n de los discos de cubo

Los discos de cubo se instalan directamente en el eje de 5/8"-11.

1.Enrosque el disco en el eje a mano, asent6,ndolo contra el montaje suave.

2.Oprima el botOn del seguro del eje y utilice una Ilave para apretar disco.

3.Invierta el procedimiento anterior para retirar el disco.

AADVERTENCIA: El no colocar bien el disco FIG.8

contra el montaje suave antes de encender la K herramienta puede ocasionar daho a esta o al disco,

INSTALACION DE DISCOS CON

CENTRODEPRIMIDO (FIG. 8)

Los discos de centro deprimido tipo 27, se deben utilizar con las bridas disponibles. Para m6,s informaciOn consulte las tablas

que aparecen en las p6,ginas 53-55 de este manual.

1.Instale el disco (K) en el eje (F) contra el montaje suave.

Page 58
Image 58
DeWalt DWE4519, DWE4517 Instalaci6n y remoci6n de los discos de cubo, Instalacion Y Remocion DE LA Guarda FIG

DWE4519, DWE4517 specifications

DeWalt, a renowned name in the power tool industry, continues to deliver exceptional equipment for professionals in various trades. Among its impressive lineup are the DWE4519 and DWE4517 angle grinders. These tools embody innovation, durability, and performance, tailored to handle rigorous tasks with ease.

The DeWalt DWE4519 is a robust 9-inch angle grinder designed for the heaviest grinding, cutting, and polishing applications. This tool stands out with its powerful 4.0 HP motor, delivering an impressive no-load speed of 6,000 RPM, ensuring maximum productivity. One significant feature of the DWE4519 is its exclusive dust ejection system, which helps to protect the tool from damaging dust and debris, enhancing its longevity. Additionally, the electronic clutch prevents kickback in case of a wheel bind-up, enhancing operator safety.

On the other hand, the DeWalt DWE4517 is a slightly smaller model, featuring an 7-inch wheel design. It is equipped with a powerful 4.0 HP motor, allowing for a no-load speed of 6,500 RPM, making it ideal for a wide range of applications, from metalworking to masonry projects. A key feature of the DWE4517 is its adjustable guard, which provides added versatility when cutting or grinding different materials. The magnesium housing makes this grinder lighter without compromising structural integrity, ensuring it can withstand tough job site conditions.

Both models feature a side handle that can be positioned in multiple ways, providing optimal control and user comfort. The DWE4519 and DWE4517 also include a two-position removable handle, allowing users to customize the grip to suit their working style, which is essential for maintaining precision during labor-intensive tasks.

Safety is a priority in the design of both grinders, demonstrated through their protective features like the electronic braking system, which helps stop the wheel quickly once the trigger is released. Furthermore, the anti-vibration technology integrated into both models minimizes fatigue, making them suitable for prolonged use.

In summary, DeWalt’s DWE4519 and DWE4517 angle grinders are powerhouses that combine advanced technologies and user-centric designs. With their high-performance motors, durability, safety features, and ergonomic designs, these tools are perfect for professionals who demand excellence in their grinding tasks. Whether on the construction site or in a metalworking shop, these grinders are reliable companions for every job.