Stage 4:
Installing the PMK 550
and the PVS 305SA IP
Stage 4 Involves Installing the Devices Shown Below.
PMK 550 Pole Mount Kit
Mounting Plate
Base Plate
To open, remove 4 cover screws
PMK Covers (2)
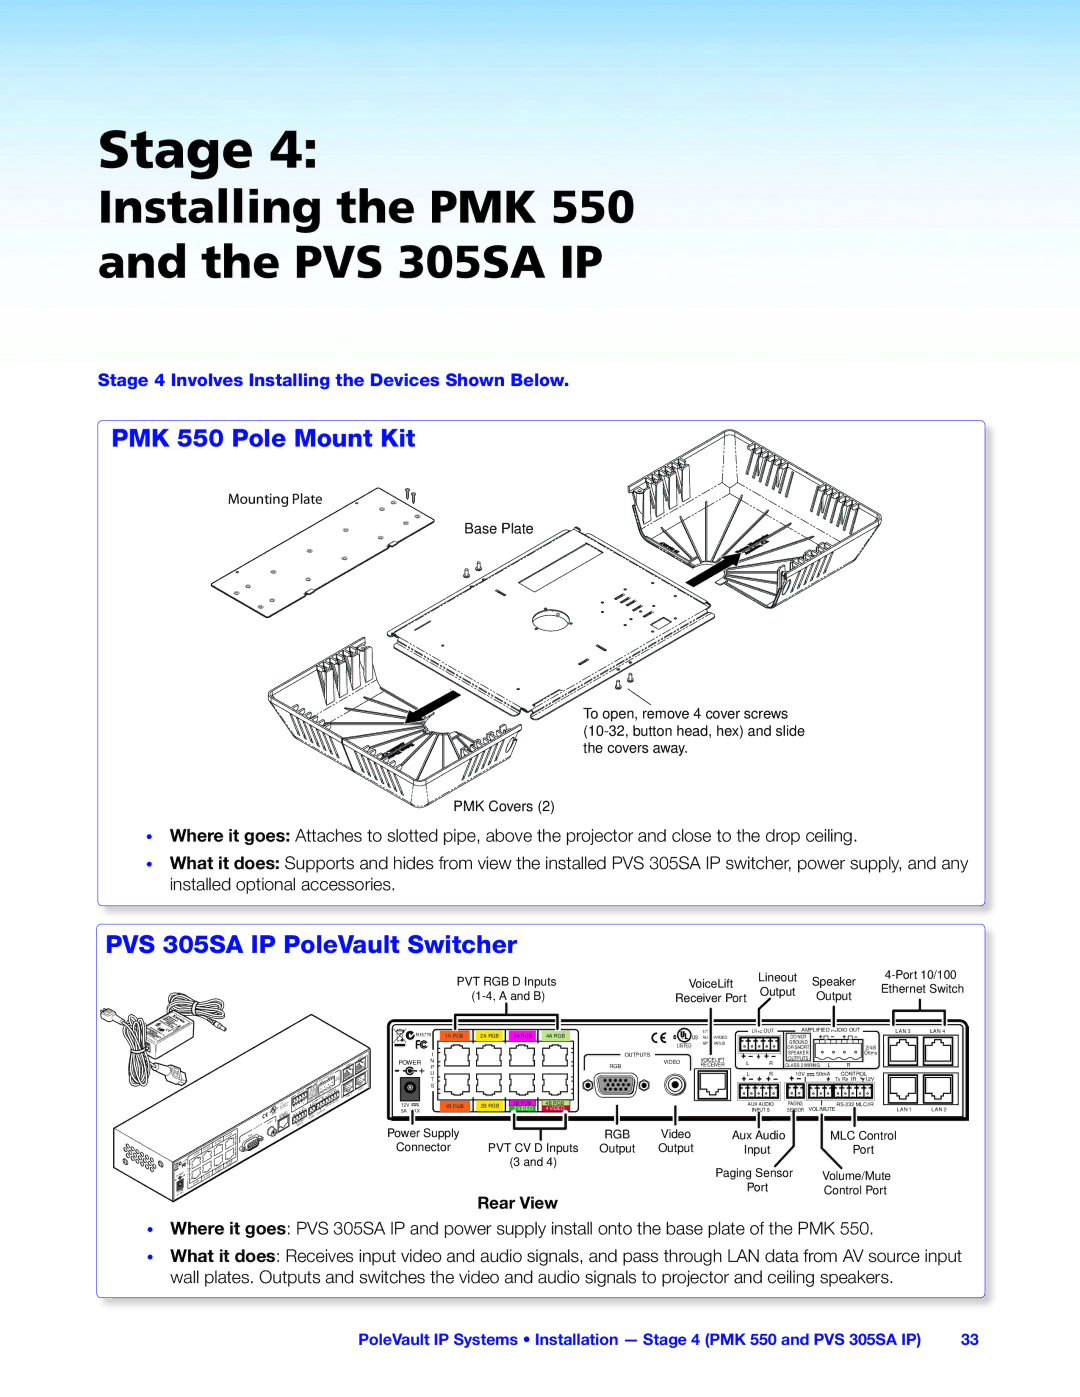
•Where it goes: Attaches to slotted pipe, above the projector and close to the drop ceiling.
•What it does: Supports and hides from view the installed PVS 305SA IP switcher, power supply, and any installed optional accessories.
PVS 305SA IP PoleVault Switcher
PVT RGB D Inputs | VoiceLift | Lineout | Speaker |
| ||||
Output | Ethernet Switch | |||||||
| Receiver Port | Output | ||||||
|
|
|
|
| ||||
|
|
|
|
|
|
|
| |
|
|
|
| 4A RGB |
|
|
|
| 3A RGB |
|
|
| 2A RGB | |
|
|
| 1A RGB |
|
| N15779 |
| 4B RGB | |
|
| I |
| /VIDEO |
|
| N |
| 3B RGB |
POWER | P |
| /VIDEO | |
T |
| RGB | ||
|
| U |
|
|
|
| S | 2B |
|
|
|
| 1B RGB |
|
12V | MAX |
|
|
|
5A |
|
|
| |
RGB
| US |
LISTED | VOICELIFT |
| RECEIVER |
VIDEO
OUTPUTS
OUT LINE
R
LR
L ![]()
| AUDIO |
AUX | 5 |
INPUT | |
|
|
|
| OUT | |
|
|
| AUDIO | 2/4/8 | |
AMPLIFIED |
|
| Ohms | ||
|
|
| |||
DO NOT |
|
|
| R |
|
GROUND |
|
|
|
| 12V |
OR SHORT | L |
| CONTROLIR | ||
SPEAKER |
|
|
| Rx |
|
OUTPUTS2 WIRING50mA | Tx |
|
| ||
CLASS10V |
|
| MLC/IR | ||
|
|
|
| ||
PAGING | VOL/MUTE |
|
| ||
SENSOR |
|
|
|
|
|
4 LAN
3 LAN
2 LAN
1 LAN
N15779 | 1A1ARGBRGB | 2A2ARGB | 3A3ARGB | 4A4ARGBRGB |
|
| 17TT |
| LINE OUT | AMPLIFIED AUDIO OUT | LAN 3 | LAN 4 | ||||
| ® | US AUDIO/VIDEO |
|
| DO NOT |
|
|
|
|
| ||||||
|
|
|
|
|
|
| LISTED | APPARATUS |
|
| GROUND |
|
|
|
|
|
|
|
|
|
|
|
|
|
|
| OR SHORT |
|
| 2/4/8 |
| ||
| I |
|
|
|
| OUTPUTS |
|
|
|
| SPEAKER |
|
|
| Ohms |
|
POWER | N |
|
|
|
|
| VIDEO | VOICELIFT | L | R | OUTPUTS |
|
|
|
|
|
|
|
|
| RGB | RECEIVER | CLASS 2 WIRING | L | R |
|
| ||||||
| P |
|
|
|
|
|
|
|
|
|
|
|
|
|
| |
| U |
|
|
|
|
|
|
| L | R | 10V | 50mA | CONTROL |
| ||
| T |
|
|
|
|
|
|
|
|
|
|
| Tx Rx IR | 12V |
| |
| S |
|
|
|
|
|
|
|
|
|
|
|
|
|
|
|
12V |
| 1B RGB | 2B2BRGB | 3BRGB | 4BRGB |
|
|
| AUX AUDIO | PAGING |
|
|
| |||
| /VIDEO3 VIDEO | /VIDEO4 VIDEO |
|
|
|
| INPUT 5 | SENSOR | VOL/MUTE |
| LAN 1 | LAN 2 | ||||
5A MAX |
|
|
|
|
|
|
|
| ||||||||
Power Supply |
|
|
| RGB | Video |
| Aux Audio |
|
| MLC Control |
| |||||
Connector | PVT CV D Inputs | Output | Output | Input |
|
|
| Port |
| |||||||
|
|
|
| (3 and 4) |
|
| Paging Sensor |
|
|
|
|
| ||||
|
|
|
|
|
|
|
|
| Volume/Mute |
| ||||||
|
|
| Rear View |
|
|
| Port |
|
| Control Port |
| |||||
|
|
|
|
|
|
|
|
|
|
|
|
|
| |||
•Where it goes: PVS 305SA IP and power supply install onto the base plate of the PMK 550.
•What it does: Receives input video and audio signals, and pass through LAN data from AV source input wall plates. Outputs and switches the video and audio signals to projector and ceiling speakers.
PoleVault IP Systems • Installation — Stage 4 (PMK 550 and PVS 305SA IP) | 33 |
