5725A
Page
Table of Contents
5725A
Calibration and Verification
5725A
List of Tables
5725A
List of Figures
Viii
Interference Information
Page
Operator Safety Summary
Symbols Marked on Equipment
Servicing Safety Summany
First AID for Electric Shock
Introduction and Specifications
5725A
Introduction
Where to Go From Here
5700A Operator Reference Guide
How to Use the Manuals
5700A Operator Manual
5700A Remote Programming Reference Guide
Specifications
Linearity Bandwidth
Stability Temperature Coefficient Noise Range
Overshoot 5% Common mode rejection 140 dB, DC to 400 Hz
10 Hz
AC Voltage
5725A Amplifier
±ppm output + mV
Maximum Current Load Limits
Voltage Range
Frequency Hz Settling time seconds
Nominal Value
Temperature
Two-Wire Adder active compensation Note Lead Resistance
Coefficient
II L UII MAX
DC Current
± ppm output + μA
AC Current
Relative Uncertainty ±1C Hours Days Year ± ppm output + nA
10C
Range Absolute Uncertainty
Volts DBm Resolution Hours Days ± % output + μV Year
Wideband AC Voltage Option
Hz-500 kHz
Guard isolation 20 volts
General Specifications
Temperature performance Operating 0C to 50C
Size
5725A
Installation
5725A
Standard Equipment
Unpacking and Inspection
Model or Part Number
Line Power Cord Types Available from Fluke
Line Power Cords Available for Fluke Instruments
Placement and Rack Mounting
Service Information
Cooling Considerations
Connecting to the 5700A Calibrator
Correct Way to Dress Interface Cable
100V 110V F8A 115V
Selecting Line Voltage
120V S2 S3 S4 200V 220V 230V F4A
Accessing the Fuse
Accessing the Fuse
Connecting to Line Power
5725A
Operating Notes
5725A
Operating Notes
Front Panel Features
Front Panel Features
Current Mode Indicator
Front Panel Features Current Output Binding Posts
5725A Standby Indicator
Voltage Mode Indicator
Rear Panel Features
Rear Panel Features
5700A Calibrator Connector
Rear Panel Features Current Output Binding Posts
Calibration Switch
Line Voltage Selection Switches
Turning on the 5725A Amplifier
Warm Up
5725A Operating Functions and Modes
Standby
Voltage Standby
Current Standby
Voltage Operate
Current Operate
Conditions That Activate the 5725A
Theory of Operation
High Voltage Heat Sink Assemblies
Overall Functional Description
A Overall Block Diagram
1100V AC Range Functional Description
11A Range Functional Description
Voltage and Current Standby Modes
Operation in the 11A DC Range
Operation in the 11A AC Range
Voltage Standby
How the 5700A and 5725A Communicate
Description of the Out-Guard Lines 5725A Side
Description of the In-Guard Lines
∙ B-RCL
Functional Summaries by Assembly
∙ B-FEEDBACK
Interconnect Assembly A1
Detailed Circuit Description
Power Supply Assembly A4
High Voltage Supply Section
Internal Fuse Data
Switching Section
Current-Limit Section
System Supply Section
Microcomputer
Digital Assembly A5
Fan Supply Section
External RAM
Digital Assembly Block Diagram
Led Driver
Data Latch
Strobe Lines
Optoisolator Link
Current Amplifier Assembly A2
Power Up and Reset Circuitry
Watchdog Timer
Break-Detect Circuitry
Current Amplifier Assembly Block Diagram
Error Amplifier Section
Output Stage Section
Monitor Section
Control and Switching Section
Power Supply Section
High Voltage Amplifier A3
Input Amplifier
High Voltage Amplifier Assembly Block Diagram
Window Comparator
Integrator
Input Clamp
Midstage -400V Filter
Transconductance and Cascode Stage
Midstage
High Voltage Heat Sink Assemblies
Autobias Current Source
Autobias Sense Circuit
Signal Transformer Usage
Signal Transformers
Temperature Monitoring
High Voltage Amplifier Feedback
High Voltage Sense Assembly A6
High Voltage Sense Assembly Block Diagram
Sense Amplifier Section
Destination Assembly
High-Quality Reference Name Destination
Signals Monitored by the Analog Monitor Section
Analog Monitor Section
Analog Input Switching Section
Serial Interface/Guard Crossing Section
Control Section
AC Line Voltage Selection Section
5725A
Calibration and Verification
5725A
Where to Find Further Information
5725A
Maintenance
5725A
Replacing the Fuse
Cleaning the Air Filter
General Cleaning
Cleaning PCA’s
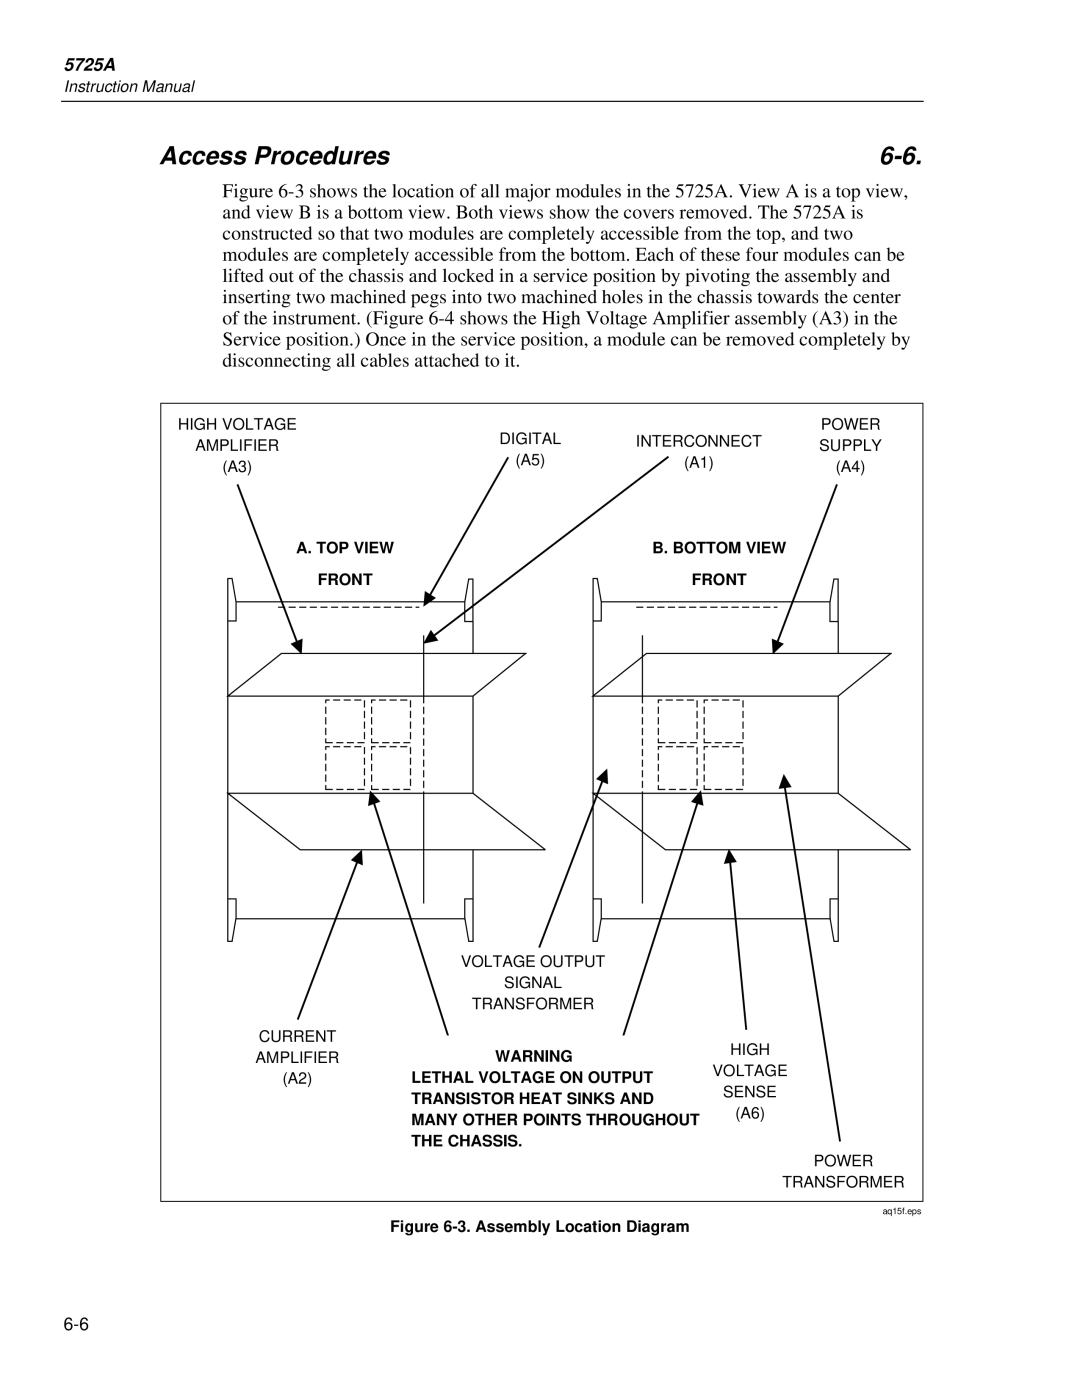
Access Procedures
Assembly Location Diagram
Initial Access Procedure
WWarning
TP307
TP304 TP301
Accessing the Power Supply Assembly A4
Accessing the Digital Assembly A5
When Reinstalling Digital Assembly
Accessing the Current Amplifier Assembly A2
Accessing the High Voltage Amplifier A3
Correct Way to Dress Cables
Accessing the High Voltage Sense Assembly A6
Accessing the High Voltage Output Transistors
Accessing the Interconnect Assembly A1
Enabling Front or Rear Binding Posts
Enabling Front or Rear Binding Posts
Troubleshooting
5725A
5725A Fault Codes
Self Diagnostics
A Fault Codes
Fault Message Explanation
Self Diagnostics
Manual Tests for Fault Isolation
Analog Monitor Faults
Fault no Message
Problem 4 Fault When Entering Current Standby
Reduced-Voltage Troubleshooting Mode
Problem 3 Fault When Entering Voltage Operate
Problem 5 Fault When Entering Current Operate
Testing the Power Supply By Itself
5725A
List of Replaceable Parts
5725A
Manual Status Information
How to Obtain Parts
Newer Instruments
Revision Level Final Assembly
Service Centers
Assembly Name
Ref or Option No
TM1
Aq24f.tif
Aq25f.tif
Aq26f.tif
Aq27f.tif
Aq28f.tif
Aq29f.tif
Aq30f.tif
Aq31f.tif
A1 Interconnect PCA
5725A-1611
A2 Current Amplifier PCA
List of Replaceable Parts
Reference Description Designator Fluke Stock Tot Qty
5725A-1650
A3 High Voltage Amplifier PCA
Reference Description
JUMPER,WIRE,NONINSUL,0.200CTR
5725A-1661
A4 Power Supply PCA
PAD, Adhesive
HARNESS, High Voltage Supply
5725A-1631
A5 Digital PCA
5725A-1650
A6 High Voltage Sense PCA
HEADER,1 ROW,.156CTR,12 PIN
List of Replaceable Parts
ZENER,UNCOMP,3.3V,5%,20.0MA,0 ZENER,UNCOMP,5.1V,5%,20.0MA,0
5725A-1601
A12 Transformer Enclosure Assembly
Aq32f.tif
Aq33f.tif
Aq34f.tif
Aq35f.tif
A30 Inductor PCA
5725A
Schematic Diagrams
5725A
5725A-1611
5725A
Schematic Diagrams
5725A-1650
Schematic Diagrams
5725A
Schematic Diagrams
5725A-1661
Schematic Diagrams
5725A
Aq59f.eps
5725A
Schematic Diagrams
AT Pins 12 and 13 of U507 5725A-1650
Schematic Diagrams
5725A-1601
Schematic Diagrams
5725A
Schematic Diagrams
5725A
Aq45f.eps
5725A
Index
5725A STANDBY, 3-5CABLE OFF, 3-5CURRENT MODE, 3-5FAULT
Chassis GROUND, 3-7CURRENT OUTPUT, 3-5,3-7HI, 3-5,3-7
5725A
Manual Supplement
Change #1

