Page
Page
Contents
Using the Internet
Using Multimedia
Windows Basics
Managing Power
Iii
Sending and Receiving Faxes
Travel Tips
Customizing Your Computer
Networking Your Computer
169
Maintaining Your Computer
Restoring Software
Troubleshooting
Safety, Regulatory, and Legal Information Index
Upgrading Your Notebook
Checking Out 1 Your Gateway
Component Icon Description
Front
Component
Left side
Speakers are turned off when speakers or headphones are
Right side
Back
Bottom
Component Icon Description
Keyboard area
Component Icon Description
Identifying your model
Gateway model number
Gateway serial number
Microsoft Certificate of Authenticity
Internal wireless label
Finding your specifications
Checking Out Your Gateway
Peripheral devices
Accessories
Batteries and automobile/airplane power adapters
Carrying cases
Printers
Getting Started
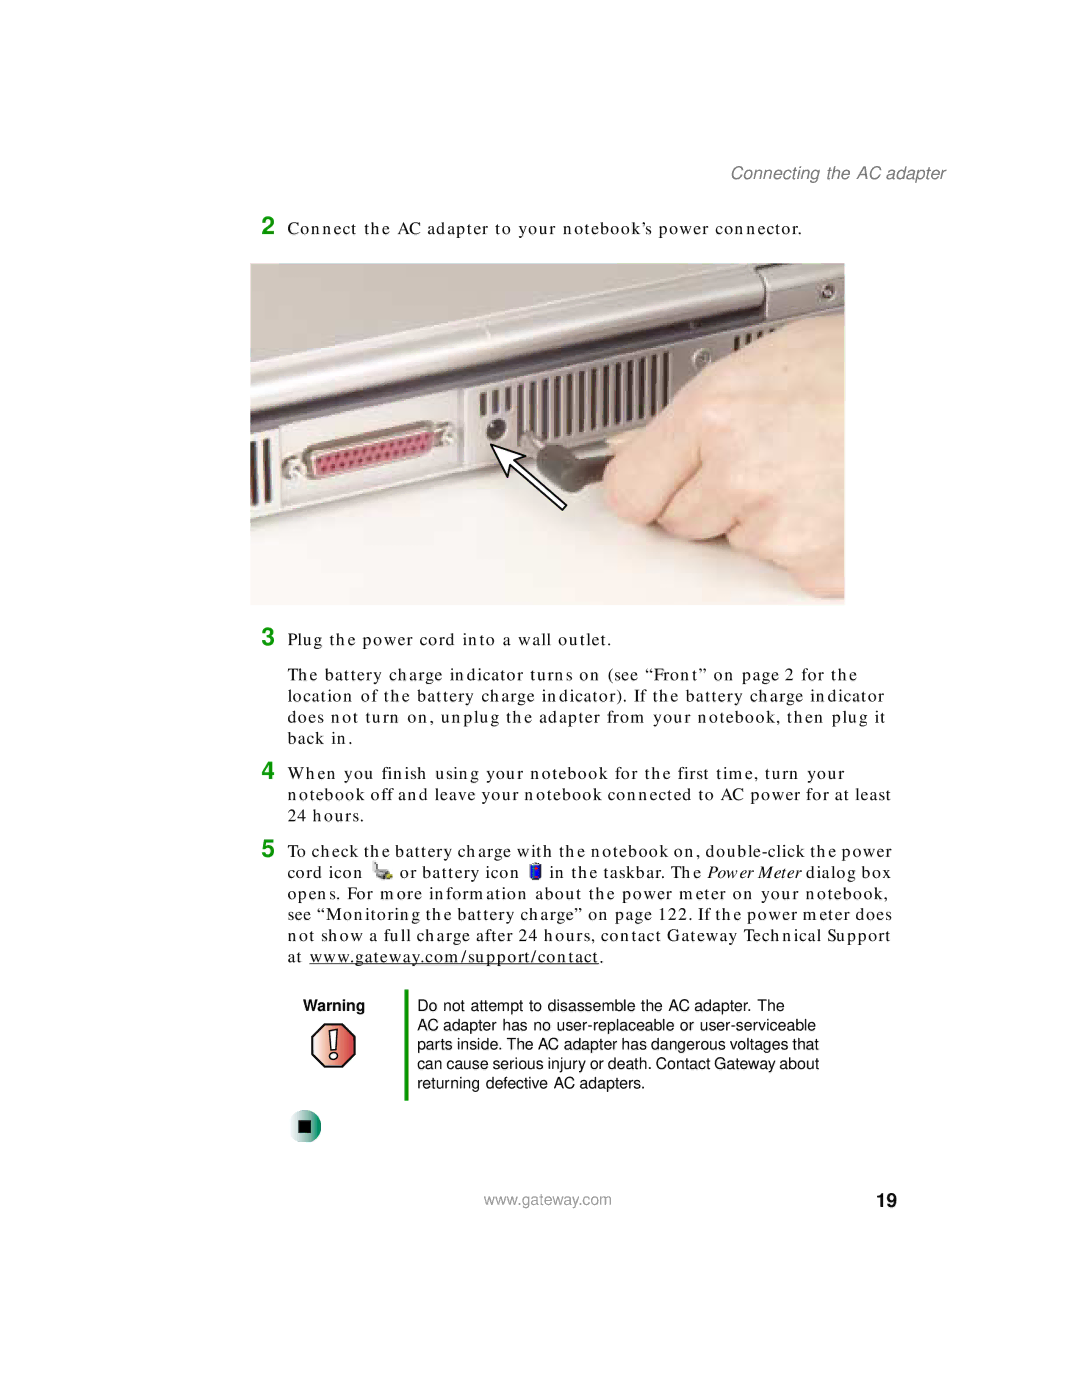
To connect the AC adapter
Connecting the AC adapter
Connecting the AC adapter
Protecting from power source problems
To start your notebook
Starting your notebook
Turning off your notebook
Waking up your notebook
To turn off your notebook
To close unresponsive programs and restart your notebook
Restarting rebooting your notebook
Indicator Icon Description
Status indicators
Status indicators
Using the keyboard
Key type Icon Description
Key types
Press and hold F N while Pressing this system key
System key combinations
Decrease the brightness of the display
Button Icon Press to
Multi-function buttons
Using the EZ Pad touchpad
Do this
Using the touchpad
Using the EZ Pad touchpad
To connect the modem
Connecting the modem
To connect to a wired Ethernet network
Connecting to a wired Ethernet network
Broadband Internet connections
Installing a printer, scanner, or other peripheral device
Getting Help
To start HelpSpot
HelpSpot
HelpSpot
Searching for a topic
To play a HelpSpot video
HelpSpot videos
Online help
Gateway Web site
Support Home tab
Using eSupport
Windows Basics
About the Windows environment
Desktop elements Description
Using the desktop
Using the Start menu
To use the Start menu
To add icons to the desktop
Adding icons to the desktop
Identifying window items
Identifying window items
Window item Description
Working with files and folders
Viewing drives
To view the drives on your computer
To see the files and folders on a drive
Creating folders
To create a folder
To copy a file or folder to another folder
Copying and moving files and folders
To move a file or folder to another folder
To recover files or folders from the Recycle Bin
Deleting files and folders
To delete files or folders
To empty the Recycle Bin
Browsing for files and folders
To browse for a file
Searching for files
To find files and folders using the Search utility
Using the Windows Search utility
Using advanced search options
Working with documents
Creating a new document
To create a new document
To save a document
Saving a document
To open a document
Opening a document
To print a document
Printing a document
Do this
Shortcuts
Using the Internet
Learning about the Internet
To set up an Internet account with America Online
Setting up an Internet account
Accessing your Internet account
To connect to your America Online Internet account
To disconnect from your America Online Internet account
Using the World Wide Web
To connect to a Web site
Connecting to a Web site
To download files or programs from a Web site
Downloading files
Using e-mail
To send e-mail using America Online
Sending e-mail
Checking your e-mail
To check your e-mail using America Online
Using the Internet
Using Multimedia
To use a diskette
Using the diskette drive
Using the CD or DVD drive
Identifying drive types
CD drive CD-RW drive DVD drive
To insert a CD or DVD
Inserting a CD or DVD
To adjust the overall volume level from Windows
Adjusting the volume
Adjusting the volume
To adjust the overall volume level using hardware controls
To adjust specific volume levels
Click the Volume tab
Listening to CDs
Listening to CDs
To play a CD
Listening to CDs
To make an audio recording
Recording and playing audio
Clicking Stop
To play an audio recording in Sound Recorder
Playing audio and video files with the Windows Media Player
To play a file using the Windows Media Player
Playing CDs
Using MusicMatch
To play a music CD
To create rip MP3 files
Creating MP3 music files
Click the record button. The Recorder window opens
To edit track information
Editing track information
Building a music library
To change the music library display settings
Changing the music library display settings
To listen to an Internet radio station
Listening to Internet radio
Using a recordable drive
Using advanced features
Creating data CDs
Insert a blank, writable CD into your recordable CD drive
To create a data CD
Select Source Files Source Pane Add
100
101
Creating music CDs
102
To create music CDs
103
104
105
Copying CDs
106
To copy a CD
107
Playing a DVD
To play a DVD
108
Capturing video
To use Pinnacle Expression
109
110
111
Sending and 7 Receiving Faxes
To install Fax
Installing and configuring Fax
Installing Fax
Configuring Fax
113
To configure Microsoft Fax
114
Sending a simple fax
To send a simple fax
115
Setting up your cover page template
To set up your fax cover page template
116
To fax a document that you have scanned
Faxing from programs
Faxing a scanned document
To fax a document directly from most programs
To receive and view a fax
Canceling a fax
To cancel a fax that has not been sent
Receiving and viewing a fax
Automatically retry sending a fax
To automatically retry sending a fax
119
Automatically cancelling a fax
To automatically cancel a failed fax
120
121
Managing Power
122
Monitoring the battery charge
123
Recharging the battery
Recalibrating the battery
To recalibrate the battery
124
125
Changing the battery
Replacing the battery
To replace the battery
126
127
Extending battery life
Conserving battery power
Using alternate power sources
Changing power modes
128
If your computer You want to Then
129
Changing power settings
Changing the power scheme
To change the power scheme
130
Changing alarm options
To change the alarm options
131
Changing advanced settings
To change advanced power management settings
132
Activating and using Hibernate mode
To activate Hibernate mode
133
134
To use Hibernate mode
135
Travel Tips
Radio frequency wireless connections
Modem
136
Files
Security
137
Power
To create a startup password
138
139
Additional tips
140
141
Customizing 10 Your Computer
142
Adjusting the screen and desktop settings
Adjusting the color depth
To change the color depth
143
Adjusting the screen resolution
144
To adjust the screen resolution
Changing the colors on your Windows desktop
To change desktop colors
145
Changing the desktop background
To change the desktop background
146
147
Selecting a screen saver
To select a screen saver
148
149
Changing the touchpad settings
To change your touchpad settings
150
151
Changing the touchpad settings
Programming the multi-function buttons
To program the multi-function buttons
152
Adding and modifying user accounts
To add, delete, or modify user accounts
153
154
To switch user accounts
155
Networking Your Computer
156
Benefits of networking
Sharing a single Internet connection
Sharing drives
157
Sharing peripheral devices
Streaming audio and video files
Playing multi-player games
158
Wired Ethernet network
Wireless Ethernet Ieee 802.11a or Ieee 802.11b network
Selecting a network connection
Using a wired Ethernet network
Ethernet, Fast Ethernet, or Gigabit Ethernet
159
160
Example wired Ethernet network
161
Equipment you need for a wired Ethernet network
162
Using a wireless Ethernet network
163
Example access point wireless Ethernet network
164
165
Example peer-to-peer wireless Ethernet network
166
For more information
Using your notebook on a network
To turn wireless Ethernet on or off
167
168
169
Moving from Your 12 Old Computer
Using the Windows XP Files and Settings Transfer Wizard
To open the Files and Settings Transfer Wizard
170
171
Transferring files
Finding your files
To find files in the My Documents folder
To find files using Find or Search
172
File type File usually ends
173
Transferring Internet settings
Setting up your ISP
To use the Internet Connection Wizard
Transferring your Internet shortcuts
Installing your old printer or scanner
Installing a USB printer or scanner
Transferring your e-mail and address book
Installing a parallel port printer
To install your old printer
175
176
Installing your old programs
177
Maintaining 13 Your Computer
After purchase
Maintenance task Immediately
Caring for your computer
178
179
Maintenance task Immediately Monthly When needed
Creating an emergency startup diskette
To create an emergency startup diskette
180
Creating an emergency startup diskette
181
182
Protecting your computer from viruses
183
To scan for viruses
To update Norton AntiVirus
To remove a virus
184
185
Managing hard drive space
Checking hard drive space
To check hard drive space
Using Disk Cleanup
To use the Windows Disk Cleanup program
186
Checking the hard drive for errors
To check the hard drive for errors
187
188
Defragmenting the hard drive
To run Disk Defragmenter
189
190
191
Backing up files
Using the Scheduled Task Wizard
To start the Scheduled Task Wizard
192
Cleaning your computer
Cleaning the exterior
193
194
Cleaning the keyboard
Cleaning the computer screen
Cleaning the mouse
195
To clean your trackball mouse
196
197
Restoring Software
198
Using the Restoration CDs
Page
200
201
202
Reinstalling programs
To reinstall programs from the red Gateway CD
203
204
Reinstalling Windows
To reinstall Windows XP and the device drivers
205
206
207
Upgrading Your
Adding and removing a PC Card
To insert a PC Card
208
209
To remove a PC Card
210
Preventing static electricity discharge
Preventing static electricity discharge
211
Adding or replacing memory
To add or replace memory modules
212
Adding or replacing memory
213
Page
Replacing the hard drive kit
To replace the hard drive kit
215
216
217
218
219
Troubleshooting
220
Safety guidelines
First steps
Software support tools
221
An audio CD does not produce sound
Troubleshooting
CD or DVD drives
Your notebook does not recognize a disc or the drive
223
DVD movie will not play
To check IRQ usage
Cleaning CDs or DVDs
Device installation
You have computer problems after adding a new device
Diskette drive
To free IRQ resources for the new device
225
226
Display
227
To restore deleted files
File management
Hard drive
228
You see a Data error message
Internet
You cannot connect to the Internet
229
Connecting to a Web site takes too long
External keyboard does not work
You see a Memory error message
Keyboard
Memory
Your modem does not dial or does not connect
You see a Not enough memory error message
Modem
To check the dialing properties
232
Your 56K modem does not connect at 56K
To access the gateway.your.way dial-up server
Modem is not recognized by your notebook
233
To run modem diagnostics
Modem is noisy when it dials and connects
234
External mouse works erratically
To turn down the modem volume
Mouse
External mouse does not work
236
Passwords
Networks
PC Cards
Power
Printer
237
238
To set a default printer
You see a Printer queue is full error message
To make sure that the printer is not set to work offline
239
You see a Printer is out of paper error message
Sound
You are not getting sound from the built-in speakers
Video
External monitor is not working
240
Telephone support
Before calling Gateway Technical Support
241
242
Service description How to reach
Resource Service description How to reach
Telephone numbers
243
Tutoring and training
Self-help
Tutoring
Resource Service description For more information
Training
244
Important safety information
Setting up your system
245
Replacement parts and accessories
246
Care during use
Wireless Guidance
Regulatory compliance statements
247
248
United States of America
249
Unintentional emitter per FCC Part
FCC declaration of conformity
250
251
Unintentional emitter per ICES-003
Canada
252
Industry Canada IC Intentional emitter per RSS
253
Unintentional emitter
Mexico
254
Intentional emitter
255
Laser safety statement
Trademark Acknowledgments
Macrovision statement
256
All Rights Reserved
257
Index
258
259
DVD/CD-RW
260
261
171
262
Fn 27
263
264
164
265
Battery 23, 122, 123, 124, 125
266
136
267
268
116
269
183