Instructions

Using the probe. (on some models)

If your model has a door latch, do not lock the oven door with the latch while cooking with the probe. The latch is used for self-cleaning only.

For many foods, especially roasts and poultry, internal food temperature is the best test for doneness. The temperature probe takes the guesswork out of cooking foods to the exact doneness you want.

Safety

Use of probes other than the one provided with this product may result in damage to

the probe.

Use the handles of the probe and plug when inserting and removing them from the food and outlet.

Cable

Plug

Handles

Probe

Operating Instructions

The temperature probe has

a skewer-like probe at one end and a plug at the other end that goes into the outlet in the oven.

nTo avoid damaging your probe, do not use tongs to pull on the cable when removing it.

nTo avoid breaking the probe, make sure food is completely defrosted before inserting.

nTo prevent possible burns, do not unplug the probe from the outlet until the oven has cooled.

nNever leave your probe inside the oven during a self-cleaning cycle.

nDo not store the probe in the oven.

Installation Instructions

After preparing the meat and placing it on a trivet or on a broiler pan grid, follow these directions for proper probe placement.

Insert the probe completely into the meat. It should not touch the bone, fat or gristle.

For roasts with no bone, insert the probe into the meatiest part of the roast. For bone-in ham or lamb, insert the probe into the center of the lowest large muscle.

Insert the probe into the center of dishes such as meat loaf or casseroles.

Insert the probe into the meatiest part of the inner thigh from below and parallel to the leg of a whole turkey.

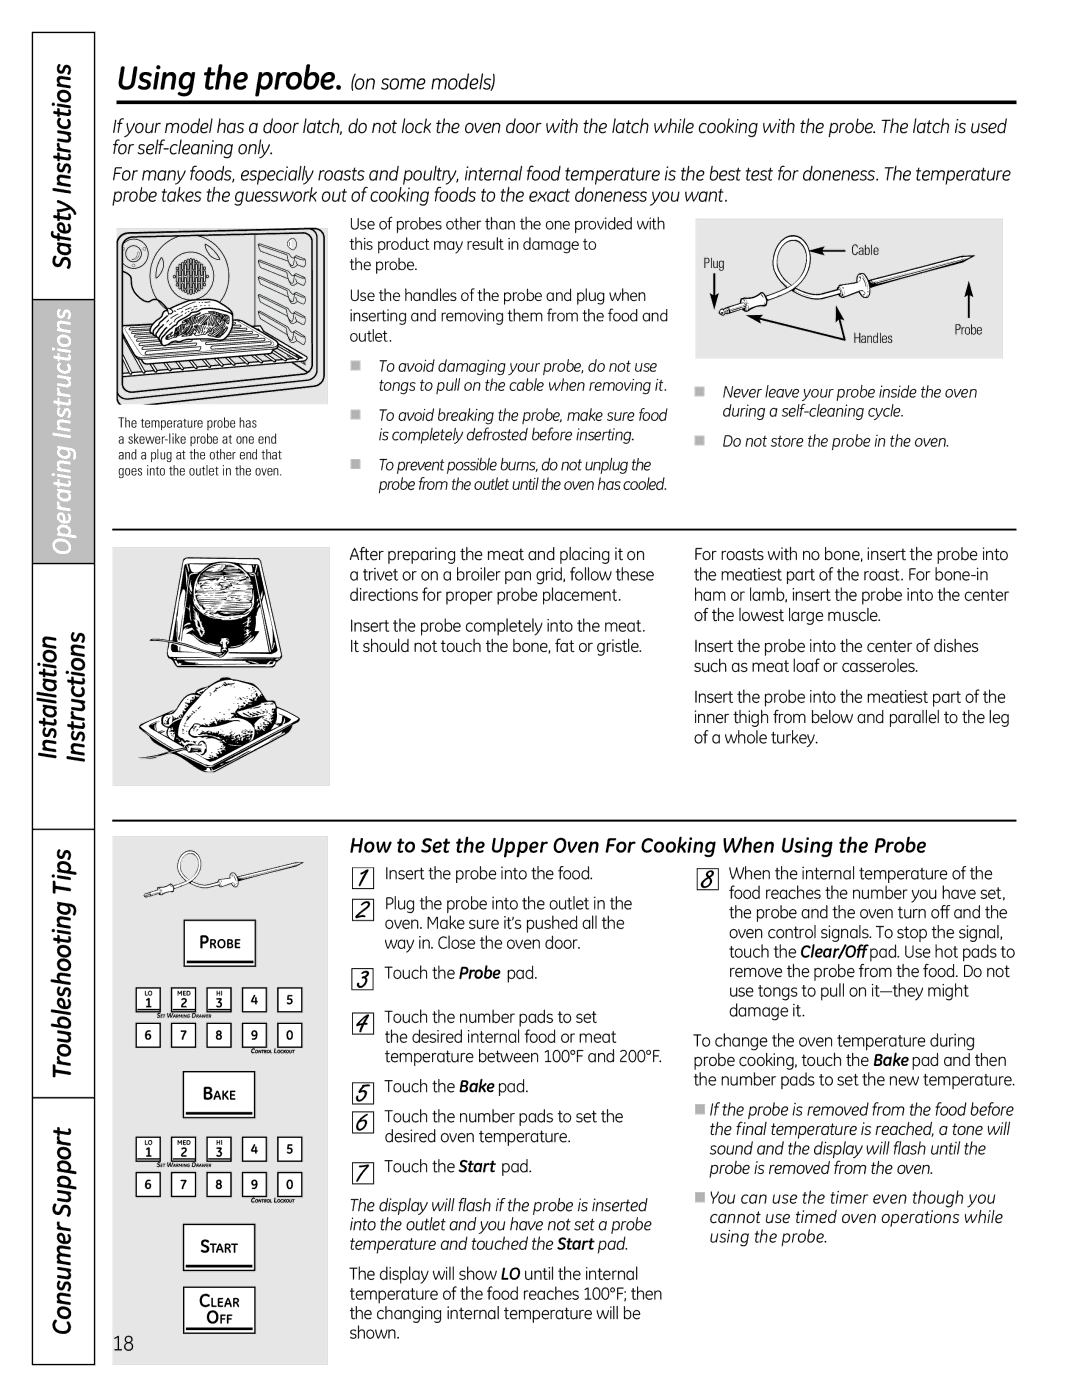
How to Set the Upper Oven For Cooking When Using the Probe

Consumer Support Troubleshooting Tips

18

Insert the probe into the food.

Plug the probe into the outlet in the oven. Make sure it’s pushed all the way in. Close the oven door.

Touch the Probe pad.

Touch the number pads to set the desired internal food or meat temperature between 100°F and 200°F.

Touch the Bake pad.

Touch the number pads to set the desired oven temperature.

Touch the Start pad.

The display will flash if the probe is inserted into the outlet and you have not set a probe temperature and touched the Start pad.

The display will show LO until the internal temperature of the food reaches 100°F; then the changing internal temperature will be shown.

When the internal temperature of the food reaches the number you have set, the probe and the oven turn off and the oven control signals. To stop the signal, touch the Clear/Off pad. Use hot pads to remove the probe from the food. Do not use tongs to pull on it—they might damage it.

To change the oven temperature during probe cooking, touch the Bake pad and then the number pads to set the new temperature.

nIf the probe is removed from the food before the final temperature is reached, a tone will sound and the display will flash until the probe is removed from the oven.

nYou can use the timer even though you cannot use timed oven operations while using the probe.

Page 18
Image 18
GE JGB295 Using the probe. on some models, How to Set the Upper Oven For Cooking When Using the Probe, Touch the Probe pad

JGB810, JGB820, JGB800, JGB805, JGB295SERSS specifications

The GE JGB295, JGB295SERSS, JGB805, JGB800, and JGB820 are notable models from General Electric’s line of home appliances, specifically designed to enhance the cooking experience in modern kitchens. Each model boasts distinct features and technologies that cater to varying culinary needs while maintaining efficiency and convenience.

The GE JGB295 is a versatile range that combines both gas cooking and electric baking functions. With its spacious oven capacity, it provides room for multitasking and preparing multiple dishes simultaneously. One of its main features is the powerful convection cooking system, which circulates heat for even cooking results, allowing food to bake uniformly.

The JGB295SERSS variant, an upgraded version of the JGB295, includes the same underlying features but is enhanced with a sleek stainless steel finish, giving it a more modern and professional look. This model also comes equipped with advanced safety features, including a gas shutoff valve and a child lock option to ensure peace of mind during cooking.

The GE JGB805 is another standout model focused on efficiency and performance. With its dual fuel configuration, it combines the advantages of gas burners and electric ovens. The JGB805 features edge-to-edge cooking surfaces, maximizing space and providing an easy-to-clean design. Its Wi-Fi connectivity enables remote control via smartphone, allowing users to monitor cooking progress without being tied to the kitchen.

Meanwhile, the JGB800 model emphasizes user-friendly design through its intuitive controls and smart settings. It features a programmable timer and various cooking modes tailored for different culinary styles. Additionally, its self-cleaning oven function minimizes maintenance efforts, making it a practical choice.

Lastly, the GE JGB820 integrates advanced technology with a focus on enhancing cooking precision. This model features a seamless cooktop for easy cleanup and a heavy-duty oven rack that glides smoothly, accommodating a variety of dish sizes. Its Air Fry mode allows for healthier cooking options, providing crispy results without compromising on flavor.

Together, these GE models represent a commitment to quality, innovation, and convenience, making them valuable additions to any kitchen. Whether it’s baking, roasting, or frying, these ranges are designed to meet diverse cooking needs while ensuring efficiency and ease of use.