Settings
Date/Time Settings (Continued)
Item
Description
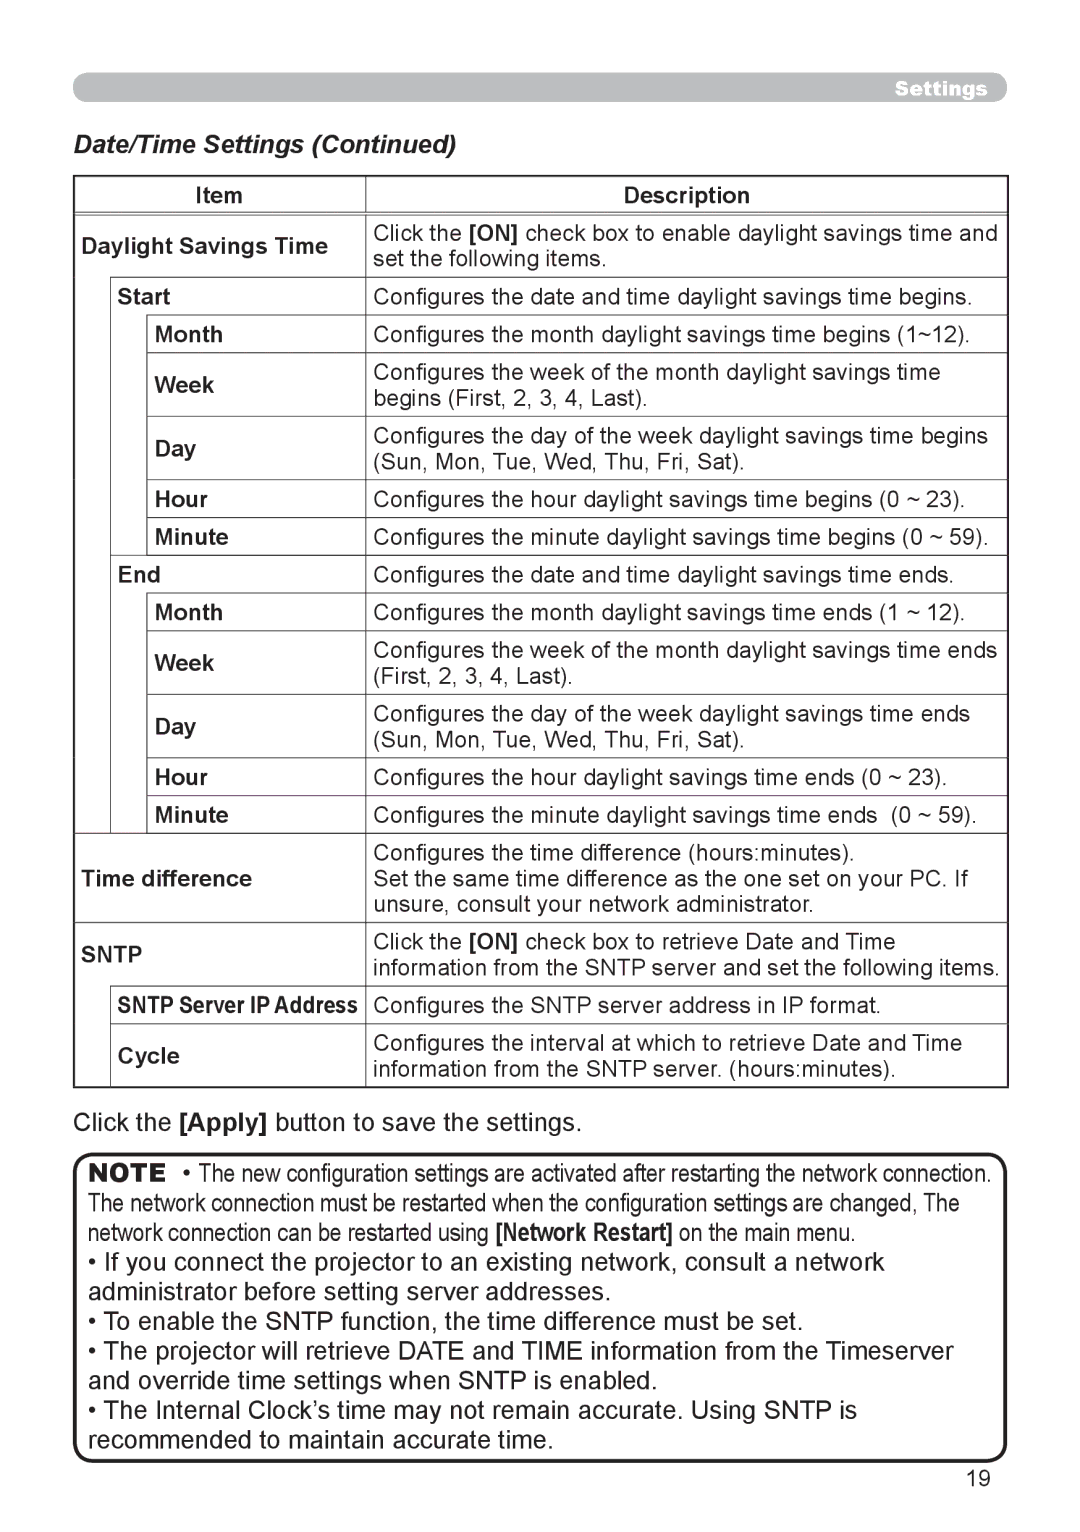
Daylight Savings Time | Click the [ON] check box to enable daylight savings time and | |||
set the following items. | ||||
|
|
| ||
|
|
|
| |
| Start | Configures the date and time daylight savings time begins. | ||
|
| Month | Configures the month daylight savings time begins (1~12). | |
|
| Week | Configures the week of the month daylight savings time | |
|
| begins (First, 2, 3, 4, Last). | ||
|
|
| ||
|
| Day | Configures the day of the week daylight savings time begins | |
|
| (Sun, Mon, Tue, Wed, Thu, Fri, Sat). | ||
|
|
| ||
|
| Hour | Configures the hour daylight savings time begins (0 ~ 23). | |
|
| Minute | Configures the minute daylight savings time begins (0 ~ 59). | |
| End | Configures the date and time daylight savings time ends. | ||
|
| Month | Configures the month daylight savings time ends (1 ~ 12). | |
|
| Week | Configures the week of the month daylight savings time ends | |
|
| (First, 2, 3, 4, Last). | ||
|
|
| ||
|
| Day | Configures the day of the week daylight savings time ends | |
|
| (Sun, Mon, Tue, Wed, Thu, Fri, Sat). | ||
|
|
| ||
|
| Hour | Configures the hour daylight savings time ends (0 ~ 23). | |
|
| Minute | Configures the minute daylight savings time ends (0 ~ 59). | |
Time difference | Configures the time difference (hours:minutes). | |||
Set the same time difference as the one set on your PC. If | ||||
|
|
| unsure, consult your network administrator. | |
SNTP | Click the [ON] check box to retrieve Date and Time | |||
information from the SNTP server and set the following items. | ||||
|
|
| ||
| SNTP Server IP Address | Configures the SNTP server address in IP format. | ||
| Cycle | Configures the interval at which to retrieve Date and Time | ||
| information from the SNTP server. (hours:minutes). | |||
|
|
| ||
Click the [Apply] button to save the settings.
NOTE • The new configuration settings are activated after restarting the network connection. The network connection must be restarted when the configuration settings are changed, The network connection can be restarted using [Network Restart] on the main menu.
•If you connect the projector to an existing network, consult a network administrator before setting server addresses.
•To enable the SNTP function, the time difference must be set.
•The projector will retrieve DATE and TIME information from the Timeserver and override time settings when SNTP is enabled.
•The Internal Clock’s time may not remain accurate. Using SNTP is recommended to maintain accurate time.
19
