РУССКИЙ ∂ÏÏËÓÈο PORTUGUÊS SPANISH ITALIANO FRANÇAIS DEUTSCH ENGLISH
RAS-SX10HAK / RAC-SX10HAK RAS-SX13HAK / RAC-SX13HAK
INDOOR UNIT OUTDOOR UNIT
RAS-SX10HAK RAS-SX13HAK
PRECAUTIONS DURING INSTALLATION
PRECAUTIONS DURING SHIFTING OR MAINTENANCE
PRECAUTIONS DURING OPERATION
SAFETY PRECAUTION
ENGLISH
NAMES AND FUNCTIONS OF EACH PART
INDOOR UNIT
OUTDOOR UNIT
ABOUT OUTDOOR UNIT
INDOOR UNIT CONTROL PANEL / CLEANING UNIT
How to Attach the Nano Titanium Air Cleaning Mesh Preparation
REMOTE CONTROLLER
NAMES AND FUNCTIONS OF EACH PART continued
BUTTONS TO
START OPERATIONS
FUNCTION SELECTOR
POWERFULL Button
INSTALLING ANTI-MOLD WASABI CASSETTE
2 Install the anti-mold wasabi cassette
1 Open the front panel
Close the front panel
FILTER CLEANING UNIT OPERATION CHECK
1 Make sure the power plug is firmly plugged into the power outlet
2 Performing operation check after the power is turned on
Perform the filter cleaning unit operation check
PREPARE THE REMOTE CONTROLLER
Install the batteries
Open the cover and press the RESET
ABOUT ADDRESS SELECTOR SWITCH
PREPARE THE REMOTE CONTROLLER continued
Ampere setting Standard/Save can be selected
WHEN OPERATING THE REMOTE CONTROLLER
Adjust the room temperature
AUTOMATIC OPERATION
STOP
AUTOMATIC OPERATION
HEATING OPERATION
DEHUMIDIFYING OPERATION
DEHUMIDIFYING OPERATION continued
COOLING OPERATION
DRY COOL OPERATION
40 %~70 %
10C~32C
16C~32C
Setting Range of AUTO/MANUAL Operation
POWERFUL OPERATION
CANCEL
STAINLESS PLASMA AIR PURIFYING FAN OPERATION
STOP
INFRARED HUMAN PRESENCE SENSING FUNCTION
Example Cooling
DYNAMIC AIR DEFLECTION FUNCTION TRACING/EVASION
Set the detection speed of the sensor to “Slow”
Fine tune the detection speed of the sensor
INTERNAL CLEANING OPERATION
STOP While
SLEEP OPERATION
MOLD MONITOR OPERATION
ADJUSTING THE VERTICAL AIRFLOW DIRECTION
Set automatically
Vertical airflow swing
Vertical air flow of your preference
ADJUSTING THE HORIZONTAL AIRFLOW DIRECTION
Adjust the horizontal airflow direction
Horizontal angle of your preference
TIMER PRESET OPERATION
How to preset the timer
How to preset the OFF TIMER ON TIMER
How to cancel the preset timer
ITALIANO FRANÇAIS DEUTSCH
РУССКИЙ ∂ÏÏËÓÈο PORTUGUÊS SPANISH
FURTHER CONVENIENT TIMER FUNCTION
Combination of ON TIMER and DEHUMIDIFY button
SLEEP TIMER OPERATION
Combination of Sleep Timer and On Timer operation
FILTER CLEANING OPERATION
1 Automatic filter cleaning operation
Conditions under which automatic filter cleaning is performed
About the noise during filter cleaning
ITALIANO FRANÇAIS DEUTSCH ENGLISH
STOP Press
FILTER CLEANING OPERATION continued
2 Manual filter cleaning operation
3 Maintenance
HOW TO PROHIBIT THE FILTER CLEANING OPERATION
Set to prohibit the filter cleaning operation
Return to the filter cleaning operation setting
Operate the manual filter cleaning operation. Page
Set to prohibit the filter cleaning operation again
MAINTENANCE
Maintenance of dust box
Stop the operation with the remote controller and
3 Turn on the power supply or turn on the circuit breaker
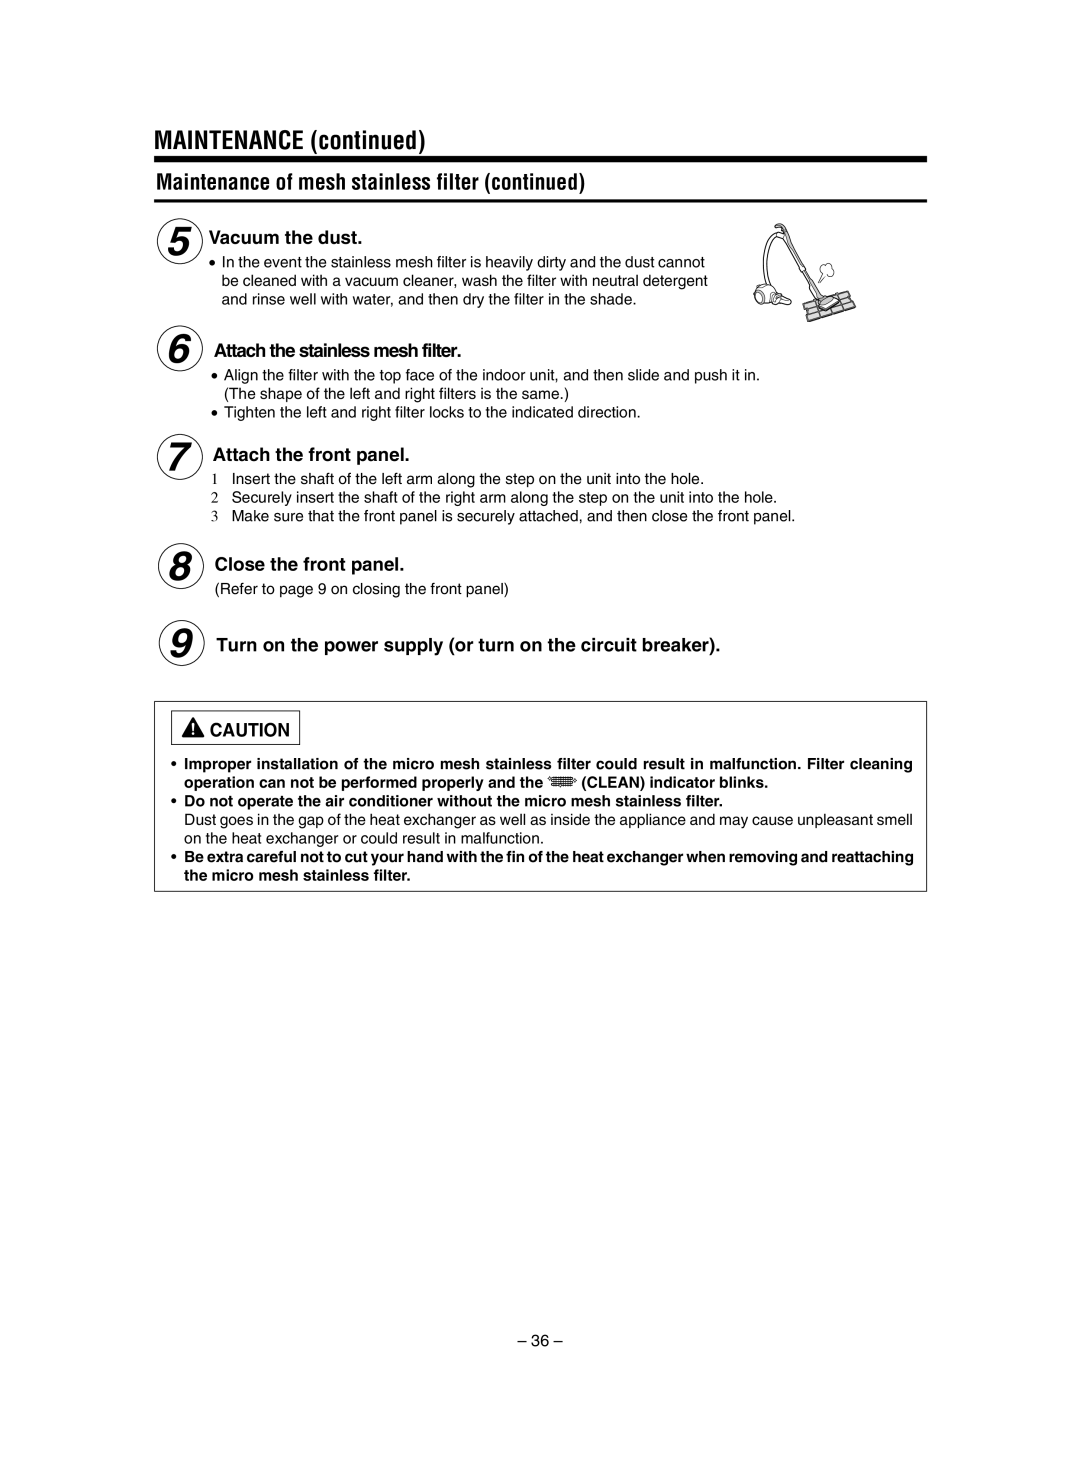
Maintenance of Stainless Mesh Filter
controller and unplug the power plug
Stop the operation with the remote
or turn off the circuit breaker
MAINTENANCE continued
Maintenance of mesh stainless filter continued
Turn on the power supply or turn on the circuit breaker
Vacuum the dust
Maintenance of dust catcher
the power supply or turn off the circuit breaker
Stop the operation with the remote controller and unplug
Remove the front panel
Maintenance of electric dust collector electrodes
4 Turn on the power supply. or turn on the circuit breaker
Stop the operation with the remote controller
and unplug the power supply or turn off the
UNDERSTANDING THE OPERATING MECHANISM
NAMES AND FUNCTIONS OF EACH PART Page
THE IDEAL WAYS OF OPERATION
TROUBLESHOOTING
FILTER CLEANING OPERATION
TROUBLESHOOTING continued
PLEASE CHECK THE FOLLOWING BEFORE SERVICE
ANTI-MOLD WASABI CASSETTE
THE FOLLOWING CASES DOES NOT INDICATE MALFUNCTION
Disconnect the power supply
Reconnect the power supply
Automatic operation starts when the temporary switch
Unplug the power
INSPECTION AND MAINTENANCE
REGULAR INSPECTION
OPERATION DISPLAY CHART
During internal cleaning operation page
During preset of the mold monitor operation page
Display
MEMO
474 A
РУССКИЙ ∂ÏÏËÓÈο PORTUGUÊS SPANISH ITALIANO FRANÇAIS 中 国 语
室内机 室外机
室内机/室外机
分 体 式 冷 气 机
安全注意事项
安装方面的注意事项
搬移或修理时的注意事项
使用上的注意事项
使用上的注意事项
各部的名称和功能
室外机的说明
中 国 语
室内机操作部和清扫部
纳米钛空清网的安装方法
各部的名称和功能 继续
可以使运转开始的按钮
功能选择部
防霉芥末盒的安装
1 打开前面板。
2 安装防霉芥末盒。
3 关上前面板。
过滤网清扫部的动作确认
1 将电源线可靠地接入电源中。 警告
2 进行接通电源后的动作检查。 进行过滤网清扫部的动作检查。
请准备好遥控器
装入电池。
打开盖板
用有尖细端头的物品按下复位
请准备好遥控器 继续
4 能够设定电流值标准/节省切换。
操作遥控器时
自动运转
自动运转
室温的微调节
风速的切换
制热运转
乾爽除湿运转
可设定的温度范围为16C ~ 32C。
围为 40% ~ 70% 。
乾爽除湿运转 继续
制冷运转
凉快运转
干燥除湿、凉快运转的自动/手动切换
10 ~32
50 %~60 %
16 ~32
不锈等离子空气清净送风运转
全功率运转
乾爽除湿
红外线人体检知传感器
以冷房运转为例
动态导风(追踪/回避)运转机能
以暖房运转为例
传感器的检测速度设定为「慢速」
传感器检测速度微调
内部清洁运转
快眠运转
功能选择 钮
霉菌监视运转
上下风向的调节
自动设定
上下风向摆动
上下喜好风向
左右风向的调节
左右风向的摆动
左右喜好调节
1 按
3 按
定时器预约运转
定时器的预约方法
4 按
定时预约的取消方法
更方便的定时器使用方法
开机定时 与 乾爽除湿 钮的组合
睡眠定时运转
睡眠定时运转和开机定时的组合
开机定时 进行第二天早上的运转等。
1 预约 开机定时。 74, 75页
过滤网清扫运转
1 自动过滤网清扫运转
在过滤网清扫运转结束时 , 返回到
进行自动过滤网清扫运转的条件
过滤网清扫运转时的声音
3 维护
过滤网清扫运转(继续)
2 手动过滤网清扫运转
过滤网清扫运转禁止的设定方法
1 过滤网清扫运转禁止的设定方法。 2 重新设定过滤网清扫运转禁止的方法。 3 进行手动过滤网清扫运转 80页
4 再一次设定过滤网清扫运转禁止的方法。 1 , 2 , 4 的设定方法, 80页
清洁 指示灯反复出现闪烁、亮灯和变暗现象。非故障
集尘盒的保养方法
请用遥控器停止操作, 断开电源。 或者切断断路器 用水清洗集尘盒。
接入电源。 或打开断路器)
在清扫机体前,请使用遥控器停止操作或者切断断路器。
不锈过滤网的保养方法
1 请用遥控器停止操作,并断开电源。 或者切断断路器 2 打开前面板。
3 拆下前面板。
4 拆下前面的不锈过滤网。
维护(继续)
不锈过滤网的保养方法(继续)
5 用吸尘器等吸掉灰尘。
6 安装不锈过滤网。
捕尘器的保养方法
请用遥控器停止操作,并断开电源。
或者切断断路器 。
拆下捕尘器。
维护 继续
电气集尘器电极的保养方法
1 请用遥控器停止操作,并断下电源。 或者切断断路器 2 请用双手轻轻打开上下导风板。 注意
3 用牙刷清除电气集尘器电极的脏污。
运转的原理和希望用户事前了解的事项
各部的名称和功能 52页
更理想的使用方法
1. 建议用户设定为“恰当的室温”, 既省钱又有益於身体。 请不要将室温设定得过低或过高。对健康不利,且浪费电力。
拉上窗帘或百叶遮帘, 可以减少热量的进出, 更有效地用电。 2. 请时常换气。 注意 如果与燃气器具同一室使用时,必要进行换气。
3. 要外出时, 可有效利用霉菌监视功能。 (请参照霉菌监视运转) 4. 就寝时, 可有效利用定时功能。
遇到问题时
过滤网清扫部的动作的说明
遇到问题时 继续
防霉芥茉盒的说明
请服务人员维修以前,请先检查以下事项
这非有故障
运转 指
出现下述情况时,请迅即向销售店咨询
暂时运转
进行暂时运转时,请先断开电源。 或切断断路器。) 再次接入电源。或打开断路器。)
按下暂时运转开关后, 会进行自动运转。
定期检查
检查整备
运转显示快查表
内部清洁运转中
Page
474 A

 CAUTION


 (CLEAN) indicator blinks.