PROMPTEXPLANATION
02 START: PARTN |
|
ANY PARTITION | 0 |
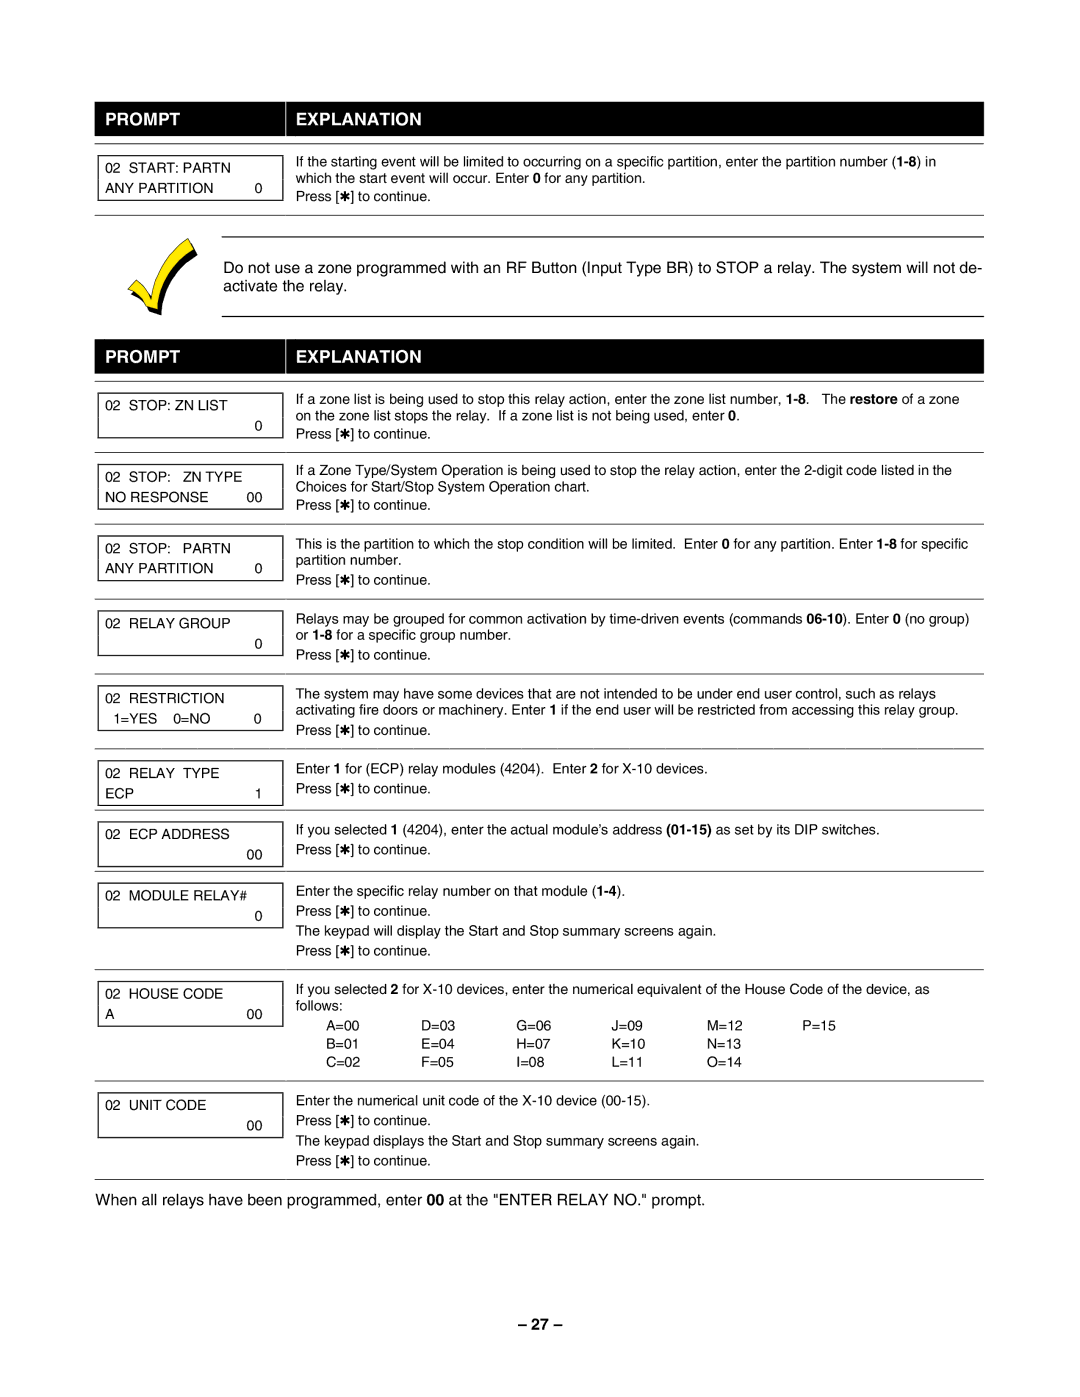
If the starting event will be limited to occurring on a specific partition, enter the partition number
Press [✱] to continue.
Do not use a zone programmed with an RF Button (Input Type BR) to STOP a relay. The system will not de- activate the relay.
PROMPTEXPLANATION
| 02 | STOP: ZN LIST |
|
|
|
| 0 |
|
|
| |
|
|
|
|
|
|
|
|
| 02 | STOP: ZN TYPE |
|
| NO RESPONSE | 00 | |
| |||
|
|
|
|
|
|
|
|
| 02 | STOP: PARTN |
|
| ANY PARTITION | 0 | |
| |||
|
|
|
|
|
|
|
|
| 02 | RELAY GROUP |
|
|
|
| 0 |
|
|
| |
|
|
|
|
|
|
|
|
| 02 | RESTRICTION |
|
| 1=YES 0=NO | 0 | |
| |||
|
|
|
|
|
|
|
|
| 02 | RELAY TYPE |
|
| ECP | 1 | |
| |||
|
|
|
|
|
|
|
|
| 02 | ECP ADDRESS |
|
|
|
| 00 |
|
|
| |
|
|
| |
|
|
| |
| 02 | MODULE RELAY# | |
|
|
| 0 |
|
|
| |
|
|
|
|
|
|
|
|
| 02 | HOUSE CODE |
|
| A |
| 00 |
|
| ||
If a zone list is being used to stop this relay action, enter the zone list number,
Press [✱] to continue.
If a Zone Type/System Operation is being used to stop the relay action, enter the
Press [✱] to continue.
This is the partition to which the stop condition will be limited. Enter 0 for any partition. Enter
Press [✱] to continue.
Relays may be grouped for common activation by
Press [✱] to continue.
The system may have some devices that are not intended to be under end user control, such as relays activating fire doors or machinery. Enter 1 if the end user will be restricted from accessing this relay group.
Press [✱] to continue.
Enter 1 for (ECP) relay modules (4204). Enter 2 for
Press [✱] to continue.
If you selected 1 (4204), enter the actual module’s address
Enter the specific relay number on that module
Press [✱] to continue.
The keypad will display the Start and Stop summary screens again.
Press [✱] to continue.
If you selected 2 for
A=00 | D=03 | G=06 | J=09 | M=12 | P=15 |
B=01 | E=04 | H=07 | K=10 | N=13 |
|
C=02 | F=05 | I=08 | L=11 | O=14 |
|
|
|
|
|
|
|
02 UNIT CODE
00
Enter the numerical unit code of the
The keypad displays the Start and Stop summary screens again. Press [✱] to continue.
When all relays have been programmed, enter 00 at the "ENTER RELAY NO." prompt.
– 27 –
