HP Photosmart 2600/2700 series all-in-one
User Guide
Safety information
Contents
Print from your computer
Contents Use HP Instant Share USB 125
Index
Label Description
HP all-in-one overview
HP all-in-one at a glance
Control panel overview
Control panel features
Label Name and Description
Color graphics display icons
Color graphics display screen saver
Icon
Scan To menu
Menu Overview
Copy Menu
Scan Menu
Fax Menu
Setup Menu
Photo Menu
Proof Sheet Menu
Use the HP Image Zone to do more with your HP all-in- one
Access the HP Image Zone software Windows
Setup Menu
To open the HP Director
Feature Purpose
Button Name and Purpose
Open the HP Image Zone window
To open the HP Image Zone window
Products Icon Feature and Purpose
Services Icon Feature and Purpose
Display the HP Image Zone Dock menu
To display the HP Image Zone Dock menu
Device Tasks Icon Purpose
Manage and Share Icon Purpose
Manage and Share Feature Purpose
Setup Guide
Find more information
Onscreen help from your device
Connection information
Connect using a USB cable
Connect using Ethernet
Supported connection types
Connect using wireless
To connect the HP bt300 to your HP all-in-one
To set your HP all-in-one to require passkey authentication
Set Bluetooth security for your HP all-in-one
Use a passkey to authenticate Bluetooth devices
Use Webscan
Set your HP all-in-one to be invisible to Bluetooth devices
Reset Bluetooth settings on your HP all-in-one
To set your HP all-in-one to be Not visible
Connection information
Connection information
Transfer photos
Transfer photos using a Windows PC
Work with photos
Edit photos
Transfer photos using a Macintosh
Edit photos using a Windows PC
Edit photos using a Macintosh
Share photos
Share photos using a Windows PC
Share photos using a Macintosh
Print photos using a Windows PC
Print photos
Print photos using a Macintosh
Work with photos
Work with photos
To load an original on the glass
Load originals and load paper
Load an original
Papers to avoid
Choose papers for printing and copying
Recommended papers
We do not recommend printing to the following papers
We do not recommend copying to the following papers
Load paper
Load full-size paper
To load full-size paper in the main input tray
Load originals and load paper
Load 10by 15cm 4by 6inch photo paper
To load full-size plain paper in the optional lower tray
Load postcards or Hagaki cards
To load postcards or Hagaki cards in the main input tray
To load envelopes
Load envelopes
To load postcards or Hagaki cards in the optional rear tray
Load other types of paper
Paper Tips
Tips
Avoid paper jams
Paper
Load originals and load paper
Memory card slots and camera port
Use a memory card or PictBridge
Camera
Control memory card security on a network
Transfer photos to your computer
Memory Card and PictBridge
Print photos from a proof sheet
Print a proof sheet
Complete the proof sheet
Scan a proof sheet
Use the print options menu to set photo print options
SettingDescription
Set photo print options
Setting Description
Image Size
Change print options
Use the edit features
Set new photo print options defaults
Edit images on the HP all-in-one
Print photos directly from a memory card
To use the Zoom feature
To use the Rotate feature
Use the Zoom or Rotate functions
Print individual photos
Create borderless prints
Print a Dpof file
Print photos from a PictBridge-compatible digital camera
Use quick print to print the current photo
Deselect photos
To print camera-selected photos
Use the slide show feature
View or print photos in a slide show
To view a slide show
Share photos through HP Instant Share
Use the HP Image Zone
Set the copy paper size
Use the copy features
Paper type Suggested paper size settings
Paper type Control panel setting
Set the copy paper type
Press Start Copy Black or Start Copy Color
Increase copy speed or quality
Select an input tray
Copy a two-page black-and-white document
Change default copy settings
Make multiple copies of the same original
Press Start Copy Black
Make a 10by 15cm 4by 6inch borderless copy of a photo
Copy a 10by 15cm 4by 6inch photo onto a full-size
Press Start Copy Color
Copy a photo several times on one
Resize an original to fit onto letter or A4paper
Copy a faded original
To copy a blurred document from the control panel
Copy a document that has been faxed several times
Enhance light areas of your copy
To copy an overexposed photo from the control panel
Make a poster
Prepare a color iron-on transfer
Stop copying
Use the scan features
Scan to an application
Scan an original USB-connected
Scan an original network-connected
Send a scan to an HP Instant Share destination
Send a scan to a memory card
Stop scanning
Scan
Print from your computer
Print from a software application
To change the print settings for the current job
Change the print settings
To change the print settings for all future jobs
Windows users
Macintosh users
To change all other print settings
Stop a print job
To stop a print job from the HP all-in-one
Print from your computer
Fax setup
USA
Choose the right fax setup for your home or office
Select your fax setup case
You answered Yes to question
Questions DSL service
You answered No to all
Only
To set up your HP all-in-one with a separate fax line
Case a Separate fax line no voice calls received
Case B Set up your HP all-in-one with DSL
To set up your HP all-in-one with DSL
Case D Fax with a distinctive ring service on the same line
To set up your HP all-in-one with a distinctive ring service
To set up your HP all-in-one with a shared voice/fax line
Case E Shared voice/fax line
To set up your HP all-in-one with voice mail
Case F Shared voice/fax line with voice mail
To set up your HP all-in-one with a PC modem
Case G Fax line shared with PC modem no voice calls received
Case H Shared voice/fax line with PC modem
Set up your HP all-in-one to a computer with one phone port
Set up your HP all-in-one to a computer with two phone ports
Back view of the HP all-in-one
Case I Shared voice/fax line with answering machine
Fax setup
Set up your HP all-in-one to a computer with one phone port
Set up your HP all-in-one to a computer with two phone ports
Back view of the HP all-in-one
Case K Shared voice/fax line with PC modem and voice mail
100
User Guide 101
Test your fax setup
To test your fax setup from the control panel
User Guide 103
104
Choose the recommended answer mode for your setup
Use the fax features
Set up the HP all-in-one to receive faxes
Setting None
Off
Send a basic fax
Set the answer mode
Send a fax
Press Start Black
Enable fax confirmation
Send a fax manually from a phone
To send a fax manually from a phone
Send a fax using redial
Resend a fax to multiple recipients
To send a fax using monitor dialing from the control panel
Send a fax using speed dials
Send a fax using monitor dialing
Receive a fax
Set the number of rings before answering
Set the date and time
Receive a fax manually
Enter text and symbols
Set the fax header
Enter text using the visual keyboard
Enter text using the keypad on the control panel
Generate reports manually
Print reports
Generate reports automatically
Create speed-dial entries
Set up speed dialing
Update speed-dial entries
To change the resolution from the control panel
Change the fax resolution and lighter/darker settings
Change the fax resolution
Delete speed-dial entries
Set fax options
Change the lighter/darker setting
Set new default settings
Set tone or pulse dialing
Adjust the volume
Set the paper size for received faxes
Change the answer ring pattern distinctive ringing
To change the answer ring pattern from the control panel
Redial a busy or unanswered number automatically
Set automatic reduction for incoming faxes
To set backup fax reception from the control panel
Set backup fax reception
Use error correction mode
Set the fax speed
To change the ECM setting from the control panel
Fax speed setting
To set the fax speed from the control panel
To reprint faxes in memory from the control panel
Reprint or delete the faxes in memory
Fax over the Internet
To delete all the faxes in memory from the control panel
To stop faxing from the control panel
To cancel a number you are dialing
Stop faxing
Use HP Instant Share USB
Overview
Send photos from a memory card
Send images using your HP all-in-one
Get started
To send photos immediately upon inserting your memory card
If you are using a Windows-based computer
To insert the memory card and send photos at a later time
Send a scanned image
To send a scanned image from your HP all-in-one
To use the HP Image Zone software
Send images using your computer
Send images using the HP Image Zone software Windows
To use the HP Instant Share client application
To use the e-mail option within the HP Director
Open the HP Photo and Imaging Gallery
132
Use HP Instant Share networked
HP Instant Share Send
HP Instant Share Receive
Preview or automatically print received images
HP remote printing
Create destinations
Use the HP Instant Share access list
To create destinations
To use the access list
Send images directly from your HP all-in-one
138
Send photos from a destination file
Cancel sending images
To send images from the HP Image Zone Windows users
To receive images from any sender
Receive from any sender Open mode
Receive images
To receive images from a specified group of allowed senders
Receive from a specified group of senders Private mode
Print received images
To automatically print received images
Automatically print received images
Manually print received images
To preview images before printing
To print an image collection without previewing it
Set print options
Press Start Color, Start Black, or Photo
Press Start Color or Start Black
146
Remote print documents
Cancel print jobs
Remove received images
To remove image collections
To set HP Instant Share options
Set HP Instant Share options
To use the HP remote printer driver
Press 3 to select HP Instant Share Options
Instant Share Options
Network-connected to USB-connected
Order paper, transparency film, or other media
Order accessories
Order supplies
Order print cartridges
Country/region Number for ordering
Accessory and HP model Description Number
Order other supplies
Australia 131047 Europe +49
154
Clean the lid backing
Clean the HP all-in-one
Clean the glass
Maintain your HP all-in-one
To check the ink levels from the control panel
Clean the exterior
Check the estimated ink levels
Print a self-test report
Replace the print cartridges
Work with print cartridges
Handle the print cartridges
To replace the print cartridges
160
User Guide 161
Use a photo print cartridge
Use a gray photo print cartridge
Use the print cartridge protector
Align the print cartridges
To clean the print cartridges from the control panel
Clean the print cartridges
Clean the print cartridge contacts
To clean the print cartridge contacts
Clean the area around the ink nozzles
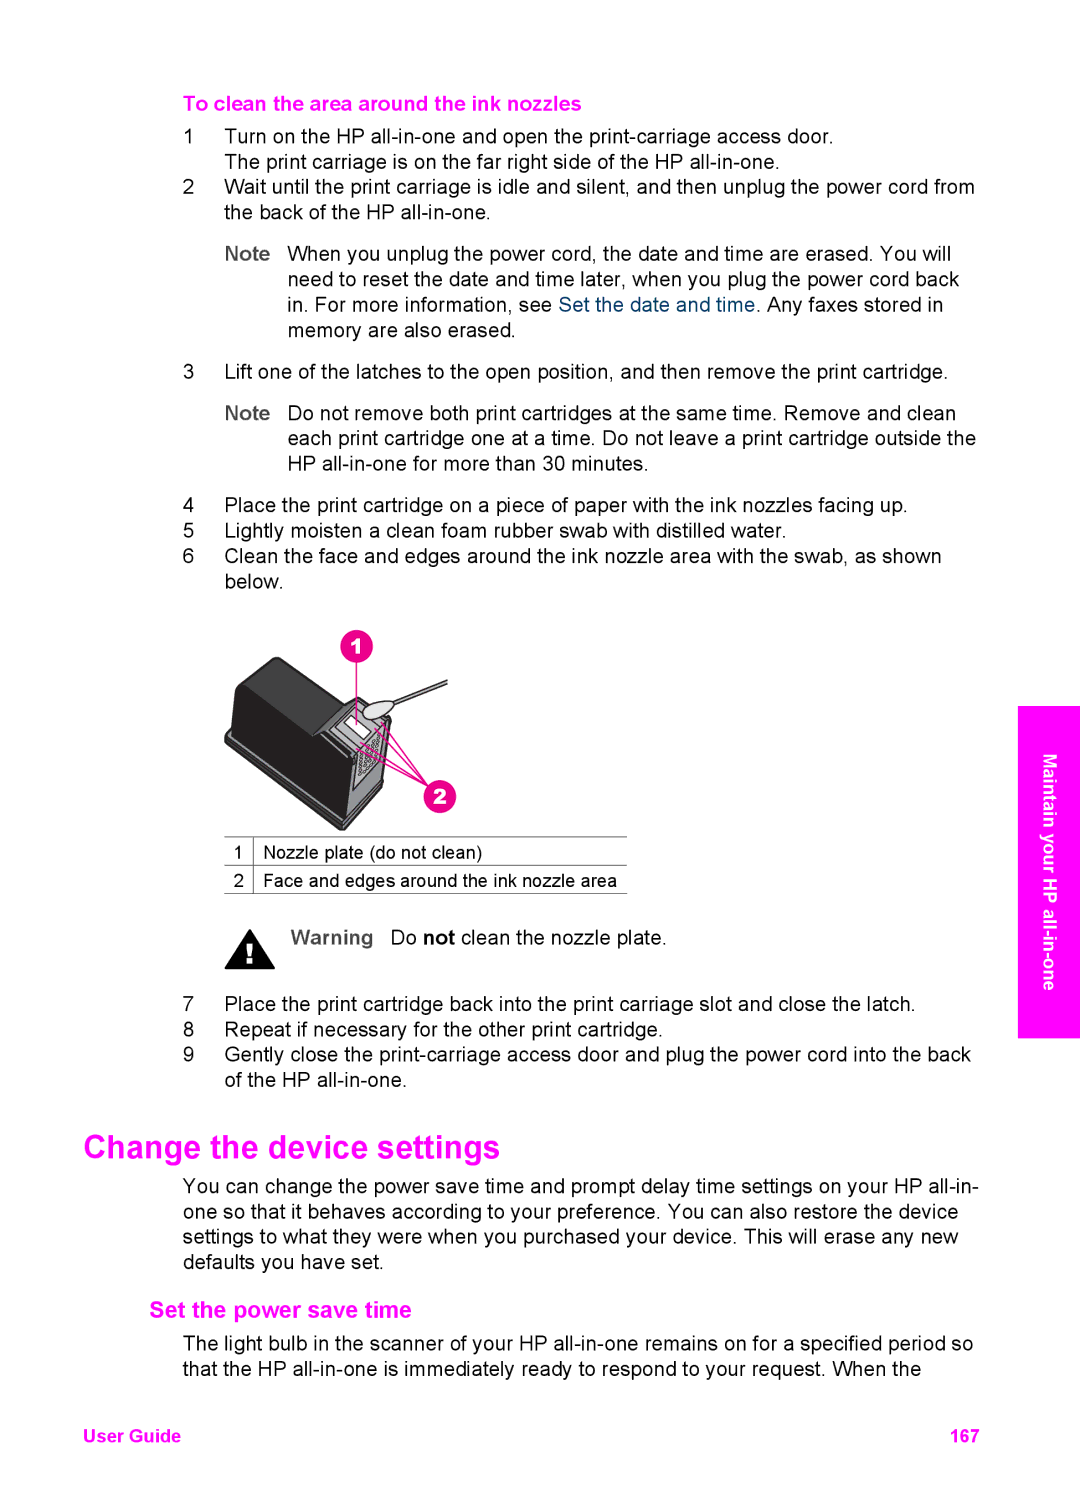
To clean the area around the ink nozzles
Change the device settings
Set the power save time
Restore the factory defaults
Self-maintenance sounds
Set the prompt delay time
Troubleshooting information
Before you call HP Support
My HP all-in-one does not turn on Solution
Setup troubleshooting
Hardware setup troubleshooting
View the Readme file
User Guide 171
Color graphics display shows the wrong language Solution
Incorrect type of paper is loaded in the input tray
Solution HP all-in-one does not print
Software installation troubleshooting
Minimum system checks screen appears Solution
Red X appears on the USB connect prompt Solution
Some of the icons are missing in the HP Director
Fax wizard does not start
To uninstall from a Windows computer, method
Registration screen does not appear Solution
Uninstall and reinstall the software
On the Windows taskbar, click Start, Settings, Control Panel
To test your fax setup
Fax setup troubleshooting
To uninstall from a Macintosh computer
Fax hardware test failed Solution
Fax test failed
Fax line condition test failed Solution
Dial tone detection test failed Solution
184
User Guide 185
HP all-in-one cannot receive faxes, but can send faxes
User Guide 187
Fax tones are recorded on my answering machine Solution
To extend your phone cord
Minimum installation error
HP Instant Share setup issues
Am having problems faxing over the Internet Solution
You need to install device software Solution
HP Instant Share Not Set Up Solution
Operational troubleshooting
Press 3 to select Add New Destination
Paper troubleshooting
Paper has jammed the HP all-in-one Solution
Print cartridge troubleshooting
HP Instant Share troubleshooting
Connection errors
No network connection. See documentation Solution
To enter information in the EWS
Failed to connect to HP Instant Share Solution
To check the DNS IP address
To check your proxy settings
Under Applications, click Instant Share
Corrupted Destination file found Solution
Connection lost to HP Instant Share service Solution
Send image collections errors
Destination not authorized on this device Solution
Login failed. Refer to the manual for Help Solution
To remove files from the HP Instant Share service
Send and Receive image collections errors
HP Instant Share service dis Solution
Unsupported file format Solution
Photo memory card troubleshooting
HP Instant Share Error Report messages
Corrupted file Solution
Device update Windows
Device update
Fax troubleshooting
Device update Macintosh
To use device update
Get support and other information from the Internet
Access your serial number and service ID
Get HP support
HP customer support
Call in North America during warranty
Call elsewhere in the world
User Guide 205
Call in Australia post-warranty
Call HP Korea customer support
Call HP Japan customer support
Remove print cartridges from a functional HP all-in-one
HP Quick Exchange Service Japan
Prepare your HP all-in-one for shipment
Remove print cartridges from a nonfunctional HP all-in-one
Remove the control panel overlay and pack your HP all-in-one
User Guide 211
212
Warranty service
Warranty information
Duration of limited warranty
Warranty upgrades
Limitations of warranty
Hewlett-Packard limited global warranty statement
Extent of limited warranty
Limitations of liability
Limited warranty information for EU countries/regions
Local law
Deutschland Österreich Hewlett-Packard GmbH
System requirements
Paper specifications
Technical information
Paper-tray capacities
Print margin specifications
Paper sizes
Print specifications
Top leading Bottom trailing Left Right Edge Edge1
Copy specifications
Fax specifications
Physical specifications
Memory card specifications
Scan specifications
Power specifications
Additional specifications
Environmental product stewardship program
HP inkjet supplies recycling program
Regulatory notices
Recycling program
Regulatory model identification number
FCC statement
Exposure to radio frequency radiation
User Guide 225
Regulatory notices for wireless products
Geräuschemission
Arib STD-T66 Japan
Declaration of conformity European Economic Area
HP Photosmart 2600series declaration of conformity
HP Photosmart 2700series declaration of conformity
March Date
230
Symbols/Numerics
Index
ECM
User Guide 233
234
User Guide 235
236
User Guide 237
Q3450-90195