User Guide
Copier/MFP KM
Printers
Table of Contents
Cover Mode, Page Insert, and Transparency Interleaving
Installing the Printer Driver in Windows
To install using a Local Connection
Local Connection
Any toner or ink cartridges before connecting the cable
Displayed, click Cancel
Operation Guide
Installation
Page
Installation
Page
USB Connection
Click Cancel
To install using a USB Connection
Choose from one of the following options
Setup.exe file
If Found New Hardware dialog box appears, click Cancel
Anyway
Page
Advanced
Page
Select No to complete the installation and click Finish
To install using a Network Connection
Network Connection
Installation
Find and select the printer URL and click Next
Installation
To install using an LPR Port Connection
LPR Connection
Setup.exe file
Anyway
New port Type list, and then click Next
Page
Installation
Page
Installing Components
Displayed components may vary based on the printer model
Page
Installing the Latest Printer Driver
To install using the Add Printer Wizard
Page
Accessing Printer Properties
Printer Properties
Installing Optional Devices
To install optional devices Click the Device Settings tab
Details, see Assigning Virtual Mailboxes on
Booklet Stitcher Punch Settings Assigning Virtual Mailboxes
RAM Disk
Settings
To change RAM Disk setting
Inactive
User Settings
On the Device Settings tab, click User
Identification Unit of Measurement
Selection
Language
Preference
Simplified User Interface
Description Language PDL Settings
On the Device Settings tab, click PDL
Options Descriptions
Option Description
Administrator Settings
Administrator Settings dialog box shown below
Models
Job Name Display Setting Administrator Password
Click OK
Password must be between 4 to 16 characters
To set the Administrator password
Compatibility Settings
Page
Auto Configuration
Click Auto Configure
Page
Printer Properties
Page
Basic Printing Tasks
Basic Printing
Page
Printing from Applications
Page
Using a Different Print Size
Printing Multiple Pages Per Sheet
Scaling
Be printed
Reduce Image to Fit
Matching the Paper Size before Printing
Media Type Usable Paper Cassettes
Printing on Paper of Non-Standard Sizes
Listed below
Name can be up to 31 characters
Size Cassette MP tray Duplexer unit
Printing with Custom Paper Sizes
Duplex Printing
Paper size Media Type
Printing on Both Sides
Manual Duplex
Flip on Long Edge Flip on Short Edge Portrait
Manual Duplex Settings
Media tab, select Cassette
To print on both sides, follow these steps
Reverse Order Printing
Prologue/Epilogue
Prologue/Epilogue tab includes
Embeds Prologue/Epilogue data file to the end of each
A print job. Select one page option
Language dialog box
Printing Watermarks
Selecting the Watermark
Adding Watermarks
Page
Selecting and Creating Custom Colors Color printers only
Luminosity Adjustment
Positioning Watermarks
Clear the Disable Feature check box on the Watermark tab
Deleting Watermark Text
Page
Adjusting Image Settings
Details, refer to Printing with Covers on
Resolution, Kyocera Image Refinement, and EcoPrint features
Print Quality
Grayscale Adjustment
Font Downloading
Available Device
Substitute with
Device fonts
Fonts
Click OK to save the settings
Reverse Image
Click OK to save your settings
Document Portability
Halftone Screen
Adjusting Color
Color Mode
Monochrome
Color Mode Settings Descriptions Options Color Cmyk
Color Mode Definitions
Definitions
Select the check box for your preferred settings
Select for your preferred settings
Click OK to save the ICM Settings
Monitor display
Lightness
Adjust the Saturation and Lightness
+180
Click OK Click OK to save the settings
Color Adjustment Settings -- RGB
Color Space, select RGB mode
Color Space Option Description
Click OK to save the color adjustment settings
Staple
Using Stapler
Staple and Offset features cannot be used simultaneously
Upper Left Upper Right Booklet
To set stapler settings
Offset and Staple cannot be used simultaneously
Using the Offset
Offset
Click the Output tab in the Properties dialog box
Punch and Booklet Printing cannot be used simultaneously
Using the Punch
Punch
Properties dialog box, click the Output tab
Cover Mode, Page Insert, and Transparency Interleaving
Printing with Covers
Cover Printing Options
5Front Outside
�Front and Back
Back cover Front cover
Insert
To edit cover printing options
Insert Page Printing
Inserted
To adjust media combination settings
Combinations
Transparency Interleaving
100
Transparency Interleaving Method
From the Media Type list, select Transparency
101
Booklet Printing
102
103
Using Booklet Printing
Left-Edge Right-Edge Binding
Left Edge Binding Right Edge Binding
Sorter Modes
Collating mode Non-collating mode Mailbox mode
Collating Modes
104
Sorter Mode Differences
105
106
Non-Collating
Select the Collate check box
From the Output to list, select Mailbox Face-down
Mailbox Mode
Clear the Collate check box
107
Rotate Collate
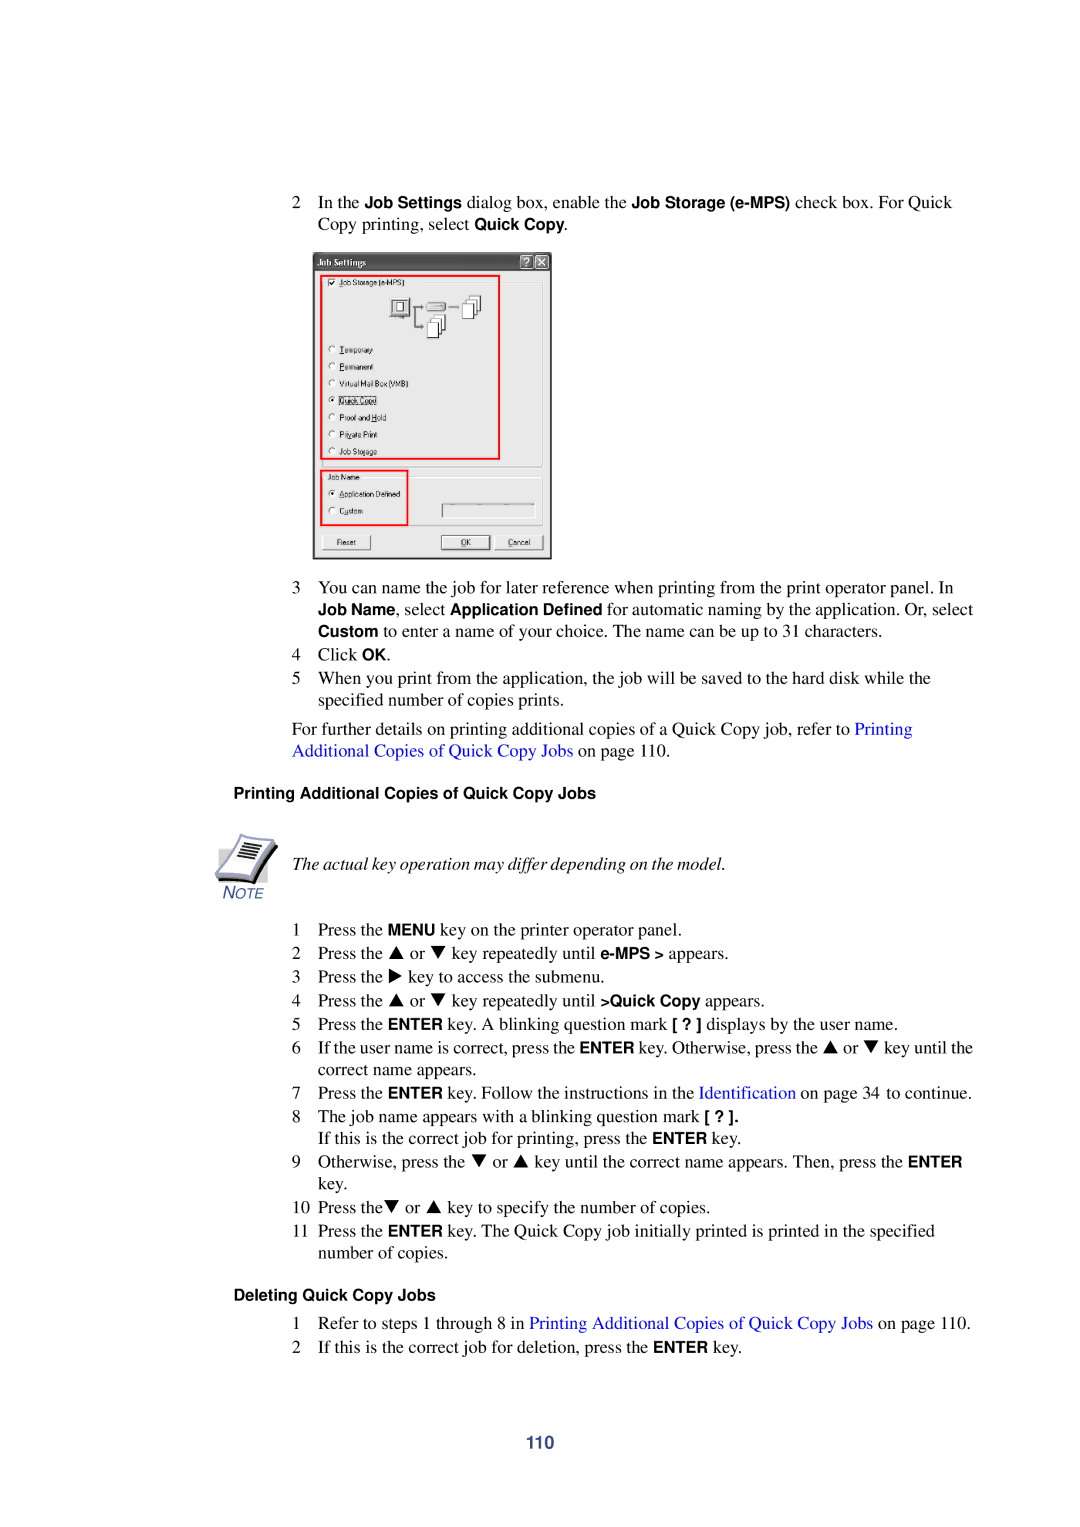
Job Settings
Using Rotate Collate
108
Lower corner of the 3-D image
Job Settings offers a variety of functions as listed below
Quick Copy
109
110
Actual key operation may differ depending on the model
Press theT or S key to specify the number of copies
Printing Additional Copies of Quick Copy Jobs
111
To print using Private Print, follow these steps
Printing Remaining Copies of Proof Hold Jobs Private Print
Proof and Hold
Printing Private Print Jobs
Job Storage
112
Printing Jobs Saved Using Job Storage
Virtual Mailbox
113
114
115
116
Importing and Exporting the Virtual Mailbox List
117
Saving Jobs in Virtual Mailboxes
118
Select Virtual Mail Box VMB and click Selection
Printing Virtual Mailbox Job Lists
Printing Jobs in Virtual Mailboxes
Temporary and Permanent Jobs
119
Tray 001 Represents Virtual Mailbox
120
Check that your printer has an optional hard disk installed
Utility is required
Printing and Saving Temporary and Permanent Jobs
Jobs, the dedicated KM-NET Job Manager utility is required
Installed on it. Local connection cannot be used in Windows
Using KM-NET for Clients to Print Saved Jobs Again
121
Printing Additional Copies of Saved Jobs
122
123
Printing a barcode on a print job
Orientations Position
Reading with the Barcode Reader
124
Horizontal Vertical
Creating Profiles
For further details, refer to Installing Components on
Saving Profiles
125
126
Editing Profiles
127
Profile Selections, and click Delete
128
Deleting Profiles
Importing and Exporting Profiles
129
Read source
Import Read Destination
130
Setting Information
Displayed settings may vary depending on the PDL
131
132
CG Times Italic
Times New Roman Italic
133
134
Index
135
136
Prescribe
137
138
Page
2005 Is a trademark of Kyocera Corporation
Revision 1.3